Author:
Virginia Floyd
Date Of Creation:
13 August 2021
Update Date:
1 May 2024
Content
- Method 2 of 4: Removing the flat head screw
- Method 3 of 4: Removing the Torx Slotted Screw
- Method 4 of 4: Removing Small Screws
- Tips
- Warnings
- Often, the corners (edges) formed by the intersection of the grooves are grinded and brittle, which greatly complicates the unscrewing of such screws. Therefore, be very careful when performing the described methods so as not to damage the screw.
 2 Use a knife. Insert the tip of the knife into the long indentation and turn it counterclockwise.
 - If you have a low-quality knife, and the screw is twisted very tightly, then you risk bending the knife without unscrewing the screw.
3 Use a coin. Try inserting a coin into a long slot. This will generally only work with larger diameter screws. - Insert a coin into the long slot and turn it counterclockwise.
4 Use pliers. This will only work if the screw is not fully tightened, that is, its head rises slightly above the surface of the object. Using pliers, grasp the screw head on both sides and turn the screw counterclockwise. - Pointed nose pliers will work better than regular pliers.
5 Use your fingernail. This will only work if the screw is not tightened very tightly. Insert your fingernail into the long indentation and rotate it counterclockwise. 6 Use an old CD. Insert the edge of the old CD into the long groove and turn it counterclockwise. This can damage and / or break the CD, so make sure you don't need the disc. - If the screw is tightened very tightly, then this method will not work.
7 Use a hacksaw to cut a long groove in the screw head (as with slotted screws). This will only work if the screw is not fully tightened, that is, its head rises slightly above the surface of the object. Using a hacksaw (hold it perpendicular to the surface of the screw head), slowly saw through the long groove in the screw head. - Make sure you are not cutting the surface of an object or material into which the screw is attached.
- Remove the screw with a flat screwdriver or other flat object such as a credit card.
8 Use a flat screwdriver. If you do not have a Phillips screwdriver, try using a flathead screwdriver that is about the size of the Phillips screw holes. Insert a flathead screwdriver into the long slot in the screw and turn it counterclockwise. - This will only work with medium to large diameter screws.
- Be careful not to rip off the edges of the screw slot.
9 Use a toothbrush. Melt the end of the brush with a lighter or other fire source. After that, immediately insert the melted end of the brush into the grooves on the screw head; wait a while for the melted end of the brush to solidify. Now try turning the screw counterclockwise. - If the screw is tightened very tightly, then this method will not work.
- Be very careful when using a lighter to avoid accidents, and melt the end of the brush slowly to control the process.
Method 2 of 4: Removing the flat head screw
 1 Use this method to remove the flat head screw. A flat head screw is a screw that has one indentation in its head (from end to end of the screw head). If you don't have a flathead screwdriver, you can use any flat object to remove the screw.
 - 2 Use a plastic card such as a bank card. Insert the card into the slot and turn it counterclockwise. Make sure you don’t need the card as it can be damaged by removing the screw.
- 3 Use the "eyelet" from an aluminum can (for beer or drink). Break off the tab from the can and insert it into the groove on the screw head. Turn the tab counterclockwise.
- 4 Use a coin. Try inserting a coin into the slot and turning it counterclockwise.
- 5 Use a knife. Insert the knife blade into the recess and turn it counterclockwise.
- If you have a low-quality knife and the screw is twisted very tightly, then you risk bending the knife without unscrewing the screw.
- 6 Use pliers. This will only work if the screw is not fully tightened, that is, its head rises slightly above the surface of the object. Using pliers, grasp the screw head on both sides and turn the screw counterclockwise.
- Pointed nose pliers will work better than regular pliers.
- 7 Use your fingernail. This will only work if the screw is not tightened very tightly. Insert your fingernail into the groove and rotate it counterclockwise.
Method 3 of 4: Removing the Torx Slotted Screw
 1 Use this method if you need to remove the Torx screw. A Torx slotted screw is a screw with a star-shaped recess in the head. There are also protected Torx screws; they have a rod in the center of a recess in the form of a six-pointed star.
 - The edges of the Torx screw slot are very easy to damage, so be very careful when using alternative tools when removing such screws.
- 2 Use a small flathead screwdriver. Insert a flat head screwdriver into the two opposite beams of the screw head grooves. Turn the screwdriver counterclockwise; do this slowly so as not to damage the edges of the screw slot.
- For a Torx protected screw, insert a flathead screwdriver between any beam of the groove and the shaft that is in the center of that groove.
- To remove the secured Torx screws, turn them clockwise.
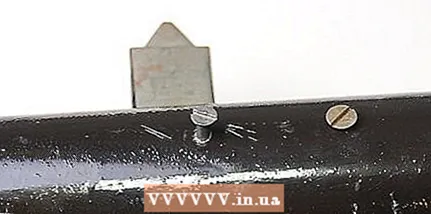
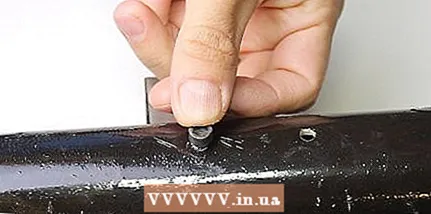
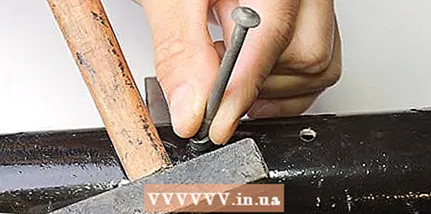 3 If you want to remove the secured Torx screw with a regular Torx screwdriver, get rid of the center bar on the head of the secured Torx screw. Take a center punch (or similar flat tool), position the end of the center punch at the base of the rod, and hit the center punch with a hammer to remove the rod.
 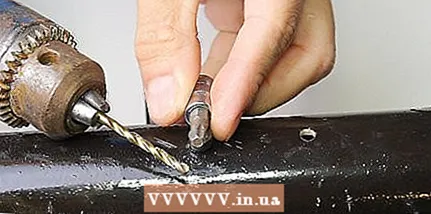 4 Drill a hole in the screw. If you want to remove the secured Torx screw with a regular Torx screwdriver, drill a hole in the middle of the six-pointed star tip with this screwdriver.
 - 5 Use a toothbrush. Melt the end of the brush with a lighter or other fire source. After that, immediately insert the melted end of the brush into the recess on the screw head; wait a while for the melted end of the brush to solidify. Now try turning the screw counterclockwise.
Method 4 of 4: Removing Small Screws
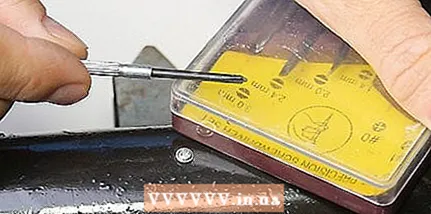 1 Use this method if you need to remove a small screw. It is especially difficult to remove small screws without the appropriate tools. Such screws are often found in electronic devices. In this case, it is better to use the tools used to repair the glasses.
 - If you do not have such tools, use one of the following methods.
- Eyewear repair tools are inexpensive and easy to find.
- 2 Use a knife. Insert the sharp tip of the knife into the recess in the screw head and turn it counterclockwise. Also try to insert the tip of the knife at a slight angle to provide more contact between the knife and the screw.
- 3 Use a nail file. Insert the sharp tip of the nail file into the recess on the screw head and turn it counterclockwise.
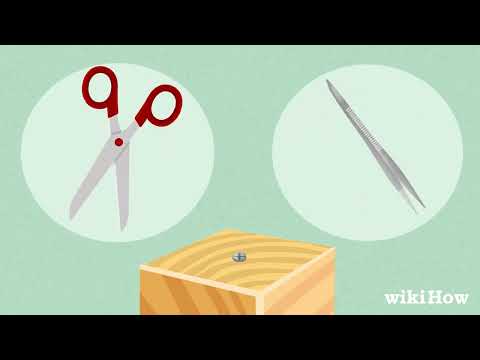
- 4 Use small, pointed scissors. Insert the sharp point of these scissors into the recess in the screw head and turn them counterclockwise.
- Rounded scissors are not very suitable for loosening screws.
- 5 Use tweezers. Insert the sharp tip of the tweezers into the groove on the screw head and turn counterclockwise.
Tips
- For screws with an unusual slot, such as those used in electronic devices, you may need to purchase a special tool, as attempting to unscrew such screws without the proper tool may void the warranty or damage the screw to the point that it will have to be drilled out.
- Remember, using a screwdriver is much preferable to using any alternative tools. Therefore, always try to use a screwdriver.
- Carry a small set of screwdrivers with you to avoid getting into a situation where you don't have the right screwdriver.
- Tool kits are available at most home improvement stores; it is a good investment and will help you solve most of the simple tasks in the household, garden and garage.
- Follow the methods described in this article slowly and carefully so as not to damage the edges of the screw slot.
- Spray the screw with WD-40 before removing the screw. This will make it easier and faster to unscrew the screw.
- If you cannot unscrew the screw in any way, drill it out (the diameter of the drill should be slightly smaller than the diameter of the screw).
- If the screw is too tight, you can rip off the slot, damage the screwdriver or damage the product itself. To loosen the screw connection, use the L-shaped tool to tap the driven tool with a hammer (start with light tapping and increase the strength as needed). Among other things, this is the only way to remove the saw blade locking nut.
Warnings
- Be careful when using a lighter to melt the brush. Keep flames and flammable objects away from you.
- Be careful when using knives or other tools instead of a screwdriver, as improper use can be dangerous.
- Attempting to loosen the screws on some electronic devices without the proper tools may void the device's warranty.
- Always use power tools with care and keep moving parts away from your body to avoid injury. Observe all precautions recommended by the manufacturers of such tools.


