Author:
Peter Berry
Date Of Creation:
18 February 2021
Update Date:
17 May 2024
Content
- If you are sure that you will like this instrument then you can choose to purchase it on installment or purchase it now. If you are taking courses then you should consult with your teacher about the flute that is right for you.
- Flutes are priced from about 2 million to more than 20 million dong, but good quality flutes for students only cost about 6 million dong. Beginners should purchase a reputable brand's hole-punched flute because many inexpensive flutes are made very recklessly and difficult to play.
- Make sure you play the flute well before deciding to buy a hole-opener.
- The flutes are expensive, professional, and mostly open-ended if not for other reasons are usually reserved for professional flute players and also very difficult to blow.
- Before buying, seek advice from other players or consult with teachers to help choose the right instrument for you.

Consider studying with a good private flute teacher. Try asking your orchestra conductor or an instrument store employee for more information (ask at the start of the school year if you are in school). This will be a very useful source of learning information as you learn to play and as you progress to higher levels.
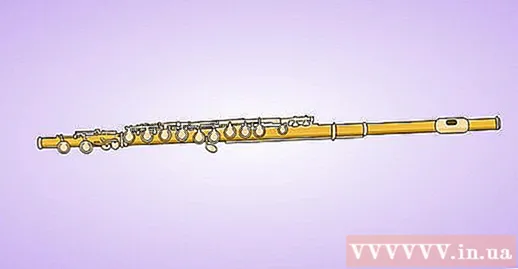
- Insert the open end of the head joint into the wider tail at the body - this is the tail with fewer buttons and is usually closest to the brand of this instrument. To connect the two parts, you may need to swirl the two parts together.
- Align the blow hole (where your mouth is) in line with the first key on the flute. Don't push all the coupling in, leave it open a bit so the flute produces a correct sound.
- Remove the tail joint from the box and connect one end to the other end of the body.Align the tail-coupling lever aligned with the last key on the body. You can adjust this straightness if needed.
Part 2 of 3: Learn to Play
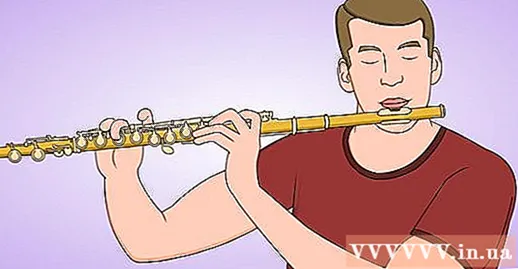
Learn to hold the flute. You will need to use your mouth over the blow hole to hold the flute and position the rest of the player horizontally, towards your right hand.- Your left hand should be very close to the blowing hole and facing you from the other side of the flute. You should place your left hand on the keys above.
- Your right hand should be placed on the bottom of the flute, near the tailpipe and facing you.
Learn how to blow the flute. At first, you may find that making a sound out of a flute is quite difficult, so you need to practice your proper blowing method before you start playing any notes.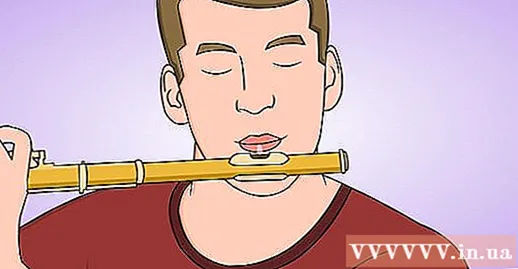
- Do not blow on the flute. Instead, learn to hit your tongue to make a "t" sound.
- One good way to practice standard flute is to try blowing into a glass or plastic bottle to make a sound. Try blowing down through the mouth of the bottle and making a “mm” sound, followed by a p-sound when you purses your lips. Remember that the more liquid the bottle contains, the higher pitched sound you will make.
- Once you've mastered the technique of blowing using a bottle, you can move on to the next step of blowing into the flute. Instead of blowing directly into the mouthpiece, try placing the edge of the mouthpiece at the lower lip and gently blow it down through the mouth (just like when you blow into the bottle).
- Do not blow your cheeks when blowing. The air should come directly from the trachea, not from your mouth. Try creating a "tu" sound while blowing, as it will help your lips form the correct position.
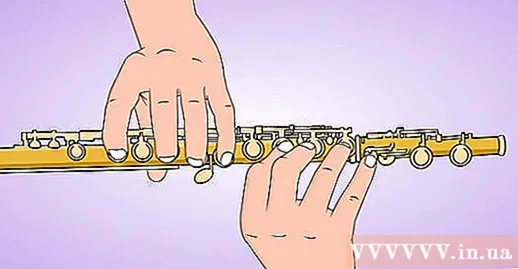
Learn how to put your hands right. The next step is to learn how to position your hands correctly, as the flute has so many keys that vary in shape and size. The initial positions of each finger are as follows:- With your left hand, your index finger should be placed on the second key from top to bottom. Ignore the 3rd key, then place your middle finger on the 4th key and your pinky finger on the 5th key. Place your little finger on the little key (or the balance key), positioned across from the side of the flute next to the 5th key. Place your left thumb on the space bar and flat on the back of the flute.
- With your right hand, place your index, middle, and ring fingers on the three keys just above the tail joint. Place your little finger on the small semicircular key at the top of the tail coupling. Your right thumb only needs to be placed below the flute to support the instrument as you play. You cannot use your right thumb to play any note.
- Remember that at first you may find this hand placement a bit awkward and unnatural. This is perfectly normal and the more practice you get, the more natural the position will feel.
Refer to the palm chart to help you memorize the notes. To learn how to play specific notes on the flute, you should refer to the palm chart. This chart will show you how to place your finger for each note.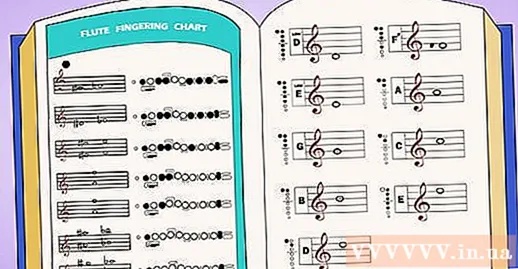
- The palm panel uses pictures and diagrams, so it is easier to visualize where each note's hand is placed. Most flute instruction manuals come with hand guides, but you can easily find them online.
- Practice playing each note until you see it sounding right. When a note is played on the flute, the note must not sound like you are blowing or whistling. Instead, the note needs to be round and even.
- After you've mastered each note, you can practice by playing multiple notes at the same time. Don't worry if the melody you're making doesn't sound very melodic, as the purpose of this practice is to learn how to naturally move from note to note.
Keep correct posture while playing. Correct playing posture is very important when learning the flute as it will allow you to increase your breath as well as help you create more even notes.
- Stand or sit upright, chin lifted, and eyes straight forward. This position will open your trachea and help you blow clearer, deeper nodules.
- When standing, keep your feet firmly on the ground and straighten your back. Don't stand on one leg or turn your neck in an awkward position. Incorrect posture will lead to muscle tension and pain, interfering with your practice.
- Remember to keep your body comfortable and avoid straining to play. This will help you blow out a more emotional and rhythmic sound.
- If you are using a track stand, make sure it is at eye level. If the stand is too low, you will have to bend your neck and retract your chin, which will block the ventilation lines and cause neck pain.
Practicing for 20 minutes a day is like saying "There is good work in grinding iron, one day is good." But keep in mind that working out for a short amount of time each day is better than focusing on a weekly 2-hour workout session.
- Try to exercise for 20 minutes a day and make sure each session has a goal to keep you focused. Set small, but specific, goals, for example, aiming to move from B to A.
- The occasional "sprint" exercise will not be effective because it forces your body to overwork, and then you will feel unnatural and uncomfortable. If you play for short and regular intervals, you will notice significant improvements and a decrease in your stiffness.
Stretch after playing. You should regularly stretch after every hour of exercise to reduce tension and prevent your body from stiffening after playing, helping you to be more ready for the next exercise. Some good exercises can be mentioned as follows:
- Gently bend your knees and bend over, letting your arms reach backwards like you are skiing. Then raise your arms to the sky as if you were about to fly. Repeat this arm and shoulder stretching exercise 5-10 times.
- As you inhale, pull your shoulders back and push toward your ears, then hold your shoulders in this position for a few seconds. As you exhale, relax your shoulders downwards. Repeat this pose a few times to release tension and relieve pain in the shoulder and neck.
- Stand up straight with your arms on your side and shake your arms and hands as if your hands are made of rubber. This will help you relax the joints in your arms and hands.
- There are many other ways to stretch other people to help relieve tension and pain. Practice whatever moves you feel comfortable with!
Do not give up. Learning to play the flute takes time, be patient, keep practicing, and ask a good teacher to help you. Soon you will be able to blow the melodious sounds! advertisement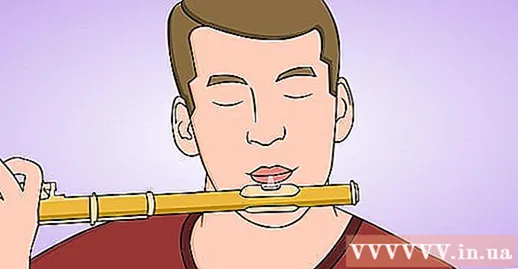
Part 3 of 3: Storing Your Flute
Clean your flute carefully after playing. Use a gauze pad or rag to wrap the pencil or any kind of long stick to remove condensation and saliva from the flute. You can also use cloth to polish the flute from time to time.
Remove the player and put it back in the box. You should never leave the flute in a single piece for too long as you will have difficulty removing it later, even causing the pieces to become stuck together.
- To dismantle your flute, gently twist the top and tail joints off the body and put them back in the box. Close the box and place it in a safe place with a stable room temperature.
- Never leave the flute on the track holder as the flute will easily malfunction. When a part of the flute is damaged, it will be difficult to repair and the replacement cost is not cheap, so please take care of your flute carefully.
- If your flute gets stuck in the joints then apply some lubrication to those parts. Vaseline also helps to lubricate joints.
Advice
- Buy a book for beginners. You can ask your orchestra conductor or flute teacher to recommend a copy. Use the book and try to play some simple music.
- Learn how to read music. Most novice books usually begin with the note names on the staff.However, if you do not know how to read the sheet music, you will also need to learn this skill later.
- Clean the player carefully before and after playing to remove any saliva and condensation from the player and make the player sound better.
- To make high notes, you need to blow into the slightly smaller mouth, at a higher angle and blow faster. Play lower notes from a lower angle and use a larger flute.
- Make it your daily routine. If you plan to practice like any other activity, then you will spend a lot of time practicing.
- Get familiar with major scales, minor scales and semitones. These will be included in your flute book. Music is usually made up of a series of scales, so once you become familiar with the scales, you will have the knowledge to be more ready to play. You also need to practice playing the 3rd, 4th chord ... to get used to it!
- Try rotating the end coupling in different directions for a better sound.
- You should keep a Fingering_Chart fingering chart in the music clip.
- If your flute repeatedly goes out of tone, it is possible that there is a problem with the equalizer button. Notice a line near one end of the equalizer string. Remove the output coupling part and insert the end of the equalizer cord in. When that end is placed above the end coupling, the straight line should lie exactly in the center of the flute. If that is not the case, ask your flute instructor to adjust the equalizer for you.
- Try to blow a little hard! If not blown hard, the sound will be very soft and not good.
- When learning a song for the first time, don't play or put your fingers in a hurry but go through the track one at a time. Pay attention to style, rhythm, sound pronunciation, tempo and key. You also need to be careful of the unusual fluctuations that are not in the key.
- If your A is lower on the equalizer, you can twist the input coupling and then screw it out. If the A is higher, reverse the output coupling and then turn it back in. It takes a little bit of tweaking to get the notes right.
- Have someone monitor your posture for a while, then you will find it easy to keep your back straight, feet on the floor, flute pointing up.
- Practice making sounds without blowing too hard.
- Most music stores have Essential Elements for bands. They have books for each instrument, and these books are not expensive but very useful.
- Do not place the flute on your shoulder or tilt your head because these habits will be very difficult to fix later.
- Always practice.
Warning
- Be careful not to get your fingers too close to the keys while playing. If you play fast beats this can get in the way.
- Do not hold the flute where the notes are. Always handle the flute in the parts where there are no machined holes. This habit will help you reduce expensive repairs. You also do not roll the flute on your lap while sitting.
- Do not drink sugary foods or eat while playing the flute. Rinse your mouth with water after eating or drinking before playing the flute. You will have to spend a lot of money to remove the gum or candy from the flute.
- NEVER wash the flute with water but use gauze to clean it.
- Do not leave the flute in areas with particularly high or extremely low temperatures for too long as this may damage the gaskets under the keys.
- If the pads fall off, do not try to fix them. Take the flute to a store or repair center.
- Do not place the cleaning cloth on top of the flute in the case, as the keys may be bent.
- Do not let your left arm hang down while playing the flute as this will cause the rest of your body to be dragged and negatively affect the sound of the flute. This also hurts your back.
- If you were not used to sitting up straight before and now you are just starting out, your back will hurt after the first few times of sitting.
What you need
- Flute
- Handbook / music book
- Soft gauze pad or rag
- Track stand (optional)
- Private tutor (optional)
- Metronome (optional)
- Flute rack (optional)
- Table of thumb positions on the flute (optional)


