Author:
William Ramirez
Date Of Creation:
16 September 2021
Update Date:
10 May 2024

Content
- Method 2 of 3: Making a paper cap
- Method 3 of 3: Create a Miniature Bezel Cap
- Tips
- What do you need
- Cloth hood
- Paper cap
- Miniature bezel cap
- For example, if the circumference of the head is 56 cm, then as a result of dividing you will get 28 cm.
- If you don't have a tape measure, wrap a piece of string around your head and then measure it with a ruler.
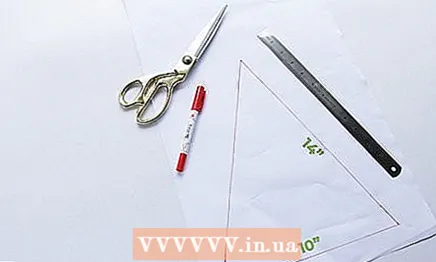 2 Draw an isosceles triangle on a piece of paper based on your calculated measurement. The base of the triangle should be half the circumference of your head. The height of the triangle can be whatever you want.
 - Attach a measuring tape to your head from the forehead to the back. See how far the tip of the hood should hang, and then use this measurement as the height of the triangle.
- For a cap for an adult, the height of the triangle should be about 36 cm. For a children's cap - about 33 cm. But this also depends on the height of the owner of the cap.
 3 Round the base of the triangle in an arc. Tie a piece of string to the pencil. Attach the free end of the string to the apex of the triangle, and then attach a pencil to the bottom-left corner of the triangle. Stretch the string and draw an arc from the left corner of the triangle to the right with a pencil.
 - You can also use a marker instead of a pencil. If you have a pair of compasses that are the right size, you can use them too.
- The arc should start at one corner of the triangle and end at the other. You should have a triangle with a rounded base.
- You can also draw an arc at the base by hand. It will not be as smooth and precise, but it will work too.
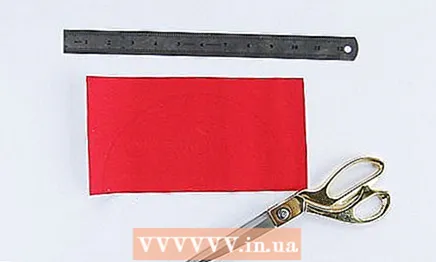
4 Cut out the pattern you created, and then circle it on a piece of folded fabric. Fold the red fabric in half, wrong side out. Attach the pattern on top so that one of the sides of the triangle is adjacent to the fold. Trace the pattern with a tailor's chalk or marker. - Fabrics such as faux fur, velvet, fleece, flannel and felt may work well for the product.
- Make sure to draw the bottom edge of the triangle in an arc, not in a straight line.
5 Cut out the fabric using 1 cm allowances. Since one of the sides of the triangle is already adjacent to the fold, you only need to add allowances on the other side of the triangle and along the lower arcuate edge. This is an important step. If you do not do it, then the cap will turn out to be too small. 6 Stitch the sides of the hood with a straight stitch with a 1 cm allowance. Start sewing from the bottom edge up to the tip of the cap. Try to match the thread as close as possible to the color of the fabric. If necessary, use tailor's pins to temporarily fasten the sides of the cap, but remember to remove them when you are finished sewing. - This work can be done most quickly with a sewing machine, but it is also permissible to sew by hand. If you are using a sewing machine, be sure to bartack at the beginning and end of the stitching to keep it from unraveling.
- If you don't know how to sew, glue the seam with hot glue or textile glue.
 7 Cut out a strip of white faux fur to trim the cap. Cut a strip of white fluffy fabric 2 cm longer than the circumference of your head. In width, this strip should be twice the intended width of the edging plus 1 cm of the seam allowance. For example, if you want the hem to be 5 cm wide, cut it 11 cm wide (5 cm x 2 + 1 cm).
 - White faux fur is most commonly used for trim, but white felt or fleece can also be used.
- If you are not sewing, but gluing the cap, cut a strip of the trim exactly the width that it should be.For example, if you need a 5 cm wide edge, cut a 5 cm wide strip.
8 Sew the ends of the fur strip with a straight stitch with a 1 cm allowance. Fold the strip in half across with the wrong side out. Align the short sides together, and then sew a straight stitch along them with a 1 cm allowance.Use white thread for this purpose. - Again, this can be done by hand or with a sewing machine. If you are using a sewing machine, be sure to bartack at the beginning and end of the stitching.
- Due to the short length of the short sides of the strip, there is no need to secure the fabric with tailor's pins. But, if you do decide to use them, do not forget to remove the pins when you are finished sewing.
9 Slip the trim over the bottom edge of the cap and sew. Turn the cap right out, but leave the fur inside out. Place the hem over the bottom edge of the cap, then sew these pieces along the underside with a 1 cm seam allowance. Use white or red threads and a straight stitch. - If you don’t know how to sew, turn the hem right side out and slide it over the bottom edge of the cap like this. Use hot glue or textile glue to glue the fur to the fabric.
- Make sure that the side seam on the fur strip and on the cap is aligned.
10 Fold the fur trim down, then fold the raw cut into the cap and sew. Leave the hood facing out. Fold down the sewn fur strip to reveal the front side. Next, fold the trim in half lengthwise, tucking its raw cut into the inside of the cap. Sew this cut to the seam allowance on the previous seam. Also, the lapel can be simply glued on the inside. - Skip this step if you previously glued the trim over the top of the cap.
- You can sew on the fur by hand or on a sewing machine using a straight stitch. If you are using a sewing machine, be sure to bartack at the beginning and end of the stitching.
11 Sew the pompom to the end of the cap. Buy a large pom pom from a craft store. Attach it to the end of the hood with hot glue or textile glue. It can also be sewn onto the cap by hand. - If you can't find a ready-made pompom, you can use a white cotton ball instead.
12 To make the hat look more elegant, make a fur pompom for it. Trace the outlines of the upside-down glass on the back of the white fur to create a circle, then cut it out. Sew a basting stitch around the circumference of this circle. Pull the thread to gather the fur into a ball. Tie the thread in a knot, then glue the fur pompom to the cap. - You need to sew or glue on either a ready-made or a homemade pompom. You don't need to do both.
Method 2 of 3: Making a paper cap
 1 Draw a 50 cm semicircle on a piece of red paper. Attach a ruler to the bottom edge of the sheet. Tie a piece of string to the pencil, then attach the free end of the string to the 25 cm mark on the edge of the sheet, and then place the pencil to the zero mark of the ruler. Keep the string taut and draw an arc from the zero mark on the ruler to the 50 cm mark on the paper with a pencil on the paper.
 - A smaller cap can be made from a semicircle with a diameter of 45 cm.
 2 Cut out a semicircle with scissors. If there are pencil marks on the paper, erase them with an eraser. If you want to make a more elegant felt hat, use the resulting semicircle of paper as a pattern to cut another semicircle out of red felt.
 - 3 Twist a semicircle into a cone, superimposing its straight radial sides on top of each other. The specific overlap will depend on the size of the hood you need. The more overlap, the smaller the cap will be.
- Try on the hood to check its size. Make it slightly narrower or wider if necessary.
- 4 Secure the cone of the hood with a stapler or glue. When you are satisfied with the size of the cone, remove it from the head. Use a stapler to staple the aligned sides together.You will need to install one paper clip along the bottom edge of the hood and another on the top of the hood. You can also secure the hood with glue or a strip of double-sided tape for a cleaner look.
- You can use PVA, office glue, or a glue stick, but you will need to temporarily chip off the edges of the cone until the glue dries. This process can take from 15–20 minutes to several hours.
- 5 Place cotton balls on the bottom of the cone. For this purpose, PVA glue is suitable for you, but you can also use hot glue. Stick the cotton balls close together so that there are no gaps between them.
- Do not use white pom-poms for this purpose, as they will not work with them to create the desired effect.
- If you can't find white cotton balls, replace them with a cut out strip of white felt.
- 6 Glue a white cotton ball or pom-pom to the end of the cap. Apply a large drop of hot glue or PVA glue to the tip of the hood. Then press a white cotton ball or pom-pom onto the glue. Wait for the glue to dry before putting the hood on.
- Hot glue sets in a minimum of time. PVA glue will take several hours to dry.
Method 3 of 3: Create a Miniature Bezel Cap
 1 Draw a semicircle on a piece of red felt and cut it out. The semicircle should be twice the intended height of the hood. It is best if its diameter is 15–20 cm. This will make it possible to make a cap with a height of 7.5–10 cm.
 - Alternatively, you can use a bowl or plate to draw a complete circle. The circle should be cut and then cut in half.
- To make the miniature hat more elegant, use red felt with sequins to make it!
- 2 Twist a semicircle into a cone, overlapping its straight radial sides. The size of the overlap does not really matter, the main thing is that you get a cone. Either way, this hat will be too small to be worn on your head in a normal way, so you will clip it to a hair band!
- If you are using glitter felt, make sure the cone is rolled up with the shiny side out.
- 3 Hot glue the cone. When you're happy with the shape of the cone, turn back its straight edge a little and apply a strip of hot glue along it. Press this edge back quickly and hold it in this position until the glue hardens. It takes only a few minutes.
- You can also use PVA glue or textile glue, but then you need to chop the cone with pins until the glue dries. The textile glue will dry for 15–20 minutes, but PVA will take several hours.
- 4 Trace the outlines of the cone on the red felt, and then cut out the resulting circle. Place the cone over a piece of felt of the same red color. Circle its base with a marker, and then cut out the resulting circle. From it you will make the bottom of the cap, to which you can attach the rim.
- Cut out the circle from the inside of the drawn paths, otherwise it will be too large.
- 5 Make two slots in the circle for attaching to the headband. Measure the width of the headband first. Then make a matching vertical slit on the left side of the circle, about 1.5 cm from the edge. Next, make the same cut to the right at a distance of 1.5 cm from the edge.
- The presence of slots will allow you to subsequently insert the bezel inside and adjust the position of the cap on the bezel. It's better than just sticking the cap onto the bezel.
- 6 Glue the circle to the bottom edge of the cone. This can be done with hot glue, PVA glue, or textile glue. Apply glue around the perimeter of the felt circle, and then press it against the base of the cone from the inside. You will have a taped seam along the bottom edge of the cone, which is as it should be.
- If you are working with hot glue, apply it in strips of 2.5–5 cm at a time, otherwise it will have time to set ahead of time.
- If you decide to use textile glue or PVA glue, pin the pieces together until the glue dries.
- If part of the circle will stick out from under the cone, cut it off.
 7 Cut off a strip of white faux fur to trim the cap. Measure the circumference of the base of the cone with a tape measure, then cut a strip of white faux fur to the same length. Its width should be about 1–2.5 cm.
 - You can find white faux fur at a fabric or craft store. If the fur is too long, trim it with scissors.
- If you can't find white fur, you can use white felt instead.
- 8 Glue a strip of white fur along the bottom edge of the cap. This can be done with hot glue, textile glue or PVA glue. If you decide to use hot glue, apply it in strips of 2.5–5 cm, then press the fur against the glue. If you apply too much glue at once, it will harden before you apply the fur to it.
- Again, if you are using PVA or textile glue, you will need to pinch the pieces until the glue dries.
- 9 Glue a pom-pom to the end of the cap. Buy a pack of small white pom poms from a craft store. Glue one pom-pom to the end of the cap, then let the glue harden. Hot glue is best used for this purpose, but textile glue can also be used.
- It is not recommended to use PVA as it takes too long to dry and the pompom may shift while the glue dries. This problem does not occur with textile glue due to its thick texture and fast drying speed.
- If you can't find pom-poms on sale, use a cotton ball.
- 10 Slide the cone onto the rim through the slots in the bottom. Slide the end of the headband into the left slot, and then push the headband inward to the right slot and out through it. Move the cap on the bezel to the position you want. It can be positioned strictly at the top or slightly to the side.
 11 Ready!
Tips
- Santa's hat doesn't have to be red and white.
- Transform this hat into an elf hat by using green felt or fleece instead of red, and red felt or fleece instead of faux fur.
What do you need
Cloth hood
- Red fabric (felt, fleece, fur, etc.)
- White faux fur
- Fabric scissors
- Tape measure
- White pompom (optional)
- Needle
- White threads
- Red threads
- Sewing machine
- Tailor's pins
- Pencil
- Twine
- Paper
- Tailor's chalk or marker
Paper cap
- Red paper
- White cotton balls
- Hot glue or PVA glue
- Pencil
- Twine
Miniature bezel cap
- Red felt
- White faux fur
- White pom poms
- Hot glue
- Hair band
- Scissors
- Marker


