Author:
Sara Rhodes
Date Of Creation:
15 February 2021
Update Date:
1 July 2024

Content
Buying a snowboard is like choosing a surfboard. Some snowboarders prefer quick turns and tricks, while others like to ride slowly and calmly. Whether you're looking for a thrill or a temporary winter hobby, buying a snowboard can be a challenging and overwhelming experience, especially if you don't know what to look for.
Steps
Part 1 of 2: Conduct a Self-Assessment
 1 Determine your level. There are three basic levels of snowboarding skills: beginner, experienced and expert. "Pro" can be considered the fourth level in terms of experience. Many snowboards are made specifically for a specific skill level. As a rule, their description will tell you what level the board is made for.
 - Novice snowboarders are those who have never snowboarded before or are still moving slowly down the track.
- Experienced snowboarders stand confidently on their feet, are able to ride on the front and back edges, perhaps even practice switch riding and gradually begin to master the snowboard park or develop their skills in other ways.
- The expert while riding has unshakable confidence, is able to adapt to weather conditions and new surroundings, as well as ride on steep slopes in full control of the descent.
- A pro is a person who has spent so much time on a snowboard that he feels more confident on it than on his own two.
- So that you don't jump to the next level of skill too quickly, one of the key factors when buying a snowboard is your progress.
 2 Determine your riding style. Snowboarding styles include freestyle, freeride, versatile, powder and backcountry. Riding style is of great importance when choosing a snowboard.
 - Freestyle includes tricks in a snow park or on a side of a mountain, such as ski jumping, railing or halfpipe. Freestyle boards are slightly shorter and softer.
- Freeride means skiing on unprepared tracks with long, deep carving and high speed. Typically, freeriders opt for classic deflection boards for added snowboard control and directional boards.
- The versatile style includes a combination of freestyle and freeride. Boards for a versatile style should be of a twin directional type, with medium stiffness and lengths to suit the style most often used.
- Powder style - for those snowboarders who climb to the peaks in search of large mountain lines. This type of driving is carried out only by experts or under the supervision of an expert. Powder boards should be stiffer and longer, with a mixed deflection for better "float" in the snow and snowboard control.
- Splitboards are specially designed for backcountry because they split in half for uphill but can be reattached for downhill. To do this, they need special clamps.
 3 Decide on the right shape for your snowboard based on your riding style. Snowboarding boards are divided into four types in shape: twin-type, directional, directional twin-type and cone. They differ among themselves in the length and width of the nose and tail.
 - Twin-tip is a symmetrical board with the same shape at both ends when the nose and tail are the same length and width. It is designed for beginners and freestylers as it can be ridden in both directions, either in a normal stance or in a switch. It will also work well for children.
- Directional boards have a predetermined direction of travel with an elongated toe, providing more sliding area and maneuverability in that direction. This type of board is more suitable for freeriders.
- Directional Twin-Type - A blend of the characteristics of twin-type boards and directional boards. These boards are designed for mountain freestylers due to their increased stability at high speeds and carving. This board also allows you to ride in a switch and on freestyle tracks.
- Tapered boards are a more extreme variety of directional boards. The nose is much wider than the tail of the board, providing increased float in the powder. This type of board is designed for powder riding.
 4 Determine the right stiffness for your snowboard based on your riding style. This parameter determines how hard or soft your board will be. The choice of board stiffness depends on your skill and riding style. The hardness of a board is measured on a scale from 0 (very soft) to 10 (extremely hard). Some boards have different stiffness in certain areas of the board for specific purposes.
 - Beginners (including children) and freestylers use soft boards because they are easier to bend and not catch the edging. They are more responsive to your body movements, making it easier to switch edges and control the board.
- Station wagons use a medium hard board for all types of riding.
- Rigid boards are good for high speed skiing, freeriding, powder riding and halfpipe riding. They are used for increased stability, preservation of momentum on powder, high speed and great aerial maneuvers.
- Freestyle boards sometimes have a softer center with a stiffer nose and tail.
- Freeride boards sometimes have a stiffer tail to help the rider on rough terrain and give a little cotton. The same goes for halfpipe boards.
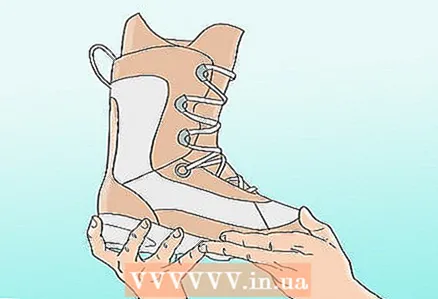 5 Choose your boots. Boots are the most important part of your snowboard in terms of comfort. They are also designed to enhance agility and, when matched with the right pair, can enhance your riding skills. The boots vary according to their flexibility and are selected based on your skill and riding style.
 - Soft boots are the most flexible and are great for beginners and kids alike due to their lightness and comfort.
- The mid-stiff boots provide more power when cornering and quicker response, making them better suited for experienced snowboarders.
- Hard boots are used in halfpipe and freeriders for fast and hard carving. They provide the ability to make sharper turns as well as extra power and protection for halfpipe riding.
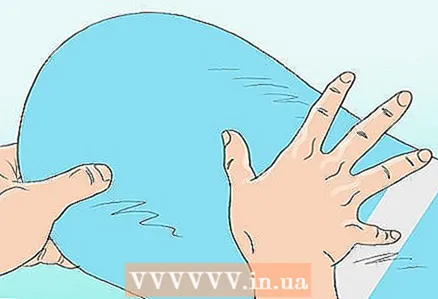
 6 Find out your height and weight to find the right board for your length. The length of the board is measured from nose to tail and greatly affects maneuverability. Ideally, when standing, the board should end at a level between your shoulder and nose. There are several characteristics that will help determine exactly how long your board should be within this range.
 - If you weigh a lot, you should choose a longer one. If you are lightweight, choose a shorter board.
- If you are a freestyler, beginner or underage, then choose a short board as it is easier to control, twist and turn. The short board should reach about up to your Adam's apple.
- If you are a freerider or a puffer rider, you should choose a long board that ends at the level of your lips. Some people prefer boards that are even longer. The long board provides greater stability at high speeds and increased sliding area on the powder.
- Shorter boards are better for children because they are easier to handle. But kids are growing all the time, so it’s probably better to choose a longer board for their height so that they can gradually grow up to it, instead of outgrowing it too quickly. For beginners in snowboarding, who ride carefully, are light and / or prefer to make sharp turns without much acceleration, it is necessary to choose a board closer to chest level. Children who ride fast and aggressively, weigh more for their height, or grow fast should choose a board that is closer to their nose in length. Do not take the board more than this one, otherwise it will interfere with their learning and the amount of pleasure they receive.
 7 Determine your shoe size to match your board width. If you already have boots, you can figure out which board width you need. Ideally, your shoes should protrude 1 to 2.5 cm beyond the edge of the board.This way, you can easily control the board when changing edges, and your toes and heels will not shovel snow when carving.
 - For most people with a size 43 shoe, a standard-width board is fine.
- People with shoe sizes 43 to 45 will need a mid-wide board.
- People with shoe sizes 45 to 47 will need a "wide" board.
- People with shoe sizes 47 to 48 will need an extra-wide board.
 8 Calculate the cost of buying a snowboard. Depending on the style, materials and design of the snowboard, boots and bindings will cost you $ 450 - $ 1000 or more. The cost of your board will depend on your budget and skill, so it's a good idea to calculate what it will cost you before going to the store.
 - Beginner boards range from $ 150 - $ 250, plus $ 140 boots and bindings around $ 150.
- Mid-range boards cost around $ 250- $ 450, plus $ 200 boots and $ 200 bindings.
- Upscale boards start at $ 450 and up, plus $ 300 boots and $ 250 bindings.
- In order to save money for the child, you can also purchase a supported board, the main thing is that it is of good quality without dents and damage.
Part 2 of 2: Exploring Snowboard Construction
 1 Take a look at the core and board construction. Most snowboards are made from wood, although some high-end boards are made from synthetic materials such as aluminum, carbon, or fiberglass. The wooden core is pasted over with fiberglass, on top of which a decorative layer is applied.
 - The cores can be made in a variety of ways, such as when high grade planks use multiple layers of wood to reinforce them. The core can also be made of wood fibers running in different directions in different parts of the core to increase the strength and cushioning of the edges. All cores are made with a vertical laminate running from nose to tail. However, instead of using solid wood through the entire core, some cheap boards have plastic spacers in the nose and tail.
- The fiberglass surrounding the core determines the rigidity of the board. The beginner and freestyle board will have one layer of fiberglass glued in one direction for extra softness and flexibility. Rigid boards have multiple layers of fiberglass laid out at different angles to increase rigidity and strength. High grade fiberglass is also lighter in weight than inferior fiberglass. The snowboard should be as light and durable as possible.
- The top layer contains a pattern, and can be made of wood, fabric, or a material made from beans. It can protect the fiberglass and core from damage, but shouldn't influence your board choice.
 2 Examine the sliding surface (slide) of the snowboard. Sliding surfaces are either extrusion, when molten polyethylene mass is glued together under pressure, or sintered, when non-molten polyethylene granules are pressed together under very high pressure. The slide can be patterned using screen printing, sublimation or die-cutting.
 - Beginners, experienced, and freestylers tend to use extrusion skid boards due to their cheapness and ease of repair in case of damage. Extrusion surfaces can be rubbed with rubbing wax or hot wax every 8 uphill runs.
- Sintered surfaces have pores between the granules that can absorb more wax, making the board much faster. Hot wax should be applied every 3-5 runs up the mountain. The sintered slipper should be waxed especially frequently to maintain its effectiveness.
- The patterns are screen printed directly on the slipper from the bottom layer up to the core. This method is often used on extrusion surfaces.
- In the sublimation method, a pattern is printed onto paper, and then ink is transferred from the paper to the surface using heat and pressure. The second layer is applied in the same way, after which the surface is glued to the board with epoxy resin.
- In the case of carving, the colors are carved and inlaid next to each other. Since no ink is used in the process, the board is lighter and the drawing clearer.
- Most boards have a number on the sliding surface indicating the number of pellets per unit volume. The number varies from 500 to 8000, and the more granules, the faster the board will be and the more often it will need to be waxed.
 3 Choose the shape of the cutout you would like to see on your snowboard. This refers to the radius of the cut between the nose and the center of the board and depends on the manufacturer. The sidecut is measured in meters, this is the radius of the resulting circle.
 - Freestylers and beginners alike are better off choosing a board with a smaller radius (deep cut) that allows for faster turns.
- A large radius (small cut) is better for long, slow turns and provides a large glide surface on the ground, which is better for freeriders and powder riders.
- There are now many new sidecut technologies that feature bumps and areas that provide additional contact points for better grip on snow. They are good for heavily ice-covered terrain.
 4 Take a look at the construction of the side walls. The sidewalls are the edges of the board between the core and the decorative layer. They hold the board together and protect the edges of the core from damage. The design of the side walls is of two types: cap and sandwich.
 - In the construction of the cap, a top layer of fiberglass covers the edges of the board to keep it from breaking on icy tracks. Such boards are more durable, but it is rather difficult to repair them.
- The sandwich design is more common and easier to manufacture, making it cheaper and easier to repair. It is in this design that the sidewalls are inserted laterally to protect the core. The side walls are clamped between the decorative layer and the sliding surface of the board.
 5 Decide on the deflection of the board. A deflection board has a curve in the center of the board, which makes the nose and tail the main grip points for the board. There are also reverse deflection boards.
 - The classic deflection has been around since the days of snowboards themselves, and thanks to the increased flexibility it provides more rebound for freestylers, better maneuverability in tight turns, and good stability on rough terrain. They retain their shape and bend longer than reverse deflection boards.
- Freestylers love reverse deflection boards because they don't cling to the edge of the rail, backcountry riders love their ability to float in the snow, and beginners love the ability to quickly jump from edge to edge.
- Some snowboards do not have any deflection at all, being an intermediate niche between classic deflection and reverse deflection, providing more maneuverability than a board with a classic deflection and more precise cut turns than a board with a reverse deflection.
- Different manufacturers have different versions of classic and reverse breaks, so read in the description for which style this or that board was designed.
- Some manufacturers are experimenting with mixing reverse and classic deflections in their boards. For example, a board can have a reverse deflection in the center and classic on the nose and tail, or vice versa, classic in the center and reverse on the nose and tail. Such boards are designed for different purposes and have a wide range of reviews.
- When it comes to deflection in the board, the rules recede into the background. Choose the option that suits you best.
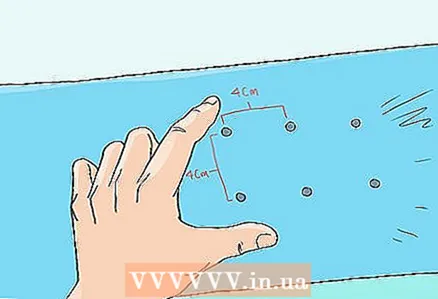 6 Select the fixings for the fasteners. Some boards have a special arrangement of mortgages for mounting fasteners to the board. In general, most boards and bindings are interchangeable, but there are also unique designs. There are four types of mounts: disc template 2x4, disc template 4x4, 3D template (Burton) and ICS system (Burton).
 - The 2x4 disc template has two rows of holes 4 cm apart. The holes in each row are spaced every 2 cm, allowing for different mounting options.
- The 4x4 disc template has two rows of holes 4 cm apart, while the holes in each row are spaced every 4 cm.
- The 3D template has diamond-shaped holes. Compatible with most bindings, it imposes great restrictions in terms of leg position. This pattern is common to Burton boards.
- The ICS system is a rail that allows the rider's foot to be extremely tightly attached to the board for a better feel on it.This template is used in Burton boards and is best suited for EST bindings from the same company. Such mounts have various variations in the position of the legs. You can purchase a special plate to use third-party bindings on an ICS board.
 7 Select mounts. Choose bindings that match your boots and board. They should be able to fit onto your board and accommodate your boots. They come in three sizes (small, medium and large) and two types (with straps and back entry). They also differ in flexibility, fixing method, highbacks and base.
 - Find the size by trying on the bindings with your boots. You can also check the manufacturer's chart with different sizes to suit small, medium or large mounts.
- Belt mounts or strap-in are the most common two-strap options. Rear-entry bindings have a highback that drops down to allow the foot to slide inward. Stretch-ins provide a variety of adjustments for support and cushioning, while rear entry bindings only require a foot to be inserted and that's it. Comfort riders prefer rear entry mounts.
- The flexibility of the mounts ranges from 0-10. Freestylers opt for more flexible bindings with a flex rating of 1 to 2, leaving more room for mistakes, easy landings and grabbing opportunities. Versatile riders prefer an average flexibility of between 3 and 5 for all types of riding, while freeriders opt for stiffer bindings between 6 and 8 due to the increased response and impulse transfer to the snowboard.
- A strap usually has a toe strap and a large ankle strap. The toe strap can be either a traditional strap or a capstrap that wraps around the toe of the boot and presses it down at the top and front at the same time for better board control. Rear entry bindings typically use only one ankle strap.
- The highback is a plate that runs from heel to calf and controls the back edge of your board. Soft and shorter highbacks provide more flexibility and ease of riding for beginners and freestylers, while hard and high highbacks are designed for the best board control and speed. The highback angle can be adjusted to suit your preference.
- The base is the main surface that attaches to the board and is made of various materials. In high-end bindings, the base is made from stronger and more flexible materials that contribute to the board's optimal flexibility, handling and durability. Some bases are tilted at a slight angle (canting) so that your stance and knee position are tilted slightly for a more natural feel.
- Children can become frustrated with bindings that are difficult for them to fix. Step-in or rear-entry mounts are often easier for children to use, but a strap-in can work as well. To see if your child can secure the bindings, have them put on a winter jacket and boots and try them out.
Tips
- Boards for women tend to be thinner in section, have a narrower center section and increased flexibility to compensate for turning force, lower body weight and smaller leg size.
- If you are new to this business, it is a good idea to rent a board first. This will allow you to decide whether you like snowboarding or not, as well as gain some experience and find out which riding style is right for you.
- Some boards are equipped with bindings and some are not. In the second case, you will need to purchase them separately and install them yourself. Snowboard shops can help you choose the right bindings and even install them for you.
- Kids' snowboards are usually soft to make it easier to turn and learn to ride. Typically, these are twin-type snowboards that are able to adapt to the child's coordination. Kids can be finicky when it comes to graphics, so keep that in mind when choosing a board.


