Author:
Virginia Floyd
Date Of Creation:
12 August 2021
Update Date:
1 July 2024

Content
- Steps
- Part 1 of 3: Roof Design
- Part 2 of 3: Cutting the rafters
- Part 3 of 3: Raising the rafters
- Tips
Roofing is the final step in creating a new building. While most owners trust specialists in the construction of roof trusses that hold on to rafters, learning how to make a roof yourself means mastering one of the true arts of carpentry, which will mainly be discussed below. The bundles themselves vary depending on the design and style of the roof you're building, but you can learn to navigate different styles and basic guidelines for sawing and lifting rafters. See Step 1 for more information.
Steps
Part 1 of 3: Roof Design
 1 Choose a roof style. If you want to make a roof, in terms of design, you have to choose from two options before you start: what style of roof you want and what kind of connection you will use for this. There are many different roof styles, relatively straight and more complex depending on the shape of the house and other practical considerations. The way in which you build the roof and the plan for its construction will depend most of all on how you want the roof to look. Some basic roof styles include:
 - Roof structures in the shape of a triangle. Triangle-shaped structures are tall, symmetrical, and require only one type of rafter.
- Gable roofs. Gable - an extended part of the roof, which is an extension of one of the walls, perpendicular to the roof.
- Dormer roofs. By incorporating an additional connection in each rafter, the roof of the attic is sloped so as to leave living space in the roof area.
- Hip roofs. Giving the house a dynamic, these roofs slope on all sides; creating slopes requires the construction of a large number of rafters of varying sizes.
 2 Select a roof tie design. The roof style that is created depends on the selected components of each roof tie and the design of that roof's structural base. In part, these will depend on the style of the roof you choose, but you will also have some wiggle room depending on the design elements of the house. There are dozens of bundle designs, and some of the most common for home construction are discussed below.
 - Striker ligaments are the most basic and consist of a main rafter, beams and support. You can get ready-made ones or you can build them yourself. You can also set them up to prepare a "loft room" ie. leave a space acceptable for life among the rafters.
- The cut bundles are located somewhere in the center of the rafters, allowing for a vaulted ceiling in the room.
- The lampposts are asymmetrical, with one beam extending outside the rest of the rafter to allow glazing along the roof.
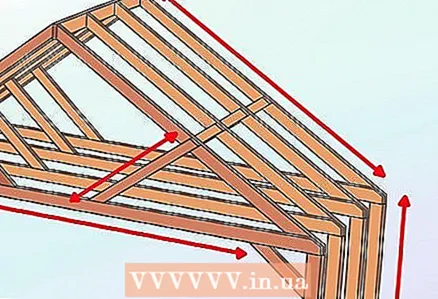 3 Understand the different measurements you will need. Whether you are going to be sawing the rafters yourself or hiring someone to do it, the most important step in the process is to properly measure and calculate the dimensions of the rafters required for your home. Rafters are geometrically precise objects that require careful calculations. You must calculate:
 - The footage of each rafter (in meters). This measurement will require knowing the length of each rafter segment. Typically, each bundle will be made of two rafters, making the width of the house equal to twice the length of one rafter.
- Increase (in meters).Rise is the height of each bundle, measured from the base of the roof segments to the highest point or peak of the roof. Consider this to be the total height of the roof itself.
- Slope (in centimeters). Roof slope means how many centimeters the roof slopes for every 30 cm along the horizon. An 18/30 slope, for example, would mean that the roof rises 18 cm for every 30 cm horizontally.
- Length of each rafter segment (in meters). After the previous measurements, you will need to calculate the length of each individual bundle segment - how much lumber is needed for the horizontal, diagonal and beveled sections of each bundle. This will depend on the design of each tie and the geometry of the previous measurements.
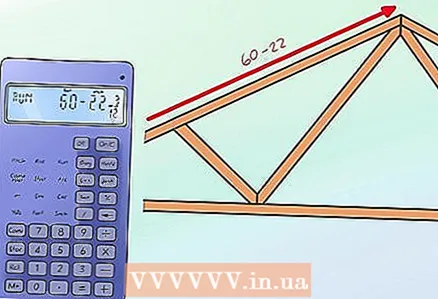 4 Use a building calculator to calculate the measurements for each rafter. The building calculator is programmed with the Pythagorean formula, which is necessary to quickly calculate the angles of right-angled triangles, so you can precisely measure the angles needed in place to construct links. You can use it as you like, but professionals almost always use construction calculators to get it done quickly and accurately.
 - You should have already measured the length and slope, but you also need to calculate the "corrected" length by subtracting the width of the ridge beam - the central beam on the roof that overlaps both rafters and forms a bundle. Divide the corrected length by two to get the actual length (the longer of the two sides, which is the right angle of the triangle formed with each rafter). On a building calculator, you can program this number for further calculations.
- Next, enter the slope of the roof that you should have already calculated for your design. After entering this information, the calculator will lay out all the information you need: the length of the diagonal segments, the internal measurement of the rise segments, etc.
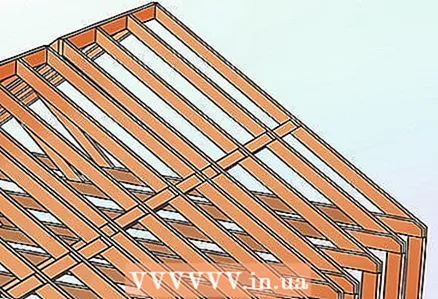 5 Determine how many rafters you need for your roof. For most load-bearing requirements, ties should be made every 60 cm along the walls. Depending on how wide the house is, you can divide the total length in centimeters by 60 to determine how many ties will be needed. More complex roof designs must be calculated separately.
  6 Consider ordering ready-made bundles of the correct specification. Most developers who are trying to create a roof on their own provide the necessary measurements and receive the rafters with delivery or provide an architectural design plan and receive ready-made bundles. This cargo has features depending on the design, and it is not easy for an ordinary buyer of a hardware store to understand all this. But you can still lift the roof yourself if you want and save money on labor. If you wish to select the design and construction of rafter segments, the next section outlines the necessary cutting and assembly.
 - Organizing the construction of your home by ordering pre-prepared bundles will also help keep construction costs down and keep waste to a minimum. You do not have to pay for the time of workers to create the bundles, as well as the materials that are needed for this. Nowadays, buying pre-made bundles is almost universal.
Part 2 of 3: Cutting the rafters
 1 Buy more lumber than you need. In general, dense softwoods such as yellow pine are preferred over spruce or twisted broad-coniferous pine to provide the necessary support. You will need a lot of it. After you have made the measurements described above, you need to roughly calculate the amount of lumber you will need for the project and order enough, taking into account waste and rejects.
 - In order not to exceed the weight of the structure, it is enough to use a timber of 5 cm x 10 cm, assuming that the fixings and ligaments have been accurately calculated. For larger roofs or more complex projects, denser lumber may be required.
- Although it will cost more, it is absolutely essential to obtain high quality straight-grain bars, which are very dense, hardened and straight like arrows. If you are building a roof for your home, the lumber should be top notch. When choosing lumber, avoid splits, knots and edges with bark.
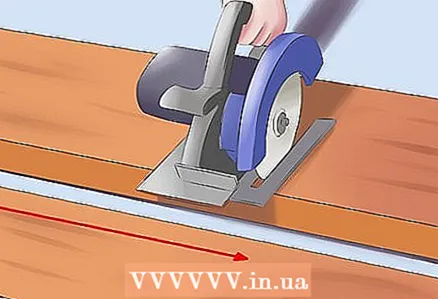
 2 Measure and cut each chord to size. Don't worry about marking the beams, you can cut each chord that goes into the rafter to fit your working size, leaving about 30-60cm extra length at each end if necessary. Place the lumber on the trestle where you cut it, and measure out each section of the rafters, sorting by length. You can use a circular saw for sawing off. The ridge beams and lower chords are usually cut to size.
 - When sawing off the ridge beam (the center board that connects both sides of the bundle) be sure to measure the height above the joint and mark it on the ridge beam. When measuring a ridge beam, it is important to take into account the width of the tree from the diagonal chords of the rafters.
- If the lumber you bought is more or less sawn to size, you don't have to worry about trimming it. Make saddle cuts first so that the beams can be joined together before trimming them as needed.
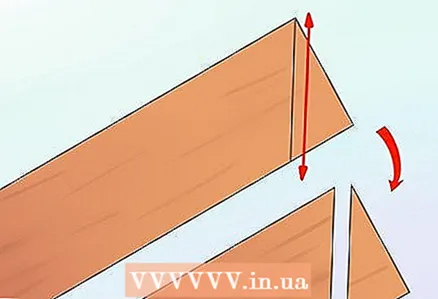 3 Measure each vertical cut. A vertical cut is an angle cut made at the end of each diagonal chord in a bunch. The angle of the cut at the end of the rafters will depend on the elevation you calculated. To measure the cuts, you will need a pencil and a movable ladder to make accurate measurements for the cuts.
 - Mark the roof slope you calculated above (we'll use 18/30 for the example below) on the building corner. On the body of the corner (longer side), mark the 30 and mark 18 on the "tongue" (shorter side of the corner).
- Line up the corner with the end of the chord and mark the line with a pencil. Some carpenters like to make this cut before making saddle cuts because it gives the board a good edge from which to measure with a tape measure. Other carpenters prefer to take all measurements at the same time and then saw them off at the same time. This is up to you.
 4 Measure the saddle cuts. Saddle cuts are made at the end of the diagonal chords of the rafters where they "sit" on the wall. If you are working from scratch, the saddle cuts should be made to fit each beam to the wall, leaving some length at the end to extend beyond the wall and create a canopy.
 - Begin by marking a plumb line, a horizontal line that marks where the wall will meet the rafter. You should be able to quickly calculate this on a carpenter's calculator.
- Draw a plumb line on the corner, then rotate it 180 degrees, applying the corner to the other side of the board, leaving at least 3 to 4 cm for the top edge attachment above the saddle cut, and at least 10 cm wide for support on the upper cut.
- Some carpenters like to measure the overhang of the rafter because there is a corner at the end of the board. Depending on the design, which will usually involve making two cuts to straighten the end of the board, there is usually about 15 cm of overhang behind the saddle cut.
 5 Measure all joints accordingly. Depending on your tie design, any number of staples may be needed. The most common triangle-shaped roof structure will require anywhere from 4 to 8, depending on the size of the rafters, with vertical cuts required for each corner in the bracket.
 - Very simple ligaments work according to the third principle.You can divide the length of the entire bottom beam by three, then measure the distance across the beam to determine where the staples should go. You can mark the center point, then mark the cuts along the joining board, depending on the length. Once again, this is a very simple method of securing a simple bundle. More complex connections will require more complex calculations.
 6 Make cuts. After you have measured the required cuts for each segment, make the most accurate cut possible. Sand the ends with sandpaper and you are ready to join the rafters together.
 - Again, some carpenters prefer to make individual chords in one go, or prepare them from rafter to rafter, finishing one and proceeding to the next. It depends on your personal preference and work organization.
 7 Knock the planks of each bundle together with nails long enough to hold both pieces together and short enough to keep them from sticking out to the other side. Use metal braces at each intersection to secure the connection. Wedges or tie plates made specifically for joining the rafters can also be used to reinforce the rafters.
 - It's a good idea to stack the rafters on top of each other on a tarp to keep them level and workable. This process will likely take several days, at least it is important that you take care of your rafters, especially in wet conditions.
Part 3 of 3: Raising the rafters
 1 Lift the ridge beam into place and secure, propping it up if necessary. Before you lift the rafters and start installing them on the walls, it is important to set the ridge beam in place across the width of the walls, and leave the center pivot points of each bundle on it. These are simply fixtures that will hold each rafter in the center. You may need to back it up at the bottom as well. It may be necessary to install additional joists along the walls to provide additional surface on which to attach the braces.
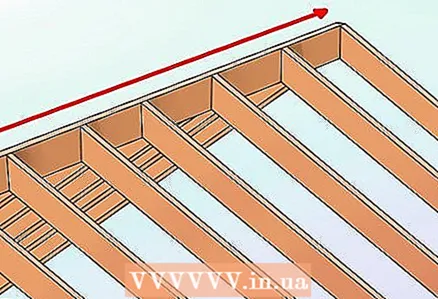
  2 Measure and mark the attachment points for each rafter. In general, the rafter should be placed at least every 60 cm in order to withstand the maximum load and for safety. The rafter mounts are small metal braces that will provide connections to the walls. If you've made saddle cuts, you may not need rafter attachments, but it's always a good idea to use them. Reinstall them according to your measurements.
  3 Place each rafter upside down on the wall brackets and swing it. When you're ready to place the rafter, mount the end upside down on the wall, using three or four helpers at least to support the weight on the ladders. Rope each rafter in place with the rope, creating the required rafter slope and moving away from the rafters that you have already set up. This is a delicate process and requires the help of several people who must work in concert.
 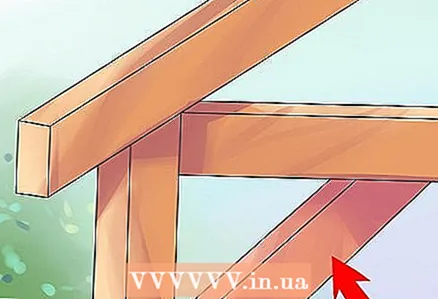 4 Install and fasten each rafter. Nail the beams to the brackets, matching their angle using a carpenter's level. Depending on the size of the roof, bottom supports may become necessary, especially for large or commercial construction projects. When you have multiple ligaments, nail the ligament brackets along the peak, ensuring it is attached to the other ligaments. This will help keep everything level and upright.
  5 Install the rafters vertically, if necessary, and install additional boards (panels). Filler boards are used to connect the wall to the end of each rafter. It's not really necessary, but many carpenters do it for aesthetic purposes and for added support.
 - Using a carpenter's level, draw a straight line to the base of the first rafter tail so that the tail touches the end of the canopy.Place a mark there, take the same measurement on the tail of the last rafter, and draw a straight line connecting the two points, marking the bases of all rafter tails, for cutting with a circular saw if you did not do this when you originally cut the rafters. Cut and nail the additional plywood panels to the rafters to provide a canopy.
 6 Make the roof sheathing. After you have tied and installed all the rafters, you can start laying the roof layer, most often just plywood, on which the material will be mounted to protect from the weather, respectively, it must be nailed. Depending on the shape of the roof, the number and shape of the cladding may vary.
 - Start the sheathing from the base of the bundles, placing the first pieces at either end, then working the other way so the seams are aligned and the roof is solid.
Tips
- If you are sawing the bundles yourself, remember to include the vertical cuts where the bundles connect to the ridge beam and make vertical marks where the bundles will join the walls.
- Do not remove any of the brackets until you have assembled the entire structure.
- The ridge beam must be wider than the rafters in order to support the load.
- For full-size projects like roofing a house, you may need to rent industrial vehicles to get the rafters in place.
- Without construction vehicles, lifting the rafters may require the assistance of several people, and possibly a temporary external ladder.
- Be sure to get all the necessary building permits.
- When thinking about the future roof, it is very useful to make a miniature model of the structure.


