Author:
Mark Sanchez
Date Of Creation:
5 January 2021
Update Date:
29 June 2024
Content
- Method 2 of 6: Learn to Toprock
- Method 3 of 6: Six-step
- Method 4 of 6: Make a Drop
- Method 5 of 6: Learn to Do Strength Elements
- Method 6 of 6: Add a frieze
- Tips
- Warnings
 2 Wear athletic shoes. Breakdancing will require physical exertion and athletic movement from you. Shoes must be comfortable. 3 Choose hip hop music. Better to stick with familiar music with an even rhythm and "flow" that you will feel. The most important thing is that the music fills you with inspiration and energy. 4 Get familiar with basic terminology. One of the first differences a b-boy needs to figure out is the difference between breakdancing and b-boing. B-boeing is the first term used to describe this dance; it is usually used within the community. The term "breakdancing" was coined by mainstream journalists in the 1980s to introduce this trend to the general public. Lately, some established dancers have been trying to bring back the term b-boing in their performances.
 - The dance is called b-boing, whether the performer is male or female. But when describing a specific person, the terms b-boy (breaker man) and b-girl (breaker woman) are used.
- All breakers have nicknames like B-Boy Cloud, B-Boy Darkness, etc. This is not so important for beginners, but ultimately, when you want to decide on your place in the dance community and gain recognition, you will need to think about it.
5 Know the term "technical". In the world of breakdancing, this term means varied, used to describe the six-step or fo-step movements that a dancer performs on the floor. When the b-boy's movements are highly technical, it means they are complex and precise. Method 2 of 6: Learn to Toprock
- 1 practice toprock (top break). This is the part of the dance that is performed in an upright position before going down to the floor and starting to step and spin.
- 2 Stand on your half-toes and start swinging easily. You need to stand lightly on your feet and be able to quickly change directions and swing up and down.
- 3 Bring your left leg forward and crosswise to your right leg. Stand lightly on your feet when doing the crossing movement. You don't have to use your left leg first, you just need to change legs every time you cross.
- 4 After crossing, return to the starting position with a small jump. In the starting position, your legs should be parallel and ready to change directions.
- 5 Bring your right leg forward and crosswise with respect to the left leg. Again, remember to stay on your toes as you do this.
- 6 Jump to starting position again. The main thing when performing toprock is to move to the rhythm of the music, so every time you practice, the speed of your toprock will depend on the beat of a particular song. Try to follow the rhythm of a baseline or looping line.
- 7 Repeat steps 2 through 4 as long as you want to toprock. These simple movements are essentially toprock.
- 8 Enter hand movements. Once you've mastered the basics of footwork, you can let your arms move with your body, but don't overdo it. Relax your arms and let them follow your legs.
- When you step forward, you can let your hands go back, when you return to the starting position, they can come back and be in front of the body.
- Hand movement is up to you, so feel the music and let your body find its way.
- Practice in front of a mirror to check if you are swinging your arms too hard.
Method 3 of 6: Six-step
- 1 Start in a prone position and bring your right leg forward. Straighten it in front of your left leg. You must balance on the outside of your right foot.
- 2 Raise your left hand off the floor and bring your left leg forward. It should be bent at a slightly more straight angle, and land behind your right leg, so that your right leg wraps around your left. Keep your left hand in the air.
- 3 Bring your right leg out of position around your left leg. Place it parallel to your left leg, about 60 centimeters apart.
- 4 Place your left hand on the floor behind you. You are now in the crab position.
- 5 Bring your left leg out and place it “around” your right. You must balance on the outside of your left foot. Raise your right hand.
- 6 Swing your right leg back, keeping your right arm in the air.
- 7 Bring your left leg back and place your right hand on the floor. You should be in the starting position.
- 8 Practice this movement until you can go the whole circle smoothly. This is one of the main break movements from which the rest of the creative elements emerge.
Method 4 of 6: Make a Drop
- 1 Move to the floor using a coindrop (spring). Twist the body, while the arms should be around the body. Tilt your body until your hands are reflexively on the floor. When this happens, swing your legs up and move to the floor to continue the dance.
- 2 Make a nidrop. Bend your left leg and place your right leg behind it. Prepare to catch yourself as you fall forward, creating a fall effect. Catch yourself with your hands and then let your bent knee drop to the floor. You are now ready to perform movements on the floor.
- 3 Perform a backdrop. Back-drop is a very difficult movement that does not need to be tried until you have fully mastered the basic elements of break dance.
- Place something soft on the floor, such as a mattress, to try a backdrop and stand in a position with your feet slightly wider than shoulder width apart and your arms extended out to the sides, parallel to the floor.
- Kick your right foot forward, then swing backward while jumping forward onto your left foot. Group up and do a forward somersault.
- Land on your mid-back and continue to move on the floor. This movement is also often performed at the end of the exit.
Method 5 of 6: Learn to Do Strength Elements
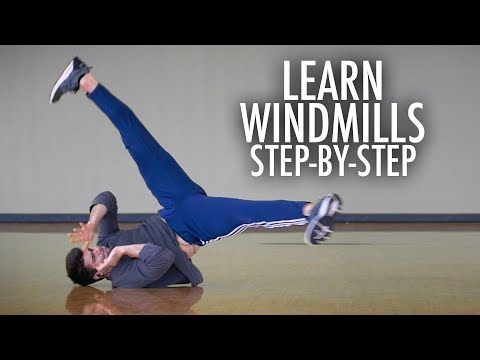
- 1 Try to make a windmill (mill, gelik). Get on your knees, firmly press your left elbow to your torso, bend your right arm at a right angle and place your hand in front of your face. Place your hands on the floor with your left elbow under your thigh bone. Your weight should be mostly distributed over your left forearm.
- Straighten your legs back and keep your weight on your left forearm. Lift your left leg up and bend your knee.
- Kick upward with your right foot while swinging your left foot under your right. When you do this movement, push off the floor with your hands and roll over your left shoulder onto your shoulder blades. To avoid injury, make sure your chin is pressed against your collarbone during this movement.
- Return to the starting position with your hands on the floor supporting your legs in the air. Your arms should now be on the right side of your body.
- Now push and swing in the opposite direction - swing with the left leg under the right, and somersault over the right shoulder to the shoulder blades.
- Continue to move the impulse from left to right using the whole body and do the windmill force element!
- 2 Learn to do headspins. To perform this movement, you must first learn to stand in the den for a few minutes, and move your legs in different directions without falling. When you are able to do this, you will be ready to try headspin.Wear a hat or bandana to promote rotation.
- Cross your legs and change them by doing swings in a circular motion, keeping the body still to feel the movement. When you first start trying this movement, keep your hands on the floor.
- When you feel confident, let your arms lift slightly off the floor as your legs come out of the crossed position to give your body a little twist at a slow pace. Be prepared to return your hands to the floor and catch yourself if necessary. The wider you spread your legs, the more force you will take, the faster you will spin.
- Concentrate on keeping your back straight and your neck safe. If you feel neck pain, stop immediately.
- 3 Show your strength with a jackhammer. If you have a strong body, you can learn how to do a jackhammer, even though it is not an easy move. Keep your weight on two bent arms, with your elbows resting on your thigh bones and your legs stretched back.
- Then try to let go of one hand and rotate on the other, using your free hand to aid rotation. When you can spin easily, you can start hopping.
- Place both hands back on the floor and turn small hops into the rotation. You will now be spinning in a circle, balancing on two arms and throwing yourself up a bit.
- Now raise one hand and give it a rotation. Place all of your weight on your supporting arm and move your pushing arm behind your back. Swing on one hand while spinning and you have mastered the jackhammer!
- This is a very difficult movement that will take a lot of strength, so don't be discouraged if it takes months to learn how to do it.
Method 6 of 6: Add a frieze
- 1 Learn to make a basic baby freeze. Place your right hand on the floor to the left of your body with your left leg extended. Bend your right knee. Bend your left elbow under your thigh bone.
- Start transferring all your weight to your arms and tilt your torso onto the top of the platform you created with two arms. Lightly rest the side of your head on the floor so that no weight is placed on it.
- Raise your legs up and hold them. This is a baby freeze position, with one leg extended and one bent.
- 2 Make a frieze on your arms. Get into a basic handstand and first try bending your knees behind your back to get used to the sensation. When you feel stable, get to your feet and this time forcefully jump into a handstand, landing on only one hand.
- Swing with your free hand behind your back and at the same time bend your knees as you would during a movement exercise.
- Slap your toes with your free hand and return to a low stance.
- 3 Try making a highchair. Take a position. Baby freeze, but instead of leading the elbow under the thigh, put the bent elbow behind your back and letting it rest on the thigh bone on the other side.
- If you are using your right elbow, place your left hand on your thigh and your left foot on the floor, at a right angle, so that your hips are straight and “facing” up.
- Raise your right leg and place your right ankle on your left knee, as if you were sitting cross-legged on a chair.
Tips
- Find your style. Don't become a robot, express your emotions.
- Have fun and express yourself.
- Watch as many videos as possible. The more you look, the more styles you learn, the more movements you can start trying.
- Never give up!
- Combine break dance training with strength training to get stronger and begin mastering movements that require good physical strength.
- Start a notebook to write down all the movements that you have mastered and come up with. This will help you make good freestyle connections.
- Relax and have fun while dancing - it's all about pleasure and rhythm.
Warnings
- B-boeing can be a dangerous dance, be sure to take precautions and do not try anything that you are not yet able to do.
- Always stretch well before dancing.
- The bottom break requires the use of force. Be careful when you first start learning the strength elements and listen to your body.
- Be careful. Buy at least knee pads and elbow pads while you study.


