Author:
Marcus Baldwin
Date Of Creation:
22 June 2021
Update Date:
1 July 2024

Content
- Steps
- Method 1 of 5: Prepare the duck
- Method 2 of 5: Skinning the duck
- Method 3 of 5: Plucking Feathers
- Method 4 of 5: remove entrails
- Method 5 of 5: Gutting ducks quickly
- Tips
- Warnings
- What do you need
Knowing how to properly carve duck will help you avoid spoilage and reduce waste, and it will also help you enjoy your killed game even more, because you can prepare it properly. Depending on what you want to do with the meat, you can quickly skin the duck using the field method, remove the skin at home after aging the meat in order to improve its quality, or you can schedule time to pluck the duck with paraffin wax and save skin - in the kitchen it will come in handy. Go to step 1 for more information.
Steps
Method 1 of 5: Prepare the duck
 1 Find out what game identification rules apply to your area. In some districts the game inspector may need an entire left wing for identification, while in other districts you will be allowed to separate the heads and entrails for identification. Since this affects how you butcher the birds, it is important to figure out how they will be checked and when the huntsman will visit.
 - The rules for hunting ducks are very different from each other. Some territories only allow a certain number of ducks to be killed per day, so it is a good idea to keep up to date with the latest regulations in your area. Federal regulations can be found here, and local laws can be found on the website of your state's Department of Natural Resources or Hunting and Fishing Committee.
 2 Wash ducks immediately after you find them. By the time you pick up the duck, it’s already swimming in the pond water, rolling around in the mud, and will probably be in the teeth of your golden retriever for a few minutes before you get to it. In other words, it is rather dirty and you need to spend a few minutes cleaning it a little before packing or cutting to prevent the meat from spoiling.
 - Remove dirt and feces from feathers, especially the area around the duck's tail.Dry it thoroughly and put it in the refrigerator, or start carving it immediately, depending on your intentions. At temperatures below 5 degrees Celsius, nothing will happen to the duck carcass for 3-5 days in clean conditions without external influences.
- Find the location of the shot and trace its trajectory. The meat in the area where the bullet passes (s) will be scorched and not very tasty. You will have to carefully remove the pellets from the carcass and then trim all the meat around this area, so rinsing the game now is a good idea.
 3 The duck should be kept for 1-2 days at a temperature of at least 5 degrees Celsius. Allowing the meat to dry will enhance the pleasant aroma, reduce the odor and make your duck more delicious. Under appropriate conditions, this can be done without cutting or after skinning or skinning the bird. For a clean bird, any method will work.
 - If the temperature is normal, you can hang the birds by their legs upside down to drain excess liquid in the barn or garage if it is cool enough. Otherwise, you can put them in plastic containers and shove them into the refrigerator if there is sufficient air circulation.
- Every hunter prefers to butcher birds at different stages of this process. If you are out hunting to shoot a lot of birds, then most likely you will want to gut them in the field as quickly as possible in order to put them in your luggage. Alternatively, you can leave the ducks intact, freeze them quickly, and let them sit for a couple of days until you butcher them under suitable conditions.
 4 Decide if you will be skinning or plucking your ducks. Skin peeling is much faster and easier, especially in the field. It depends on how you are going to cook your duck. Regardless, some people choose to leave the skin on, which means they will have to spend a lot of time plucking the bird. Both of these methods are quite acceptable and will be described below.
 - Sometimes it is better to skin ducklings and ducks shot in salt water. Oily skin can sometimes be orange in color and taste like pork if the duck has eaten a lot of shellfish.
- You can pluck any kind of ducks if you have time. Gourmets and food savvy alike agree on one thing: A properly cooked, crispy fried duck is one of the most delicious dishes. The skin is especially greasy, which means that it can heavily smell the meat. If you can take the time to preserve the skin - do it, many people think it's worth it.
Method 2 of 5: Skinning the duck
 1 Cut off the legs with wire cutters. Start cutting off both legs as close to the body as possible using a pair of pliers or a sharp knife. It is usually best to use a scissor tool so you can separate them quickly and neatly.
 - Some people throw their feet away, but you can choose not to throw them away, but use them to make broths and decoctions if you want to be extra creative.
 2 Detach one or both wings if you don't need them. Use pliers to cut the joint holding the wing as close to the body as possible. Then use a sharp knife to run along the joint and separate the remaining skin that connects the wing to the body. Then do the same with the other wing.
 - Alternatively, you can also clip the wings in the mid-joint area right where the long feathers end if you want to preserve the upper connective tissue between the wing and the body. There is not much meat there, but it is still there. If you want to do this, cut the joint, then use your knife to walk along the wing towards the bird's "armpit."
- If you would like to skin your bird in the field, but need to retain the wings for identification, read the quick gutting ducks section. You can easily skin the duck by leaving the wings.
 3 Feel the brisket with your finger. Place the duck on its back on a hard, flat surface and feel for the brisket. The easiest way to peel off the skin is to start peeling it off with your fingers by pressing directly on the bone.
 - It is not necessary to pluck the feathers before you do this, but some hunters prefer to remove the breast feathers so they do not get in the way before starting to peel off the skin. This is all great, but you will have to pluck a few feathers before you start ripping off the skin with your finger - this will make it easier for you, and you will immediately peel it all off.
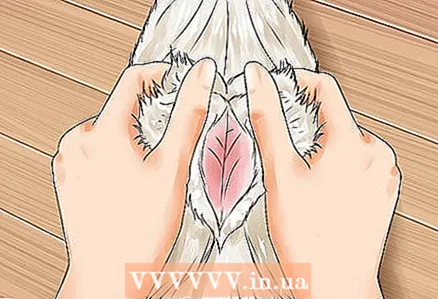 4 Peel the skin vigorously and evenly with your hands, working in opposite directions. It is likely that you will have to stick your hand in there, or perhaps you will rip out a couple of feathers before you succeed. This is fine, just try to get your finger under the skin and start pulling it down. Pull the skin in opposite directions, as if you were removing a jacket from a bird.
 - Alternatively, some people prefer to hold the duck with their back to their chest and use their fingertips to pick up the skin and pull it back, as if you were taking off a shirt. Usually this method is suitable when you are in the field, as you may not be able to put the bird on the ground.
 5 Peel back the skin. Since you have already cut off the wings and legs, you will be able to peel back the skin from all of the carcass except around the bird's neck. Once you separate the skin from the ribcage, continue to bend it in the "shoulder joints" where the wings meet and at the end around the tail. The tail feathers should remain in place.
 - You don't have to use a knife, even though most ducks' skin is stickier than rabbit fur. Try to tighten the skin as gently as possible.
Method 3 of 5: Plucking Feathers
 1 Separate the legs and wings as described earlier. Use wire cutters and a knife to cut off the legs and wings - you need a little space to pluck the bird. If you need to leave wings or other parts of the duck for further identification, do so.
 - If you are plucking a bird, as an alternative, some hunters choose not to cut off their legs so that there is something to hold onto while plucking. You decide. You can always separate them later if you wish.
 2 Pull out large flight and tail feathers in the direction they grow. Separating the outer large feathers is easy: just start plucking them out. They will sit tight, so you may just have to rip them out all at once, or several at a time, ripping them right out of the carcass.
  3 Pull out small body feathers across the growth direction. Smaller feathers can be plucked out several at a time, doing this from the bottom of the bird to the neck, against the direction of their growth. If you have strong enough shoulders and do a good job of handcraft with a little practice behind you, you should be able to rip out these feathers much faster. Use your thumb and forefinger to pull them back and lift them off.
 - In this way, you cannot rip out all the feathers. You will be left with a thin layer of very soft downy feathers that are almost impossible to tear off by hand. Collect the rest of the feathers in a bag for easier stowage. They are perfect for stuffing pillows and other items.
 4 Heat water and paraffin wax to dip the birds and remove the fluff. Boil enough water in a large pot for the duck to be dipped in, and dissolve a block of paraffin wax in it - you can find it in almost all grocery stores and other retail outlets. In hot water, it should float to the top in a thin layer. When you're ready, remove the water from the heat.
 - Use one pack or block of paraffin wax for each duck. You probably won't have to bring the water to a boil to dissolve the wax, so watch it closely.When the wax dissolves, the water is ready to use and you can start dipping your birds in it.
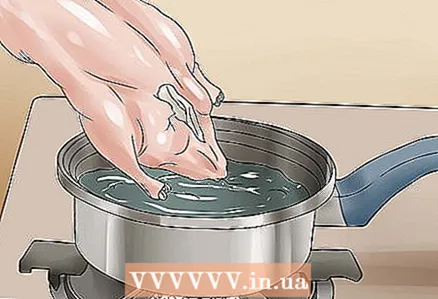 5 Dip the duck. Quickly and gently dip the bird into a layer of wax floating in the water on top, then immediately dip the duck in a bucket of cold water to help the wax stick. The duck should not be dipped for more than a second, and it is best to do it quickly. Until you've removed the entrails, it's important not to overheat the carcass too much, or you risk spoiling the meat.
 - After you've taken the duck out of the hot wax bathtub, dip it in a bucket of cold water for the wax to adhere. You can leave the duck in cold water for one or a couple of minutes, or until the wax has set, but do not overdo it.
 6 Rip the wax off your skin. The duck should now be covered with a strong layer of wax, which you can peel off to get rid of the fluffy under feathers. Pinch the bird around the abdominal muscles to break up the wax and peel off the wax in large chunks. The skin under the feathers should be very smooth, like a store-bought chicken.
Method 4 of 5: remove entrails
 1 Separate your head. Since you are moving towards the neck when removing the skin, you will have to cut off the head before the skin is completely removed. Pull the skin back to the point where the neck meets the body, and use your wire cutters as close to the body as possible to cut off the head.
 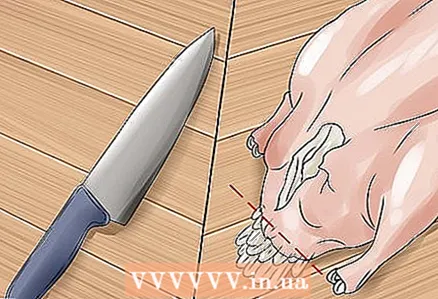 2 Separate the tail. After you peel off the skin around the duck's belly, the tail feathers are likely to stick out, holding onto a small piece of fat around the base of the body. Use your wire cutters to cut the feathers by cutting through and separating the round piece of fat from the bird.
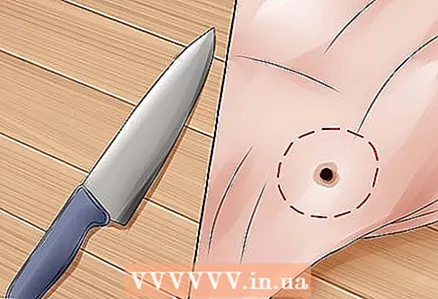
  3 Make an incision under the rib of the bird. There is no meat south of the rib line, so usually the best way to remove the entrails is to make an incision at the base of the chest under the rib to separate the organ cavity from the good meat. Run your knife along the bottom of the sternum, making straight, shallow cuts. When you get to the inside, squeeze one half of the bird firmly and pull gently to pull the insides out. The intestines should come out at the same time.
 - You can pull out the heart and liver, which can be attached to the abdomen, separately and detach the gizzard that is above. You can eat the liver by removing the bile duct - it is greenish in color and looks like a pill in the form of a capsule. The heart can also be eaten, but it is smaller in size.
- Alternatively, some hunters prefer to remove the gizzard through the upper opening and remove the remaining viscera from the abdominal cavity. This way you have less space, but you are less likely to touch the intestines, which must be separated very carefully so as not to spoil the meat.
 4 Trim the meat around the shot area. Examine the poultry meat. Where the fraction has entered the body, there should be a segment that has a singed appearance. It should be cut off because it doesn't taste good. Use extreme caution to separate any areas affected by the shot from the meat and discard the charred meat.
 - To finish carving, rinse the meat and remove any remaining feathers and any adhering dirt. You can rinse the meat with cold water or simply wipe it down with a clean towel. Dangling feathers can sit tight.
 5 Store meat properly. The duck should be stored in a cool, dry place, preferably at or below 5 degrees Celsius. Loosely wrap the meat in blood-proof paper and place in the travel refrigerator when out in the field until you get to the refrigerator. Nothing will happen to him for a week.
 - If you have a lot of meat and want to freeze a portion right now, string-lock freezer bags are best. Divide the meat into lunch portions and spread it loosely by gluing the date onto the bag.Under proper conditions, frozen duck meat should be stored for up to 6 months.
Method 5 of 5: Gutting ducks quickly
 1 Quickly skin the ducks in the field to save space. If you're on a serious hunt, you probably don't want to carry around a bunch of dead birds, most of which you plan to get rid of. If all you need is meat, quickly gut them by separating the breasts and leaving the skin, feathers, and other debris in the field. Using this method, you can also leave the wings in order to comply with the hunting rules in the area where you are hunting.
 - If you have time, it is best to skin your ducks later in a more thorough manner. Then there will be more edible meat, and leather is the food ingredient many chefs dream of. This method should be used in the field when you have nowhere to store your loot.
 2 Cut the skin on your chest. Start cutting the skin of your chest as if you were skinning the entire duck. Use your fingers to feel for the brisket and pull the skin in opposite directions, lifting it from the chest like a shirt. Pull it back so that the ribcage is fully exposed, then place the duck with its back on the ground.
  3 Step with one foot on the head and the other on the duck's legs. Hold the duck in place with your feet by placing one foot on its neck and the other on its legs. You will need to pull the brisket out and leave the rest of the duck on the ground; it will be easier for you if you hold the waste in place with your feet.
  4 Hook up the brisket with two fingers, above and below. With two fingers of one hand, hook the brisket next to the fork towards the neck of the duck. With two fingers of your other hand, grasp the sternum near the abdomen.
 - You should feel very distinctly the duck's chest, as this is the largest and most nutritious part of the meat - it is located a little on your belly and a little darker than the surrounding tissues in color - dark red.
 5 Pull up firmly. After you have pushed your sternum firmly in with your fingers, pull upward, slowly pulling the skin back and forth to make it easier for the brisket to come out. The wings should also be pulled back as they have a strong joint. If you do everything right, you can carefully pull out the meat breast along with the wings, leaving all the insides, skin, head, tail and feathers on the ground. The meat is ideal for cooking and the game inspector can identify the bird.
Tips
- Metal detectors only cost about $ 20 and will make it much easier to find the spot where the bullet hit.
Warnings
- Always check birds for signs of disease. Common signs include feather clumps, the presence of parasites or fungal eruptions, and other abnormal growths on sternum meat or other organs. If you notice any of these signs, do not eat this meat.
What do you need
- Knife
- Sealed plastic bags


