Author:
Eric Farmer
Date Of Creation:
7 March 2021
Update Date:
1 July 2024

Content
- Steps
- Part 1 of 3: Begin Inspecting the Machine
- Part 2 of 3: Inspect the Engine
- Part 3 of 3: Make a Final Check
- Tips
No one has ever sold a car because it drives very well or is very cheap to maintain. You should always keep this in mind when looking at used cars, no matter how closely you look at it from afar. However, used does not always mean bad, in fact, even very old cars can last a lot if they are well looked after. Before you even get to your wallet, you will definitely want to think it over and make sure that you never make a purchase that you will soon regret. The first and foremost thing you should pay attention to is the engine.
Steps
Part 1 of 3: Begin Inspecting the Machine
 1 Check the vehicle for spots, drops and dirt underneath. Before you quickly look at the car through the window, get on one knee and check the bottom of the car for spots, drips or dirt. If they are there, try to figure out their age, are they old oil marks or fresh stains? Is there dirt in there that is still dripping?
 - Take a look at the car and decide if this car will be properly parked and if it is losing “precious” fluids right before your eyes. While this is not always a reason to terminate the transaction, any trace of droplets, sludge, leakage or seepage of liquids can be indicative of a more serious problem.

- Dealers and owners will tell you that a small oil leak is normal and true, but only partially. Some models are notorious for oil leaks, but that doesn't mean there is something wrong with the car. It's up to you if you think the car is worth it if you add oil occasionally.

- Take a look at the car and decide if this car will be properly parked and if it is losing “precious” fluids right before your eyes. While this is not always a reason to terminate the transaction, any trace of droplets, sludge, leakage or seepage of liquids can be indicative of a more serious problem.
 2 Determine which particular liquid has formed a puddle. Puddles can also be due to oil leakage from the brake pipe, cooling systems, transmission system, power steering, or even windshield cleaning fluid. If you find a wet spot, you may want to poke your finger at it.
 - The reddish fluid is probably the transmission fluid of the transmission. Black liquid is usually just an indicator of old oil. Caramel is the color of fresh oil, or old power steering oil or old brake fluid. A green or orange liquid is probably a refrigerant.
- Be aware of clear puddles, which could be just water from rain, the engine was washed, or the air conditioner was running recently. Once you taste the stain with your fingertip, you can tell if it's oil or water. If the stain looks like both, take a look around and pay more attention to the next steps.
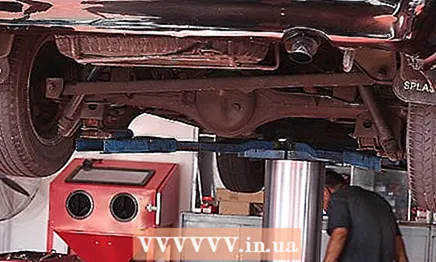 3 Check the chassis. Sellers often attach a flexible hose to the car they want to sell, and some even try to clean the engine compartment, but usually inspect the underside of the car for puddles or no puddles; how clean the parts are.You may be able to ignore simple dirt, and even be prepared to see a certain amount of road dirt and oil stains (This is a car, after all), however you will want to inspect the car for liquid stains that have recently formed and have not been removed.
 - Watch for wet spots, dark spots, and oily residue, paying particular attention to the sump and any seams or gaskets you may notice. Better to let there be remnants of dirt that appeared as a result of the elimination of problems in the car than soon have to repair the car, because it has never been repaired.
- However, new, wet dirt or oil may indicate some problems, so take what you see into account. Do not hesitate and point out imperfections (perhaps use a paper towel) to clearly see how dirty, wet, slippery or hardened the dirt can be.
 4 Determine if oil leakage is a real problem for you. If you do see drops or traces of wet dirt or grease, try to figure out where they come from. The leak is already sufficient reason to look at another car in the lot, but it's up to you whether it is a sufficient problem that prevents you from purchasing a car.
 - Some people will willingly add oil to replenish the level in the sump and can drive safely for many years without serious consequences or inconvenience. Some leaks are minor, so the oil can last for many months, while in some cars this problem is exacerbated, which can soon lead to serious breakdowns.
- If nothing is clearly flowing, dripping, and hardening due to dirt, you can calm yourself down. Many possible engine problems can only be dealt with if there is no visible fluid leakage.
Part 2 of 3: Inspect the Engine
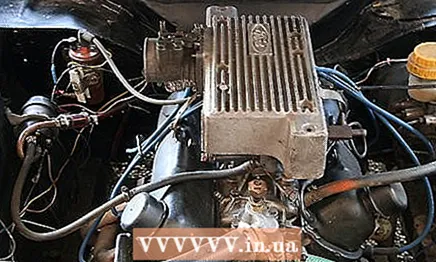
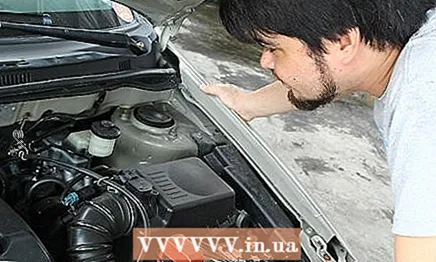 1 Open the hood and notice any odors coming from the engine. Before you start the engine, ask the salesperson to open the hood for you so you can take a look at the engine and notice any odors.
 - A good, shiny new engine should smell like rubber and plastic with a slight hint of gas or oil. At best, you will smell the natural vapors from belts, hose and various plastic parts. This is called degassing and is a completely normal process. The smell of the engine compartment should not be too different from the smell of new tires.
- In a used car, you will definitely smell oils... This is fine as long as the smell is easily tolerated by you and is not something you need to fear. You may also smell gas. Its whiff is considered perfectly normal, and in older cars with carburetors, even a strong smell of gas fumes is acceptable. However, if you feel an oversupply of gas, it could mean a leak in the fuel system and could be cause for concern.
- You can also smell turpentinewhich is essentially the smell of bad, old gas. This smell may mean that the car has just been parked and not driven for a while. You need to ask your salesperson if there is fresh gas in the gas tank and how long the car has been idle. This is usually not a big problem, but stagnant gas can lead to rust in the gas tank.
- You can also smell a very sweet smell antifreeze... It can be caused by leaks, but you should check for leaks in the cooling system. On a cold engine, they can form white to greenish spots, a sign that the refrigerant has evaporated. A pungent, pungent odor may also be present, so you need to pay special attention to the battery to some extent.
 2 Take a close look at your engine compartment and its contents. Look at the engine. Do you see the paint? Bare metal? Fat spots? Dirt? Remember, it's good that you saw dirt or even cobwebs. Dealers and retailers will frequently clean the engine compartment to keep it looking good and marketable. This does improve the look of the car, but it can hide the fact of leaks and even distract your attention from obvious flaws.
 - An engine covered in mud, on the other hand, will show you where there might be an oil or gas leak, which part has been altered or replaced (clean spots), and will also let you know the car was on the move. This means that the machine has been in operation at least recently. The cobwebs indicate that this car has not been driven for a while, this may mean nothing or may mean taking additional measures in the future.
- An engine covered in greasy, hardened dirt is both bad and good. This indicates a leak, but at least you can locate the source of the leak by looking at the dirt marks. If it's just a layer of sticky dirt and blackened goo, it might be time to replace the gaskets or even repair them completely.
- However, this does not mean at all that the engine is not working well, and that you will not be able to drive the car for a long time before you run into real problems in your car. Fuel leaks usually form a clear stain on an already dirty engine, but they are usually very difficult to determine, so you will have to use your intuition to figure out if a leak is actually occurring.
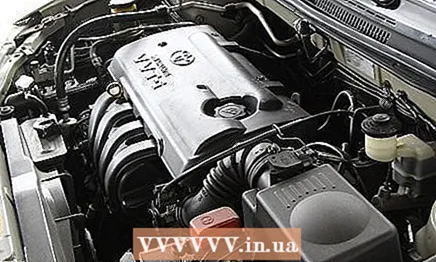
 3 Check the fuel level. At this point, you will come across a device such as a dipstick to check the oil level. Pull it, clean it, put it back, pull it again. Is there oil? Good. At this stage, the oil level in the canister may be low, it will be displayed as long as it is there at all. Most vehicles do not show the correct oil levels while they are stationary. As soon as you turn on the ignition in the car and start to warm it up, the oil level will be displayed correctly.
 - If your car has an automatic transmission, there is a different fuel dipstick, so you should check that too using the same method. Again, you just want to make sure there is some transmission fluid in him.

- If you have a power steering, then there must be a pump in it. This pump usually has a cover with a small dipstick to measure the fuel level. Check to make sure there is at least some liquid in there. Also check availability brake fluid... Usually the brake fluid reservoir is transparent, and you can see, without opening anything, what the fuel level is there.

- Ultimately, you should also check the levels refrigerant and levels glass cleaning fluid... Note, if one or the other is at a low level, remember that in the end the purchase of this car, on top of everything, includes their corresponding level.

- If your car has an automatic transmission, there is a different fuel dipstick, so you should check that too using the same method. Again, you just want to make sure there is some transmission fluid in him.
 4 Inspect belts and hoses. Ask your dealer when the car's belts and hoses were last changed. Cracks in the rubber most likely mean that this part needs to be replaced soon. Well-cleaned, even old, frayed belts and hoses can look good, so feel free to feel them in the engine compartment, squeeze the hoses, and touch the belts.
 - If the belts are made from fake, just remember that they will need to be replaced. Most dealers will appreciate these drawbacks, but you don't have to work with a dealer, and these things are sometimes overlooked.
- Mostly, you just have to make sure there are belts in the car. Some cars won't start at all without them, but many have second discharge belts that allow your A / C system and power steering to work, so make sure every pulley you see has either a belt attached to it, or good reason not to have it.
- Check the car for soft coolant hoses, which more clearly demonstrate the lifespan of the car than their appearance. Check the areas where the hoses meet and look for signs of fuel leaks.These leak spots appear when the engines are hot, so there will be no leakage and a shock dose of the engine cleaner can make them disappear. So you really should check carefully to see if there is even a trace of fuel oil that does not look like the descaling marks that you sometimes have to remove from your teapot.
- 5 Inspect the battery and battery clamps. Like the engine, batteries and their cables can wash well, but they still don't perform well. Unsurprisingly for used cars, their batteries are self-discharging, that is, they sit down on their own, so don't be discouraged if your car needs to start from an external source at some point.
- At this point, look at the battery itself to make sure it is not cracked or leaking. Look for an external cable that is safe until it turns green or hardens with a white coating.

- Look for a white (green or green / white) coating that has hardened on the clips as well. This is usually just a sign of an aging battery that hasn't worked for a while and can be cleaned with a toothbrush and a little baking soda.
- Again, it's best to have a layer of old dirt on clean metal and plastic. This does not mean that the battery is good and the clamps are not corroded in such a way that you will not be able to notice this flaw, but it does mean that no potential problems were hidden with the hard work of the draftsman.

- At this point, look at the battery itself to make sure it is not cracked or leaking. Look for an external cable that is safe until it turns green or hardens with a white coating.
 6 Ask about air filters. If you buy a car from a dealer, the air filters must be clean and new. If you just buy from a person, they may be old, dirty, and need to be replaced soon.
 - If it is necessary to change the air filters, apparently the maximum (if not all) of the filters (such as oil, gas, gearbox oil filters) should also be replaced.
- Ask your dealer if you are unsure or don't want to inspect the air filter yourself.
 7 Make sure that the turbo generator is not rusty and well secured. If the car has a charger for the turbo generator, this is the very moment that you will not be able to diagnose while the car is on the move. However, you can at least check it for leaks and make sure it is secured and not corroded.
  8 Step back and look at the engine bay as a whole. Step back and take a good look at the engine compartment and its various parts. Each model has a different way of setting up - it can be complex or simple, ordinary.
 - Look for loose wires and hoses. Look for small details that you may not understand, but notice open holes or possibly missing details.
- Newer machines are more difficult to choose from due to the fact that they are equipped with electronics (look for burn marks and other obvious damage) and complex vacuum systems.
- With old cars it is easier, they turn a blind eye to a lot, as they understand that the car is supported. Discuss any changes or modifications your salesperson made.
Part 3 of 3: Make a Final Check
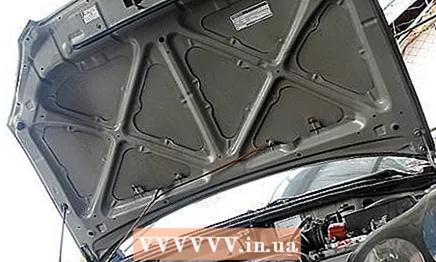 1 Look at the back of your car's hood. Stop and take a close look at the underside of the hood of your used car. There are hints, if the information on the indicators is not always clear. What you want to see is a clean (and again, operational dirt is not a problem) and undamaged gasket, which should dampen the noise from the car and also act as a fire retardant material.
 - A dirty, oily vehicle may have contaminated the gasket. If the underside of your hood just darkened, then most likely this is not a problem, but if any part of it is scorched, burned, torn off or removed, it is a sign of engine fire in the past.

- If you find traces of fire, ask when and how it happened, you may find that the engine was repaired, since in this case you just want to know about real fuel or oil leaks.
- An engine fire in the past should at least alert you, but even such an unpleasant story does not mean that the car is so bad.
- A dirty, oily vehicle may have contaminated the gasket. If the underside of your hood just darkened, then most likely this is not a problem, but if any part of it is scorched, burned, torn off or removed, it is a sign of engine fire in the past.
 2 Examine the exhaust pipe. Exhaust gas leakage is one of the problems that can lead to engine fires. You may not be able to inspect the exhaust manifold in the engine compartment well enough, but it will be easy enough for you to check the exhaust pipe. The tailpipe trim should be ash gray on the inside.
 - If it is black on the inside, then this means that the car has a high mileage (this means re-enrichment of the air-fuel mixture with gas), which is bad, of course, but not scary, and usually simply means poor fuel economy. White tips indicate the vehicle is tilting (too much air in the air / fuel mixture), which leads to increased engine wear and overheating.

- In older cars, this is a timing and valve regulation problem. In newer cars, this indicates something faulty in the electronics; usually an O2 sensor, or possibly an air flow sensor, sending inaccurate information to the computer, which then makes mistakes in the regulation of the combinations. Either way, exhaust pipe problems need to be addressed.
- If it is black on the inside, then this means that the car has a high mileage (this means re-enrichment of the air-fuel mixture with gas), which is bad, of course, but not scary, and usually simply means poor fuel economy. White tips indicate the vehicle is tilting (too much air in the air / fuel mixture), which leads to increased engine wear and overheating.
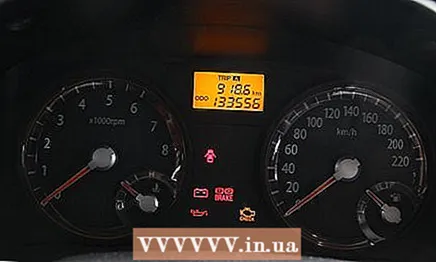
 3 Check the car to see if it starts easily. Thus, you looked, felt, touched the car, and nothing scared you off until now, therefore, there is nothing else to do but start the car and feel it on the go. These three things can happen:
 - It will start and go the first time.
- A minute will pass before it starts.
- He won't go at all.
 4 Find out why the car won't start. Did you turn the key and nothing happened? Nothing more than lighting a dashboard lamp? Check battery and wiring diagram. Pay particular attention to the clamps and make sure the cables are tight and not corroded. Again, a little soda will help cleanse them and maintain good contact.
 - And now the dashboard lamp is on, you turn the key, then you hear a click, unaccompanied by anything? Probably just a dead battery or just a bad connection. Check it and charge the battery. Pull it out if necessary or use a cigarette lighter. It is best to remove the battery, reconnect, power the charger and let it run for a while.

- Does the battery turn normally but won't start? Press the pedal well, wait a few seconds and try again. Step on the gas pedal and turn the key. If that doesn't work, keep doing this a few more times. If the car has been parked for a long time, it may just need some time to pump fuel from the tank to the engine. If you're lucky, it will start at some point and you probably won't have to do it again.

- And now the dashboard lamp is on, you turn the key, then you hear a click, unaccompanied by anything? Probably just a dead battery or just a bad connection. Check it and charge the battery. Pull it out if necessary or use a cigarette lighter. It is best to remove the battery, reconnect, power the charger and let it run for a while.
 5 Take a look at your spark plug wires. If still nothing happens, make sure the spark plug wires are secure. If you find that one is loose, secure it and try to start the car again.
 - No result so far? You should most likely remove the spark plugs and clean them. If the car has a carburetor, you can also try dumping some gas directly into the venturi (the part where air enters).
- This whole process sometimes needs to be repeated once the car starts working and you can park and you have more time. On that note, if you have a car that has been parked for a long time and you want to sell it, start it from time to time so you avoid problems and can easily start it when you need it.
 6 Listen to the sound of the engine as you start it. As soon as this happens, exit and let your vehicle idle while you re-inspect the engine compartment for leaks or smoke. Listen for wheezing, banging, clicking, or other terrible sounds. Sniffing for gas vapors (will be slightly audible), or heating (may also be observed). Here are some things you might hear and suggestions as to what it might mean:
 - TikTikTikTikTik noise that increases as you accelerate as you throttle. Sticky lifters, flat cams, loose valves, and even a loose belt can all lead to this. If this noise disappears after you add oil or after you have warmed up your vehicle, the problem is with the lift. Although this is not a cause for panic, it is worth paying attention to in the future.
- The noise "NokNokNokNok", which increases its frequency when you gas, is called machine detonation. This may be bad news for you and may mean that you have to run away from this particular car (if it is not a diesel, since it only sounds natural to it).
- A squeal, a creak, a shrill sound? These are usually the belt or belts, and sometimes the pulleys that they include. Plan to change your belt. If the noise continues after replacing the belt, then you will need to figure out which pulley. Alternators and air conditioning pumps can make this noise as well, or they can simply make noise when cleaning. Keep these sounds in mind, but if they don't really start to bother you, you don't have to worry.
- A louder knock that is out of sync with engine rpm, but may occur during acceleration or at low idle, may indicate that the engine or gearbox mount needs to be changed. Not this minute, but sooner or later you will want to repair it all.
 7 Bring your car for a test drive. Do you think everything is fine? Close the hood, and if you're taking a test drive, bring the car straight to your local auto parts store and ask them to check codes for other little things you might not have noticed. This only applies to cars from the 80s and later cars. This will usually be useful if the engine check signal is present after you start it.
 - Your mechanic can help you get out of a difficult situation with your car breaking down. You've done pretty much everything you had to do to make sure your engine is more or less normal to get you to the store. When you are driving, pay attention to any problems such as lack of power, any strange jerking or any other strange behavior of the car on the road.
- The car computer code reader can help you with some details so you can start the process of replacing parts and electronics and set up your car. Your local auto parts dealer has a device that can check your car's machine codes, and most will do it for free if they have time. If someone is trying to charge you money for a technical inspection, go somewhere else.
- You may need tuning or even a complete refurbishment. If you've done it before this time, then you have a working engine. Congratulations. Your fuel levels are high, your battery is charged, there is good gas in the tank, and you are driving. See how you feel the car on the road - after all, that's the most important thing.
Tips
- Most of these instructions are for older machines. Many recent models connect to computer diagnostics, although the computer will not be able to identify many possible problems.


