Author:
Bobbie Johnson
Date Of Creation:
9 April 2021
Update Date:
1 July 2024

Content
- Steps
- Method 1 of 4: Using iTunes
- Method 2 of 4: Using a third-party file manager
- Method 3 of 4: Using Email (iPod Touch Only)
- Method 4 of 4: Using Disk Mode
- Warnings
Do you have a lot of photos on your computer that you want to copy to your iPod? Since your iPod has a color screen (or you have an iPod Touch), you can copy your photos and view them whenever you want. There are several ways to do this, from using iTunes to emailing images to yourself.
Steps
Method 1 of 4: Using iTunes
 1 Make sure your iTunes is up to date. You shouldn't have any problems with the following steps, but an update will usually fix most of the issues you might have while using iTunes. This is also especially important if you are running a very old version that does not support the functionality you want.
 - If you are using Windows OS, then click the "Help" button → Check for Updates
- OS X: Click the iTunes button → Check for Updates
 2 Connect your iPod to your computer using a USB cable. Connect it directly to the computer port; connecting via USB conductors usually may not provide enough power. If iTunes has not been launched yet, then this may happen automatically.
 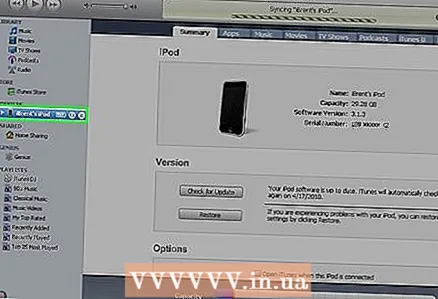 3 Select iPod in the device menu. If you don't see the sidebar, then click: View → Hide Sidebar.
 - You won't be able to sync photos to a player that doesn't have a color screen.
- If your device is not recognized, you may need to put it into recovery mode.
 4 Select the "Photos" tab. It will open with the photo sync manager.
  5 Check the "Sync Photos From" window. This will allow you to select photos from various sources to sync with your iPod.
  6 Select a source. Use the drop-down menu to choose what you want to sync your iPod with. You can choose a photo from various manager programs that are installed on your computer, or select a specific folder.
 - You can sync photos from various sources.
 7 Select photos to sync. You can sync all photos from your source or manually select multiple photos by checking the corresponding checkboxes next to each photo.
  8 Start syncing. Click “Apply” to copy your photos to iPod. The display will show the synchronization process.
Method 2 of 4: Using a third-party file manager
 1 Download the iOS file manager to your computer. The most popular IOS file manager is iFunBox. This program allows you to import photos directly to your iPod. Also, you must have iTunes installed, but you must not sync with it. iTunes only lets iFunBox recognize your iPod.
  2 Connect your iPod to your computer. You should see the connection in the iFunBox window. If nothing happens, make sure your iTunes is installed correctly.
 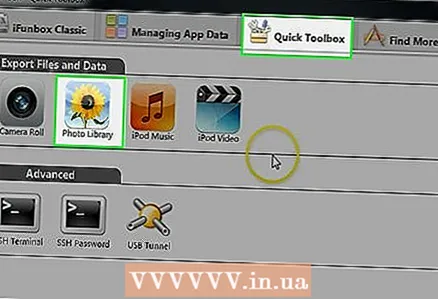 3 Select "Quick Toolbox". In the "Import Files and Data" section, click the "Photo Library" button.
 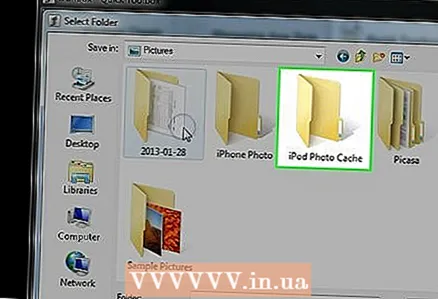 4 Add files to start transferring them to the player. You can add photos while viewing them on your computer, or simply drag and drop them into the iFunBox window. As soon as you add photos to iFunBox, they will be automatically added to your iPod.
  5 Find photos on your iPod. Open your player's photos app. The photos will appear in the photo album.
Method 3 of 4: Using Email (iPod Touch Only)
 1 Create an email for yourself. Use your preferred email program or website and send emial to your email address. Make sure this is the address you set up on the iPod Touch. Create a message on your computer and attach the necessary images to it.
 - If you only want to transfer a few photos, emial is probably the easiest way to transfer.
 2 Attach the photos you want to copy. Your e-service may limit you in size, allowing you to attach only 20-25 MB. This means that you can only send a few photos. You can attach files by clicking the "Attachments" button in your email program.
  3 Send a message. Depending on how many photos you have attached, the message may take several minutes to send.
  4 Open the message on your iPod. Open the Mail app on your iPod Touch. You should see your message in your inbox. Click on it to open it.
  5 Download images. Click on one of the images in the message to open it. Press and hold the image, and then select the "Save Picture" option. The image will be saved to your photo folder.
Method 4 of 4: Using Disk Mode
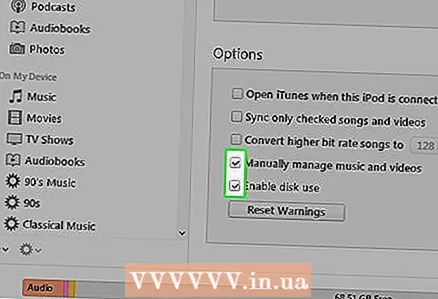 1 Put your iPod into Disk Mode. This is only possible in click-wheel players. You can put your iPod into Disk Mode through iTunes or manually.
 - Using iTunes, connect your iPod to your computer. Select iPod in the menu of the unit. On the Browse tab, click Enable Disk Usage.
- When manually adjusting, press and hold the menu button for 6 seconds. Wait until the Apple logo appears. Once the logo appears, release the buttons and then press and hold the Select and Play buttons.Hold these buttons until the Disk Mode screen appears.
 2 Connect your iPod to your computer. If you put your iPod into Disk Mode manually, connect it to your computer after Disk Mode is turned on.
 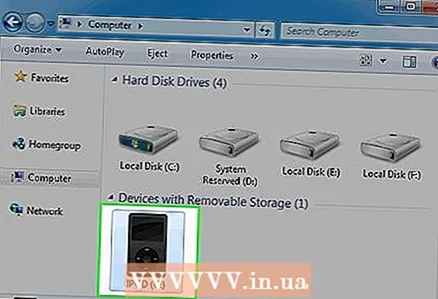 3 Open iPod on your computer. If you are using Windows, the iPod appears as a hard drive Computer / My Computer / This is a PC window (⊞ Win+E). If you're on a Mac, your iPod appears as a hard drive on your desktop.
  4 Copy photos to iPod. Open the Photos folder on your iPod. Drag or copy the photos you want to the folder.
  5 Remove the iPod. After copying the photos is complete, eject your iPod, which will make it safe to eject. In Windows, right-click on the iPod drive and select Eject. If you are using OS X, drag the drive to the Trash.
Warnings
- If you add too many photos, you may have problems playing music on your iPod.


