Author:
Carl Weaver
Date Of Creation:
24 February 2021
Update Date:
1 July 2024

Content
The compass deviation circle has a long colorful history dating back to the days of Ancient Greece.A valuable tool for cartographers and navigators around the world, there are many beautiful renditions of this simple yet useful symbol. Below we will show you how to draw a 16-point deviation compass circle yourself.
Steps
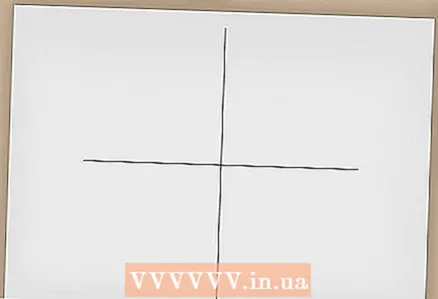 1 On a sheet of heavy drawing paper, draw a cross in the center.
- Make two marks on the sheet at an equal distance from its top side and draw a thin horizontal line along them with a pencil.
- Mark with dots the center of the sheet a few centimeters above and below the horizontal line you drew, then draw a thin vertical line through them from top to bottom. You should get a cross.
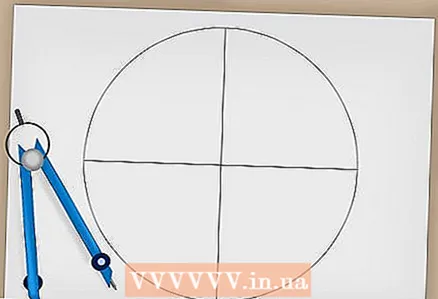 2 Draw a large circle using a compass. For this example, we will assume that the radius of the circle is 7.6 cm. This circle will constrain the outer edges of the finished compass deviation circle.
 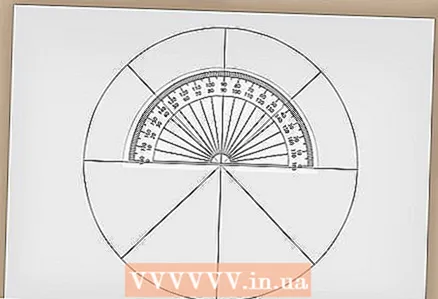 3 Use a protractor to mark the angles of 45 °, 135 °, 225 °, and 315 ° on the circle, and use a pencil to draw thin connecting lines between 45 ° and 225 °, 315 ° and 135 °.
 4 Again, using a protractor, mark the corners at the following points:
- 22.5°
- 67.5°
- 112.5°
- 157.5°
- 202.5°
- 247.5°
- 292.5°
- 337.5°
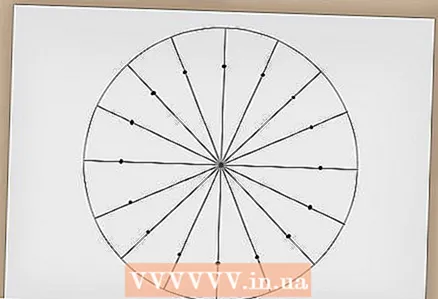 5 Connect the following points:
- 22.5 ° vs 202.5 °
- 67.5 ° vs 247.5 °
- 112.5 ° vs 292.5 °
- 157.5 ° vs 337.5 °
 6 Draw a second circle with a 10 cm radius.
 7 Set the compass to a 2.5 cm radius and draw a third circle in the center.
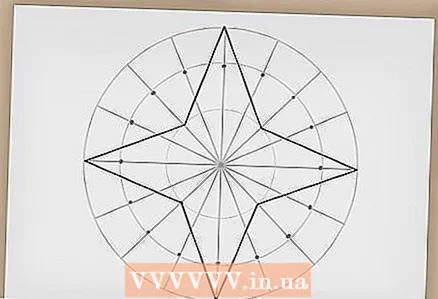 8 Draw arrows for the main directions of the cardinal points. Start at 0 ° (N for North) on the outer circle and draw a line up to 45 ° on the smallest circle.
 - Do the same by connecting the 0 ° mark on the outside and 315 ° on the inside.
- Repeat the process with the outer 90 ° point (E - East), connecting it with 45 ° and 135 ° points on the inner circle; with an outer point 180 ° (S - South), connecting it with lines with points 135 ° and 225 ° on the inner circle, and with an outer point 270 ° (W - West), connecting it with lines with points 225 ° and 315 ° on the inner circle ... It should look similar to the image shown here.
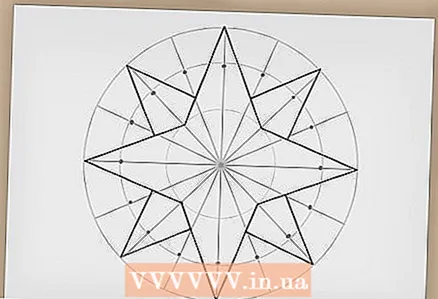 9 Connect the secondary points lightly. Start at the 45 ° outside point (NE) and connect it to the intersection of the 22.5 ° ray with the right side of arrow N.
 - Do the same, connecting the outer 45 ° point and the intersection of the 67.5 ° mark beam and the top of the arrow E.
- Repeat the process with the outside point 135 ° (SE - Southeast), connecting it to the bottom of the arrow E and the right side of the arrow S; with the outer point 225 ° (SW - South-West), connecting it with the left side of the arrow S and the lower side of the arrow W; with an outer point of 315 ° (NW - Northwest), connecting it to the top of the W arrow and the left side of the N arrow. Your compass deviation circle should look similar to the image shown.
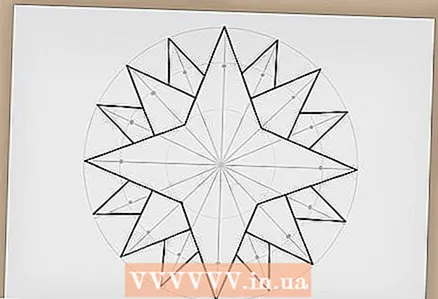 10 Add the last direction arrows, starting at NNE (North-North-East). Start at the intersection of the 22.5 ° ray with the outer circle and draw a line from the point to the intersection of the middle circle with the right side of arrow N. Do the same, connecting the outer point 22.5 ° to the intersection of the middle circle and the upper side of the NE arrow.
 - Repeat the process for 67.5 ° (ENE - East-North-East) by drawing connecting lines with the intersection points of the middle circle and the lower side of the NE arrow and the upper side of the E.
- From 112.5 ° (ESE) to the bottom of the E arrow and the top of the SE arrow.
- From 157.5 ° (SSE - South-South-East) to the bottom of the SE arrow and the right side of the S.
- From 202.5 ° (SSW) to the left side of the S arrow and the bottom of the SW arrow.
- From 247.5 ° (WSW) to the top of the SW arrow and the bottom of the W.
- From 292.5 ° (WNW) to the top of the W arrow and the bottom of the NW arrow.
- And from the point 337.5 ° (NNW - North-Northwest) to the top of the NW arrow and the left side of the N. Your compass deviation circle should look like in the image.
 11 Add the names of the cardinal directions as shown.
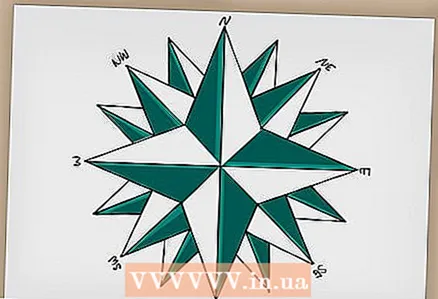 12 Color according to your requirements, and happy sailing!
Tips
- Search online for color combinations to find the perfect color combination for your compass. Use bold colors for a striking design, or use muted tones on parchment for a more antique look.
What do you need
- Paper
- Protractor
- Compass
- Ruler


