Author:
John Pratt
Date Of Creation:
15 April 2021
Update Date:
1 July 2024
Content
- To step
- Part 1 of 3: Finding your Wii console version
- Part 2 of 3: Download LetterBomb
- Part 3 of 3: Installing The Homebrew Channel
- Tips
- Warnings
This article will show you how, using LetterBomb, you can install The Homebrew Channel on your Wii console running Wii Menu 4.3. The Homebrew Channel is a simple way to play unofficial games and use unofficial applications on your Wii. Note: Modifying your Wii's software will void the warranty and could potentially damage your console if done incorrectly. LetterBomb works exclusively with Wii Menu 4.3.
To step
Part 1 of 3: Finding your Wii console version
- Turn on your Wii. To do this, either press the home button at the top of the front of the Wii, or press the home button on your Wii's remote.
 Press a. This will take you to the Wii Menu.
 - Select the button Wii. It's in the bottom left corner of the screen.
- Select Wii settings and press a. This button is on the right side of the screen.
- Write down the version number. You can see it in the top right corner of the screen. The version number should be either 4.3U, 4.3E, 4.3J or 4.3K depending on where you live.
- If the version of your Wii Menu is not 4.3 and you have not previously installed Homebrew, you must update your Wii console to version 4.3 before continuing.
- If you don't see a version at all, make sure your television shows the full picture. If this is the case and you still don't see anything, you are on Wii Menu 1.0 and you should update your Wii console to version 4.3 before continuing.
- Scroll right, select Internet then press a. This is in the second tab of the Wii Settings page.
- Select Console Information and press a. This option is in the middle of the page.
- You may want to open Connection Settings on this page first to ensure that you can access the Internet.
 Write down the Mac address of your Wii. This is a series of 12 numbers and letters that you see on this page. You need this address to download LetterBomb and the HackMii installation file.
 - Turn off your Wii. Do this by pressing the home button on your Wii and holding it until the light on it turns red.
- Remove the SD card from your Wii. The SD card is the thin, flat card in the compartment to the left of the disc slot. By pulling gently here, you remove the card from your Wii.
 Switch to your computer. Now that you have the information required to install The Homebrew Channel on your Wii, it's time to download LetterBomb.
Part 2 of 3: Download LetterBomb
 Place the SD card in your computer. It fits into the SD card slot of your computer. This is a thin port about an inch long that is likely to be on the side of your computer (or in the front of the CPU box on a desktop). A window with the contents of the SD card should appear.
 - It must be a 2 GB or less SD card.
- The bevel should go into the slot and the SD card logo should be facing up.
- If your computer does not have an SD card slot, you can use an adapter for a USB stick in which you can insert an SD card.
 Go to HackMii's LetterBomb page. This one is located at https://please.hackmii.com/, which is safe to visit despite the name.
  Select the version of your Wii. You do this under the heading "Version System Menu" almost at the top of the page.
  Enter the MAC address of your Wii. You do this in the boxes under the heading "MAC address" in the middle of the page.
 - You should also make sure that the "Bundle the HackMii installer file for me!" Option under the Mac address section is checked.
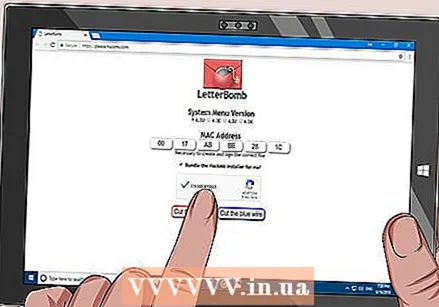 Click on the box "I am not a robot". This confirms that you are not spamming the website with requests.
 - Click either Cut the red wire or Cut the blue wire. It doesn't matter which option you click on; both will cause the Homebrew installation file to be downloaded.
 Open the "LetterBomb" folder. On a Mac, this will show you its contents.
 - On a PC, click "Extract" when prompted and then open the normal "Letterbomb" folder.
- Copy the contents of LetterBomb. To do this, click and drag your mouse over the files and folders in the Letterbomb folder to select them and right click on a file. Then click on "Copy".
- On Mac, you have to use two fingers instead of right click.
- Click on the name of your SD card. It will be in the panel to the left of LetterBomb's window.
- Double click on the folder of your SD card. It should be called "LOST.DIR".This is probably the only folder on the SD card; if not, just look for a folder ending in ".DIR".
- You may need to unhide folders on your computer before you see the "LOST.DIR" folder.
 Paste the copied files to the SD card. You do this by right-clicking (or clicking with two fingers) on the blank page of the SD card and then clicking "Paste" in the drop-down menu.
 - Eject the SD card. While you can technically just pull the card out of your computer, you should eject the SD card first so you don't lose any files. You do this like this:
- "Windows" - Right click on the name of the SD card in the left pane, then click "Eject".
- "Mac" - In the left pane, to the right of your SD card name, click the up arrow.
 Remove the SD card from your computer. Now you can get ready to install The Homebrew Channel on your Wii.
Part 3 of 3: Installing The Homebrew Channel
 Put the SD card back into your Wii. The side of the card with the label must face the card slot.
  Turn on the Wii and then press a. This will take you to the Wii Menu.
  Select the icon Wii Notice Board and press a. This is an envelope button in the lower right corner of the screen.
  Find a red envelope. Depending on your time zone, this icon is either in the folder with the current date, tomorrow's date, or yesterday's date.
 - You can scroll left or right with the arrows to check these folders.
- It may take a few seconds for the red envelope icon to appear.
- Select the red envelope and press a. You should see this icon in the center of your screen. A black screen with white text will appear.
 Press 1 when prompted. This will take you to the HackMii installation file page.
 - Select Further and press a. This is at the bottom of the HackMii installation file page.
 Select Install The Homebrew Channel and press a. This option is at the top of the page. This will install The Homebrew Channel on your Wii.
 - You must use the D-Pad to select this option, as the sensor bar does not work in this menu.
- Select Yes, further. This is at the top of the page. This will install The Homebrew Channel on your Wii.
- Select Further and press a. This option appears once The Homebrew Channel installation is complete.
 Select Shut down and press a. This is at the bottom of the page. Your Wii will now reboot and once this is complete you will be on The Homebrew Channel.
 - You can return to the main page of your Wii by pressing the HOME button, selecting "Return to System Menu" and then pressing A.
- You will see The Homebrew Channel listed in the Wii Menu. Now you can access The Homebrew Channel by selecting The Homebrew Channel, pressing A, selecting Start and then pressing A.
Tips
- You can play old or unsupported games originally developed for other platforms (such as point and click games from Lucas Art) using Homebrew's software and multiple emulators.
Warnings
- Downloading this software will expire your warranty. This is important! (Although the warranty for your Wii has probably long expired)
- The Homebrew Channel is free to download and use. Never pay for The Homebrew Channel or give payment information to anyone claiming to sell The Homebrew Channel.


