
Content
- Steps
- Method 1 of 2: Softwoods
- Correction of defects in conifers
- Sand the surface by hand
- Use a softwood stain
- Method 2 of 2: Hard rocks
- Correction of defects in hardwood
- Apply a finish to hardwood
- Sand softwood with an electric sander
- Tips
- Warnings
- What do you need
By painting wooden furniture, you can restore the original appearance of old things, as well as create beautiful colors and a shiny surface of unfinished furniture. When painted well, the natural beauty of the wood looks much better and the vibrant color is added. The process may differ slightly depending on the type of wood being painted.
Steps
Method 1 of 2: Softwoods
Correction of defects in conifers
Before dyeing conifers such as pine or other evergreens, take time to fill in holes and imperfections. If you are working with hardwoods, or hardwoods such as oak, you need to pull out the protruding nails, just wait for the paint to dry to apply a filler that matches the stain.
 1 Buy a manufactured wood filler in a color that matches your surface.
 2 Examine the surface of the wood. Inspect joints, protruding nails, small cracks, and small holes left by pests. In addition, you need to pay attention to the condition of the edges of your wood. If the edges are uneven, you will need to use filler to align them.
  3 Place the small end of the nail on top of any protruding nail. Push the final nail under the surface by hitting the head of another nail.
  4 If you are working with softwood, place a small ball of filler on the edge of the trowel. Use a trowel to apply filler to blemishes, smoothing the surface with the edge of the filler trowel.
 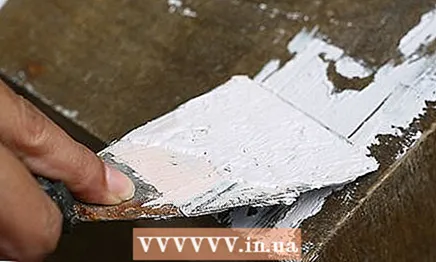 5 Continue adding more filler until it smoothes into the surface. Let the putty dry before sanding.
Sand the surface by hand
Small pieces of furniture with complex corners and fittings, as well as the edges of large pieces of wood, must be sanded by hand. Use a sanding pad when sanding the edges of the wood to keep your work surface level while sanding.
 1 Wrap the sanding pad with 100-grit sandpaper. Sand the edges of your wood until the surface reveals. Set the sanding block aside when finishing the edges.
  2 Hold a piece of 100 sandpaper in your hand with the back of the paper in contact with your palm and fingers. Sand any hard-to-reach surface element by guiding the motion of the emery along the wood grain.
  3 Wipe the sanded surface with a piece of gauze or paper towel dipped in white sirite.
 4 Repeat the sanding process with 150 grit sandpaper.
 5 After you have cleaned the sanded surface, wipe the surface again with a white spirit cloth and repeat the process again with 220 grit sandpaper.
Use a softwood stain
Synthetic bristle brushes work best with water-soluble stains, while natural bristled brushes work best with oil-based stains. Use brushes for large, flat surfaces. You will have to use fabric for hard-to-reach patterns that are difficult to paint over with a brush.
 1 Thoroughly clean the wood and clean the work surface with a soft, lint-free cloth (not gauze). This ensures that dirt, sawdust and debris do not adhere to the finished surface.
  2 Dip the edge of the brush into the stain and apply a thin coat of paint to the surface of the wood. Always paint along the grain with short or long strokes. Work on one piece of wood at a time, don't try to cover everything at once.
  3 Check the surface. If you see faded spots or areas where brush strokes don't fit together, use a soft, lint-free cloth to even out the look of the surface.
 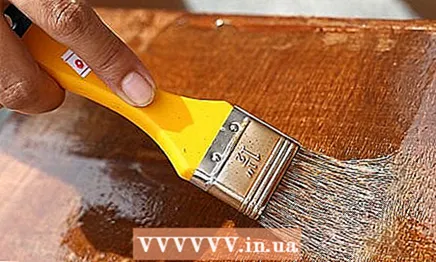 4 Move on to the next section of wood, apply more stain to the brush.
 5 Use a cloth to even out spots and uneven brushstrokes.
 6 Repeat the process, continuing to work on one piece, until you are done.
 7 Let the stain dry overnight. If the color is not as deep as you would like, apply an additional coat of stain on the parts you are not satisfied with until you achieve the desired result. Make sure the previous coat is completely dry before applying a new one.
Method 2 of 2: Hard rocks
Correction of defects in hardwood
If you are working with hardwood, you will need to fix the imperfections before painting. Make sure to choose a filler that matches the color of your wood stain, rather than the original color of your wood.
 1 Roll out a ball of putty on the edge of the putty knife. Apply filler on cracks, knots and nails until the filler is even with the surface. Use a spatula to smooth it.
 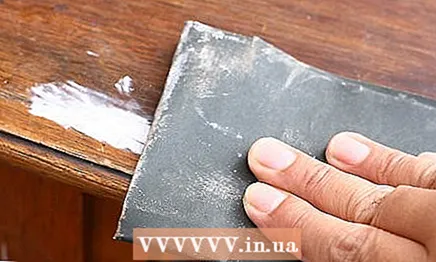 2 Sand the filler after it dries to make sure the surface is flush with the wood. Try not to damage the surface that is already painted.
Apply a finish to hardwood
Most people prefer a polyurethane finish for painted furniture. Polyurethane becomes matte, satin and glossy, so you need to choose the right one based on the type of surface you need. The finish also protects the surface of your furniture from moisture and other factors.
 1 Apply a layer of polyurethane to your stained area using a 2 inch (5 cm) brush. Work with the brush in long strokes and in the direction of the grain. Paint areas 6 "to 12" (15-30 cm).
  2 Blend the strokes between the sections by lightly stroking the joints with a brush. When you're done, the pieces should fit seamlessly together.
  3 Let the polyurethane dry overnight. Sand the surface the next day using 280 grit sandpaper.
  4 Apply a second coat of polyurethane and let it dry for one night. No need to sand the last layer.
Sand softwood with an electric sander
The preparatory stage is the most important in dyeing, because it determines the quality of the finished product. Use an electric sander for large pieces of furniture or any large area of wood. The electric sander will save you time and muscles to prepare more furniture.
 1 Wrap the sanding surface of the sander with 100 sandpaper. Secure it tightly, making sure the work surface is taut so your sandpaper does not bunch up or loosen.
  2 Plug the sander into an electrical outlet.
 3 Grasp the back of the sander with your working hand. Turn on the device and place it on a work surface.
  4 Move the sander back and forth in the direction of the grain of the wood until you sand the entire surface. Never sand across the grain, you will pull out splinters that will be visible when the stain is applied.
  5 When you're done, turn off the sander and set it aside.
 6 Wipe the surface of the wood with gauze or paper towel dipped in white spirit.
 7 Remove used 100 sandpaper from your appliance and discard.
 8 Attach 150 grit sandpaper to your sander.
 9 Repeat the sanding process along the grain and wipe the surface.
 10 Get rid of 150 sandpaper and repeat the process again with 220 sandpaper.
- If you are working with hardwood, first wipe the surface with a damp cloth before sanding with 220 paper.This will raise the grain of the wood and create a very smooth surface.
Tips
- You can purchase a sealant and stain mix, as well as a stain and finish mix. This will save you the extra step of adding trim layers to your wood stain.
- When choosing paint, choose products that are both filler and stain. This will allow a lot more stain to be applied to the wood itself.
- To paint hard-to-reach areas and intricate patterns, dip a soft cloth in stain and wipe the surface with it. Use another piece of fabric to even out the colors and blend the edges.
- If you have noticeable rough and unsightly wood ends, you can veneer them later to match the color of your final tone. It will be better than trying to treat these areas with filler.
Warnings
- Always wear rubber gloves when working with stains and finishes, as materials are difficult to remove from the surface of the leather, even if they are water soluble.
What do you need
- Wood filler (putty)
- Set of nails
- A hammer
- Putty knife
- 100, 150, 220 sandpaper
- Electric sander
- Sanding block
- Gauze or paper towels
- White Spirit
- Brush
- Stain
- Soft, lint-free wipes
- Polyurethane
- Two-inch brush
- 280th sandpaper


