Content
- Steps
- Method 1 of 4: Preparing for the procedure
- Method 2 of 4: Subcutaneous injection
- Method 3 of 4: Intramuscular injection
- Method 4 of 4: Post-injection safety precautions
- Warnings
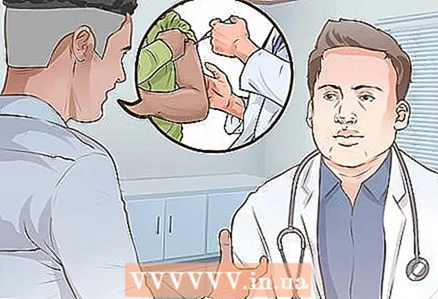
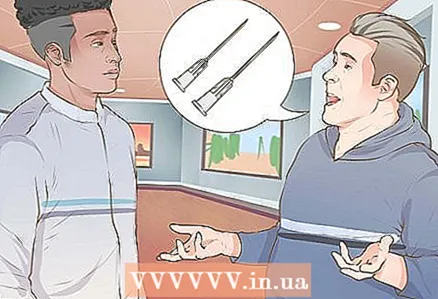
You can give yourself a safe injection at home. Safety means protecting the patient and the person giving the injection, as well as the environment.Usually, two types of injections are made on their own: subcutaneous injections, in which the needle pierces the skin and fatty tissues (for example, this is how insulin is injected) and intramuscular injections, when the needle is inserted a little deeper and penetrates the muscle. If you need to take shots or give them to a close friend or family member, your doctor or other healthcare professional must give you instructions on how to inject the prescribed drug in advance.
Attention:the information in this article is for informational purposes only. Before using any methods, consult your doctor.
Steps
Method 1 of 4: Preparing for the procedure
 1 Determine the type of injection. The doctor should tell you in detail about the type of injections prescribed and how to give them. After that, carefully study the directions for use attached to the drug, as well as the instructions of your doctor, nurse or pharmacist. If you have any questions or concerns, talk to your doctor, nurse, or pharmacist. Before giving injections, consult about the volume of the syringe, the length and thickness of the needle.
 - Some drugs are dispensed ready-to-use, while others must be drawn into a syringe from a vial or ampoule.
- Keep everything you need for injection strictly clean. Some patients are prescribed several types of injections at once.
- Take all necessary precautions to avoid confusion between syringes and needles for injecting different drugs.
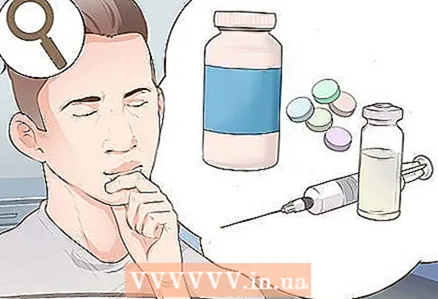
 2 Examine the packaging of the drug. Preparations for injections are available in different packages. Some medicines need to be diluted before injection. Many drugs come with injection supplies, including syringes and needles. Let us remind you again: a medical professional should instruct you about the injections and the pre-requisites. Just reading the instructions for use attached to the drug and this article is not enough - the doctor must tell you in detail about the prescribed drug and the injection method, as well as answer your questions.
 - After consulting a doctor, you can also view the description of the prescribed drug and study the step-by-step preparation for its injections in additional sources. However, remember: this should not be seen as a substitute for medical advice - the doctor must tell you how to properly prepare and administer the injection.
- In additional sources, you can also find information on the recommended volume of the syringe, the length and diameter of the needle, if they are not given in the instructions attached to the drug.
- Prepare to inject the drug in a single-dose ampoule. Many injectable medicines are available in single-dose ampoules.
- The ampoule should indicate the volume corresponding to the recommended single dose of the drug.
- This means that each ampoule contains one dose of the drug. Liquid may remain in the ampoule after you draw the volume you need from it.
- After you have prepared the volume required for injection, the ampoule should be discarded. If the drug remains in the ampoule, do not store it and do not use it for repeated injections.
 3 Prepare to inject the drug from a multi-dose vial. Some products are available in vials, which contain a volume designed for several injections.
 - The vial should indicate the volume of contents that exceeds the recommended single dose.
- If you are using a reusable vial, mark the date on which the vial was printed with a waterproof marker.
- Store in the refrigerator between injections. Do not place the bottle in the freezer.
- Some reusable vials contain small amounts of preservatives to extend shelf life. Nevertheless, such drugs retain their properties no longer than 30 days after the bubble opens.
- The vial should be discarded 30 days after you first opened it, unless your doctor advises otherwise.
 4 Get everything you need ready. You will need an ampoule or vial of medication and a suitable syringe and needle (sometimes they are in the medication box, in other cases they must be purchased separately as recommended by your doctor). You will also need rubbing alcohol, a cotton ball or some bandage, a padded plaster, and a medical waste container.
 - Remove the outer tin cover from the vial and wipe the rubber cover with a cotton swab moistened with alcohol. After that, be sure to wait until the wiped lid dries in the air. Do not blow on the lid or cleansed skin at the injection site to keep dirt out.
- Press a piece of bandage or cotton swab to the injection site to reduce bleeding. Place an adhesive plaster with a tampon pad on this place.
- The medical waste container helps to protect the patient, medical personnel, and the surrounding people from biohazardous materials. It is a thick plastic container that can hold sharp objects such as scalpels, syringes, and needles. When the container is full, it is taken to a location designated for the disposal of biohazardous materials.
 5 Check the medicine. Make sure you have the right drug of the correct concentration that has not expired. Check if the drug has been stored under proper conditions. Some medicines can be stored at room temperature, while others should be kept in the refrigerator.
 - Check for visible damage or cracks on the vial or ampoule with the drug.
- Examine the cap of the vial or ampoule. Check if it is damaged, cracks or holes. Damage to the lid may cause the preparation to become non-sterile and unusable.
- Examine the liquid inside the ampoule or vial. Check for any foreign matter or particles. Typically, injectables are clear, clear liquid.
- Some brands of insulin may be cloudy. If you do not have insulin and you notice that the liquid is cloudy, discard the drug.
 6 Wash your hands. Wash your hands thoroughly with soap and water.
 - Be sure to wash the areas under your nails and between your fingers, as well as your wrists.
- This will help prevent contamination and reduce the risk of infection.
- It is recommended to wear medical gloves before injection to further reduce the risk of infection.
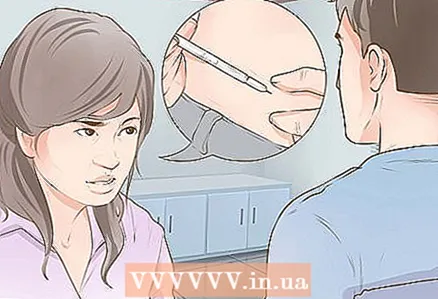
 7 Examine the syringe and needle. Make sure they are hermetically sealed. There should be no signs of damage on the packaging. After you open the package, check for cracks or any stains on the syringe body, plunger and stem. If you find damage or discoloration, the syringe should be discarded.
 - Check if the needle is damaged. Make sure the needle is not bent or broken. Do not use a damaged needle. The packaging must not be damaged, otherwise the needle may become non-sterile.
- Sometimes packages containing syringes and needles have an expiration date. If the expiration date has passed, do not use them.
- Dispose of the damaged or expired syringe and needle in a medical waste container.
 8 Make sure the syringe is of the correct type and volume. A suitable syringe must be used for injection. Do not use a different type of syringe, as this can lead to serious dosing errors. Follow your doctor's recommendations carefully.
 - Choose a syringe with a slightly larger volume than is required for the prescribed dose of medication.
- Observe the manufacturer's recommendations for the length and diameter of the needle.
- The diameter of the needle is inversely proportional to its "gauge", which is indicated on the package. The higher the gauge, the thinner the needle. Different types of needles are required to inject different drugs.
- Currently, for safety reasons, most syringes and needles are produced in the same package.Thus, a certain syringe corresponds to a needle with a fixed length and diameter. Make sure you have a suitable syringe and needle. Find the relevant information in the drug description, or talk to your pharmacist, doctor, or nurse.
- The syringe and needle can be purchased separately. In this case, they should be connected. The syringe must have a suitable container, the needle must be of the appropriate length and diameter, and must be sterile and unused. Different needles are used for subcutaneous and intramuscular injections.
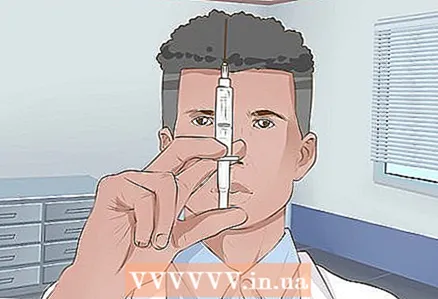
 9 Fill the syringe. Draw the medicine into the syringe according to the directions on the package (if any).
 - Sterilize the top of the ampoule or vial with rubbing alcohol and wait a few minutes for it to dry.
- Get ready to fill the syringe. You need to know exactly how much liquid preparation should be drawn into the syringe. Draw the correct dose into the syringe according to the directions for use or as directed by your doctor or pharmacist.
- To fill the syringe, pull the plunger back so that air is drawn into the syringe, the volume of which exactly corresponds to the required dose of medication.
- Turn the medicine bottle over, pierce the rubber cap with a needle, push down on the plunger and blow air from the syringe into the bottle.
- Pull the plunger of the syringe back and draw the required dose of medication.
- Sometimes air bubbles may appear in the liquid drawn into the syringe. If this happens, tap the syringe lightly while the needle remains in the medicine bottle. As a result, the air will rise upward.
- Squeeze air back into the vial and draw up more fluid as needed to get the dose you want in the syringe.
 10 Prepare the patient. Ice can be applied to the appropriate area prior to injection to reduce pain, especially if you are injecting a child. Sit or lay down the patient comfortably and expose the injection site.
 - You must have easy access to the place where you are going to give the injection.
- Ask the patient to stay still and relax.
- If you wiped the injection site with alcohol, wait a few minutes for it to dry before piercing the skin with a needle.
Method 2 of 4: Subcutaneous injection
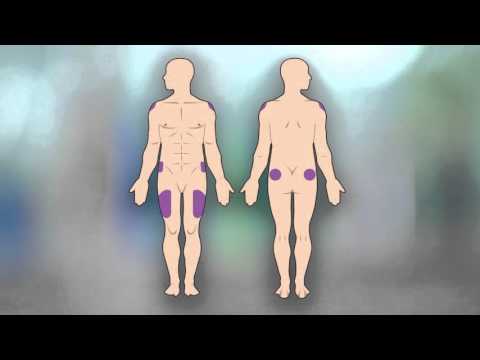
 1 Determine the injection site as directed by your doctor. Subcutaneous injections are made into the subcutaneous fat layer. These injections are used to inject certain drugs (usually in small doses). The subcutaneous fat is located between the skin and muscles.
 - Subcutaneous injections are often given in the abdomen. Select the area between your waist and your hipbone, about five centimeters from your belly button. Do not inject near your belly button.
- Subcutaneous injections can be done approximately in the middle of the thigh (slightly from the side), where you can grab 3-5 centimeters of skin with your fingers.
- The lumbar region is also well suited for subcutaneous injections. The injection is made above the buttocks and below the waist, about halfway between the line of the spine and the side.
- Subcutaneous injections are sometimes done in the shoulder, if it is possible to grab 3-5 centimeters of skin there with your fingers. Inject in the middle between the elbow and shoulder joint.
- Alternate injection sites to avoid bruising and skin damage. You can also give injections in the same area, but in different areas of the skin.
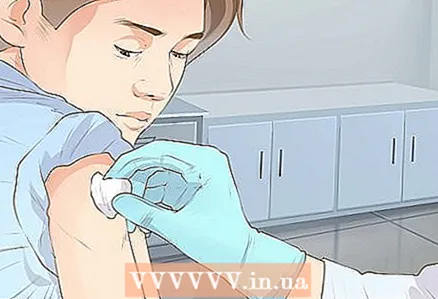
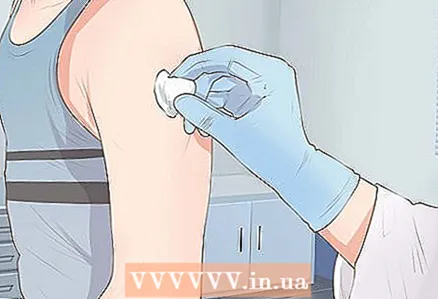
 2 Prepare for your injection. Wipe your skin with rubbing alcohol at and around the injection site. Wait for the alcohol to dry before giving the injection. It will take no more than 1-2 minutes.
 - Do not touch skin rubbed with alcohol with your hands or anything else until you have given the injection.
- Make sure you have the right drug, the right dose, and the right injection site.
- Take the syringe in your dominant hand and remove the cap from the needle with the other hand. Grab the skin with your non-dominant hand.
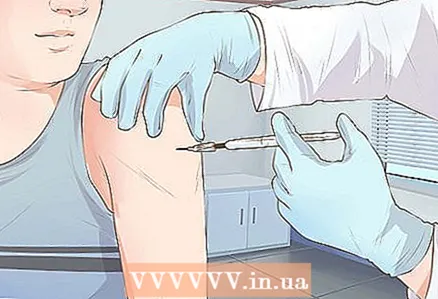
 3 Determine the angle of entry of the needle. Depending on how much skin you grab, the needle can be inserted at a 45 or 90 degree angle.
 - Insert the needle at a 45-degree angle if you can only grip about 3 centimeters of skin with your fingers.
- If you were able to capture approximately 5 centimeters of skin, insert the needle at a 90 degree angle.
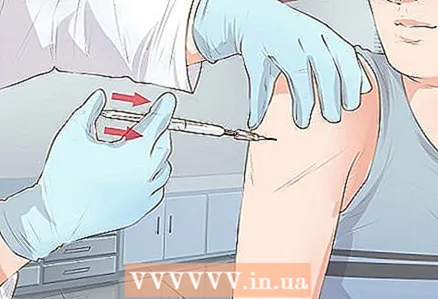
- Squeeze the syringe securely and with a quick motion of your wrist, pierce the skin with the needle.
- With a quick and gentle movement of the main hand, pierce the skin with the needle at the intended angle. While doing this, continue to hold the skin with the fingers of your other hand. With a quick injection, the patient does not have time to strain.
- For subcutaneous injections, retraction (aspiration) is not necessary, unless you are injecting an anticoagulant such as enoxaparin sodium.
- To aspirate, slightly pull back the syringe stem and check for blood. If there is blood in the syringe, remove the needle from the skin and look for another injection site. If there is no blood, continue.
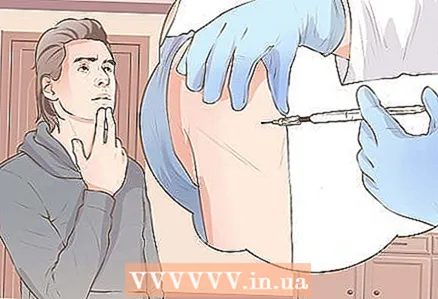
 4 Inject medicine. Press on the stem and squeeze out all the liquid from the syringe.
 - Take out the needle. Press on the skin above the injection site and with a quick and gentle movement, pull the needle out at the same angle at which you inserted it.
- The whole procedure should take no more than 5-10 seconds.
- Place the used syringe in a medical waste container.
 5 Get an insulin injection. Insulin is injected subcutaneously, but special syringes are used to accurately measure the required dose. In addition, insulin injections are given constantly, so it is necessary to record the injection sites in order to change them in a timely manner.
 - Be aware of the different types of syringes. Using a standard syringe can result in a serious dosing error.
- Insulin syringes are graduated in units, not cubic centimeters or milliliters. These are the syringes that must be used when injecting insulin.
- Check with your doctor or pharmacist for syringes that are appropriate for your type of insulin and dosage.
Method 3 of 4: Intramuscular injection
 1 Determine the injection site. With intramuscular injections, the drug is injected directly into the muscle. Choose an injection site where the muscle tissue can be easily reached.
 - There are four main sites that are recommended for intramuscular injection. These are the hips, pelvis, buttocks and shoulders.
- Alternate injection sites to avoid bruising, scars, skin damage, and pain.
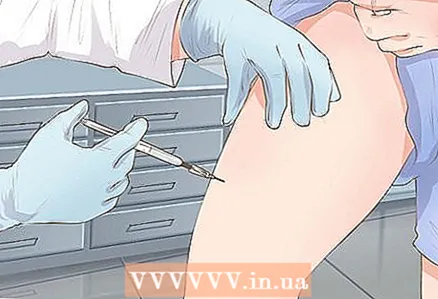 2 Inject into the thigh. Intramuscular injections are made into the vastus lateralis muscle.
 - Divide your thigh into three areas mentally. The injection should be done in the middle area.
- This is a good site for intramuscular injection, as the area on the thigh can be easily identified and easily reached.
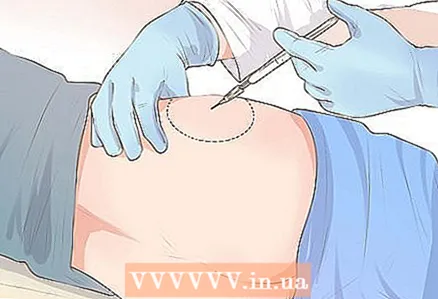
 3 Give a ventro-gluteal injection. This is an injection into the ventro-gluteus muscle. Use the identification points on the body to find a suitable injection site.
 - Ask the patient to lie on their side. Place your palm on your outer upper thigh where it meets your buttock.
- In this case, the fingers should be directed towards the patient's head, and the thumb towards the groin.
- You need to feel for the bone between the tips of your ring finger and little finger.
- Move your index finger to the side so that it forms the Latin letter "V" with the rest of your palm. The injection site will be located in the middle of this letter.
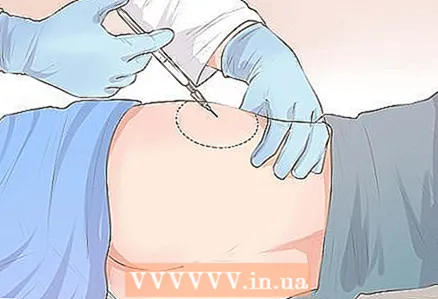
 4 Inject into the buttock. This injection should be given to the gluteus maximus muscle. With a little practice it is easy to find it. First, use the identification points on the body and divide the corresponding area into four parts.
 - Draw an imaginary line (or draw it with a cotton swab dipped in alcohol) from the tailbone to the side of the body. Determine the middle of this line and move up 7-8 centimeters.
- Draw another line that crosses the first at right angles.
- Find the curved bone at the top outside. The injection should be made in the upper outer area below this bone.
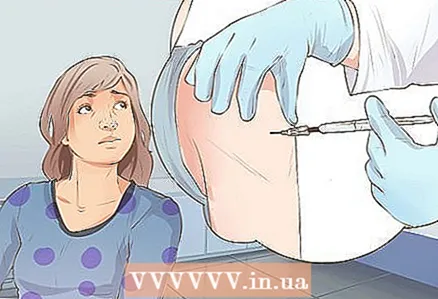
 5 Inject in the shoulder. The deltoid muscle is located in the upper arm, which is well suited for intramuscular injections if there is sufficient muscle tissue. If there is little or thin muscle tissue in this area, use another area of the body.
 - Find the acromion - the lateral end of the scapula.
- Draw an imaginary inverted triangle at the base of which the found bone lies, and the apex is at the level of the armpit.
- Give a prick in the middle of this triangle, 3-5 centimeters below the acromion.
 6 Rub alcohol around and around the injection site with rubbing alcohol. Wait for the alcohol to dry before giving the injection.
 - Do not touch skin rubbed with alcohol with your hands or anything else until you have given the injection.
- Take the syringe in your dominant hand and remove the cap from the needle with the other hand.
- Press down on the skin where you are about to inject. Press lightly on the skin and pull it tight.
 7 Insert the needle. Using a wrist motion, pierce the skin with the needle at a 90-degree angle. The needle must be inserted deep enough to inject the medicine into the muscle tissue. To do this, choose a needle of a suitable length.
 - Aspirate: Pull back the syringe stem slightly. See if there is blood in the syringe after that.
- If there is blood in the syringe, carefully pull out the needle and find another injection site. If there is no blood, continue injecting.
 8 Administer the medication carefully to the patient. Press down on the stem until all liquid comes out of the syringe.
 - Do not push too hard on the stem, or you will inject the medication too quickly. The piston should descend slowly and at a constant rate so that the patient experiences less pain.
- Withdraw the needle at the same angle as you inserted it.
- Cover the injection site with a piece of bandage or cotton swab, apply an adhesive plaster, and periodically inspect the injection site. Make sure it stays clean and does not bleed.
Method 4 of 4: Post-injection safety precautions
 1 Watch for a possible allergic reaction. The first injection of any drug should be given by a doctor who will monitor for symptoms of an allergic reaction. However, if signs of an allergic reaction develop with further treatment, seek immediate medical attention.
 - Signs of an allergic reaction include hives, rash or itching, shortness of breath, difficulty swallowing, a feeling of tightness in the throat and airways, and swelling of the mouth, lips, or face.
- If symptoms of an allergic reaction appear, call the ambulance at 103 (from a mobile phone) or 03 (from a landline phone). Note that you have just injected a drug into your body that can aggravate the reaction.
 2 Seek medical attention if an infection develops. Even with an impeccably executed injection, an infection can get into the wound.
 - Contact your doctor as soon as possible in case of fever, flu-like symptoms, headache, sore throat, joint or muscle pain, or digestive problems.
- Other symptoms that require immediate medical attention include a feeling of tightness in the chest, nasal congestion, widespread rash, changes in mental status such as confusion or loss of orientation.
 3 Observe the injection site. Pay attention to skin changes at the injection site and in the immediate vicinity.
 - A reaction at the injection site is more common when certain drugs are injected. Before giving the shots, read the information about this medicine so you know what to expect.
- Common symptoms of a reaction at the injection site include skin redness, swelling, itching, and bruising. Sometimes a bump or hardened area forms at the injection site.
- If you need to give a series of injections, alternate the injection sites to minimize damage to the skin and surrounding tissue.
- If you have persistent problems with the reaction at the injection site, consult your doctor.
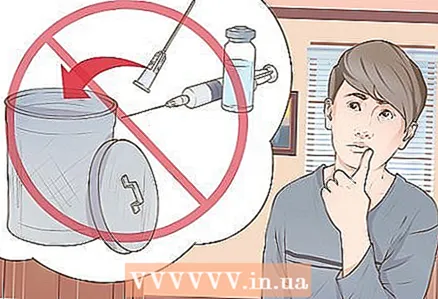 4 Dispose of used materials and tools properly. The medical waste container is designed for the safe storage of used scalpels, syringes and needles.Such a container can be purchased at your nearest pharmacy or ordered online.
 - Never dispose of used scalpels, syringes, and needles in your regular waste container.
- Check local regulations for the disposal of medical supplies. You can consult a pharmacist on this issue. You can also search the Internet for information on how to dispose of biohazardous materials in your area.
- Sharp objects, including used needles, scalpels, and syringes, are biohazardous materials as they contain remnants of the patient's skin and blood.
- Consider using specialized companies. There are companies that deal with the disposal of medical waste. Once your container is full, it can be handed over to a company that will take care of the further safe disposal of used materials.
- Talk to your pharmacist about how to safely dispose of any vials or ampoules with leftover medication. Often they can simply be placed in the medical waste container where you dispose of your used needles and syringes.
Warnings
- Do not forget: you should not try to give injections on your own without detailed advice from your doctor. The information contained in this article does not in any way replace the need for prior consultation with a doctor, nurse or pharmacist.


