Author:
Robert Simon
Date Of Creation:
21 June 2021
Update Date:
1 July 2024

Content
Similar to shoelacing, boots with more space will give you more options in terms of lacing function and style. Not only does it add a variety of unique styles to your boots, some specific laces also help your feet feel more comfortable or more supportive.
Steps
Method 1 of 3: Diagonal constriction (Diagonal style)
Choose shoelaces. Most people have boots that are at least ankle-high. Make sure that the laces are long enough for the boot.
- Ask the clerk or read on the package to determine the shoelace length.
- If you're buying a new lanyard, take the length of the string that came with the boot as standard.
- The right length depends on many factors, including the number of pairs of eyelets on the shoe, the vertical and horizontal distance between the holes, and finally the type of lacing you apply.However, on average you can choose a length of about 115 cm for shoes with 5-6 pairs of piercing, 135 cm for shoes with 6-7 pairs of piercing, 160 cm for shoes with 7-8 pairs of piercing, 185 cm with shoes with 8-9 pairs of holes and 245 cm or more if the shoes have more than 10 pairs of piercing.
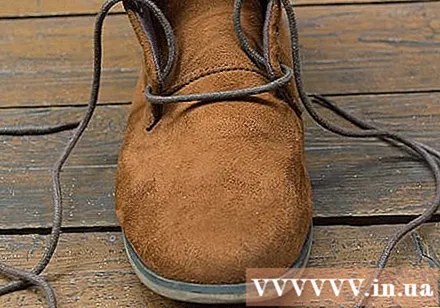
Start wearing shoelaces. The basic way to wear shoelaces is in the criss-cross pattern. Starting at the bottom, thread the string through each hole at the end. Stretch the shoelace as far as possible and align it evenly on both sides.- The shoelaces should now be on the outside of the piercing.
- With basic criss-cross pattern, you need to thread the string from the outside into the holes, not the inside out.
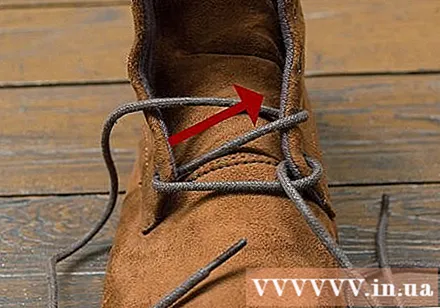
Cross one end of the string over the tongue. From below, you thread the wire into the second hole and upwards.- After passing the wire through the next hole, repeat the same with another hole.
- The shoelace should now be on the outside of the boots.
Continue piercing. You must maintain a uniform look by running on one side first and then the other until you reach the top of the shoe.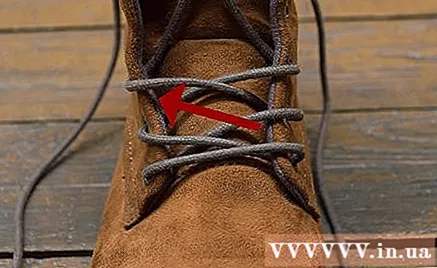
- If you cross from left to right from the first hole, keep this structure.
- To make the shoe look symmetrical, you can do the opposite of the other. If on the last one you started by diagonally running from left to right, then on the second one, cross from right to left.
- By maintaining consistency, boots not only look neat and beautiful, but laces are also easier to tie.

Pierced up to the top. If you want to leave some space and shoelaces, you may not be able to put your end hole in. At the top, tie the rope into a bow shape, or tie it all up and stuff in.- Depending on the length of the rope left over, you can also wrap it around the shoe before tying it.
Method 2 of 3: Army style
Get your shoelaces ready. This is the military boot lacing method, which you can use with the shoelaces that come with the boot or another strap of the same length.
- If your shoes have an even number of piercing pairs, you need to start by running the laces inside out through the bottom pair and pulling up.
- If the shoe has an odd number of piercing pairs, you will thread the laces from the outside in through the bottom pair.
Start wearing shoelaces. Start with one end of the string, diagonal from the inside out through the next hole. With the second pair of holes closest to the bottom, you will cross in the same way. Repeat with the other end of the laces.
- Make sure the cross wire is below, not on the bottom horizontal line.
- The laces will now overlap and lie on the outside of the shoe.
Thread the shoelace through the next vertical (same side) hole. In a row of holes, insert the shoelace directly into the hole directly above. Do the same with the other side.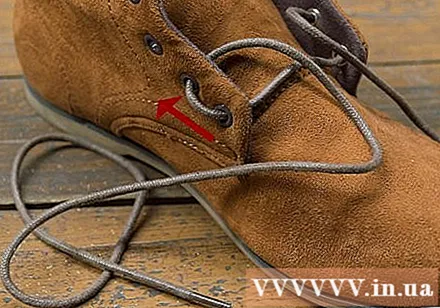
- Pass the shoelace through the next hole by going from the outside to the inside.
- You should now have a horizontal shoelace in the bottom hole, a diagonal upper section and two side holes with vertical laces.
- At this point, the laces will be on the outside of the boot.
Repeat this diagonal and thinner method up to the top hole. Take turns crossing and threading along the laces upwards.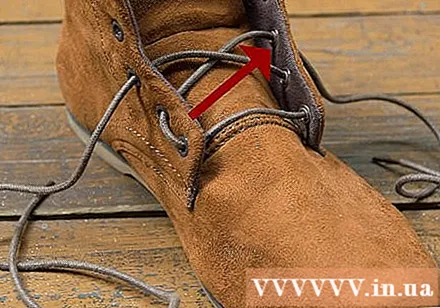
- Maintain a consistent threading order. If you pass from the right hole to the left from the inside out, do the same for each diagonal, and vice versa if you start from left to right.
Tie the shoelaces into a bow, or tie the knot and tuck the rest inside. When threaded to the top, the laces lie on the outside of the shoe. At this point, you can tie the bow as usual, or tuck the excess string into the boot if you want to look cleaner.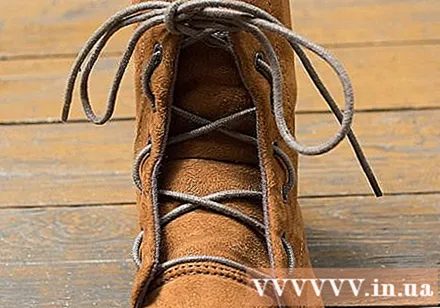
- If the string is long enough, you can also wrap it around the shoe and tie the knot in the front, then tuck under the reed.
Method 3 of 3: Trapezoidal tightening (Ladder type)
Get your shoelaces ready. You will need to use a rope that is the appropriate length for the shoe's height. You can take advantage of the laces included, or buy new laces that are at least the same length as the original one. The trapezoidal lacing method, sometimes called a straight across, is very popular among American paratroopers for its safety and reliability.
- This method is best suited for high-heeled boots with lots of piercing.
Start by running the string across the bottom pair of holes. Similar to a crossover, you need to thread the string underneath the two lowest holes.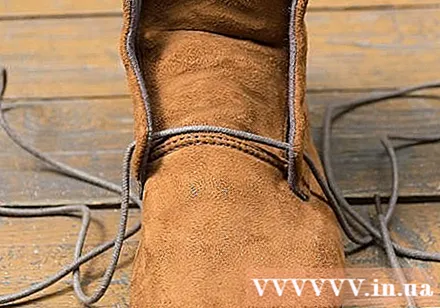
- At this point, the laces will be on the outside of the shoe.
Thread the vertical string up through the next hole in the same row. Now, instead of diagonal, you thread each vertical string up through the next hole in the same row. This time the end of the line will go from outside to inside.
- Right now, the laces will be inside the shoe.
Catch the rope across the top of the reed. Insert the end of the wire under the wire connecting the two longitudinal holes in the same row.
- In this step we will not pass the string through the hole because you are threading it horizontally, not diagonally.
- Instead of passing the string through the hole, you need to thread under the string that is lying along the outside of the shoe.
- Work with both ends. At this point, the laces will lie on the outside of the shoe.
Continue to pull up and thread the string to the next hole in the same row. Pull the rope from the bottom up, and insert it into the hole directly above in the row. Thread shoelaces from outside to inside. Do the same with the other side before spinning the shoelace again and insert the hole opposite from the bottom.
- Always keep the same order as when you started. If you went right to left first continue in that order.
Continue to thread the string from the outside in and thread each end down again. Repeat this process until you tie all the way up to the top.
- With this method, the only time the shoelace goes through the hole is when you point up to the top hole in the same row and run it from the outside in.
- After the shoelaces are threaded up to the top, the laces will point in and be inside the boot.
Tie shoelaces. After you put it to the top, tie the bow or knot and tuck the rest under the tongue. advertisement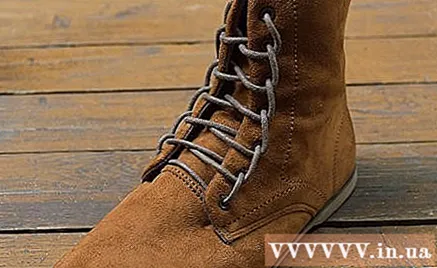
Advice
- Different lacing techniques provide stability and even greater comfort, depending on the shape and size of the boot. The criss-cross pattern is suitable for feet that are narrow in width. If your feet are wide, you should wear military style because the distance between the ropes will be wider, providing a comfortable feeling.
- Don't forget to maintain the lanyard shape. Always start on the same side that you started out with.
- It can take a long time to put on new shoelaces, especially with tall boots, so make a reasonable time for this.
- When tightened, the shoe can be rubbed against the heel when worn. You can purchase a heel pad to keep the foot in place inside the boot.


