Author:
Monica Porter
Date Of Creation:
16 March 2021
Update Date:
1 July 2024

Content
Brushes are basically the shapes of the brush tips that you can create on an image. Not only do lines or duplicate images, you can also use brushes to create lighting effects, textures, computer drawings, and so on. Brushes let you add depth and softness to your drawings, but to use them you need to know how to add brushes to Photoshop first.
Steps
Method 1 of 3: Load a new brush
Search the internet for new brush shapes to see which one is right for you. If you are not sure what you want, just enter the keyword "Photoshop Brush Packs" into your favorite search engine. There are hundreds to choose from, from paintbrushes to specially textured brushes for shading or lawn painting. You just need to find a basic set and choose the brush tip you like. Some of the most useful and trustworthy sites include:
- DeviantArt
- Creative Market
- Design Cuts
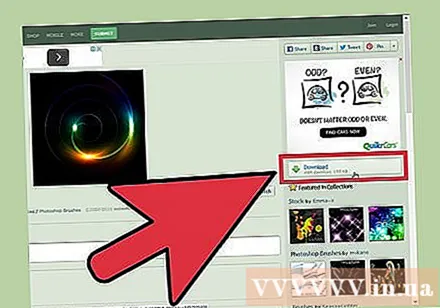
Download the file.ZIP to computer. Most brushes will be in a compressed (ZIP) directory after downloading. When you find a brush you like, download them to your computer. Most modern computers have software dedicated to opening ZIP files.- If after downloading you worry that you can't find your brushes, click and drag them to your desktop to make them easier to find later.

Open ZIP file. We need a ZIP Extractor (which is available on most computers). You just need to double click to open it. If you can't find the file, check your "Downloads" folder.- If you're not sure if you can open a ZIP file, right-click it and choose "Extract" or "Open With". Popular programs include ZIP Archive or WinRAR.

Find the file ".abr ". The folder after opening will contain many types of files, however, we only need the file.abr. If no .abr file is visible, delete the entire folder and look for another brush set. advertisement
Method 2 of 3: Add a new brush to Photoshop
Open Photoshop. You don't need to open an image. Just open the program to install the brush.
- You should open a Finder or Windows Explorer window to find your brushes.
Press the B key, or click the Brush tool to open the brush bar at the top of the screen. The taskbar at the top of the screen (depending on the tool you have open) will change to a brush bar after you press the B key.
On the brush taskbar, click the small down arrow next to the small dot, usually in the upper left corner of the screen. The Brushes Preset menu will open.
Click the gear icon, then find the item "Load Brushes". A browser window will appear. Navigate to the ZIP folder and find the .abr file - this is your new set of brushes.
Double-click the file.abr to install the brush. The new brush set is automatically added to the preset panel. You can open the Brushes Preset menu to find it at any time. Just click on the little gear icon and find the new set of brushes at the bottom of the drop-down menu.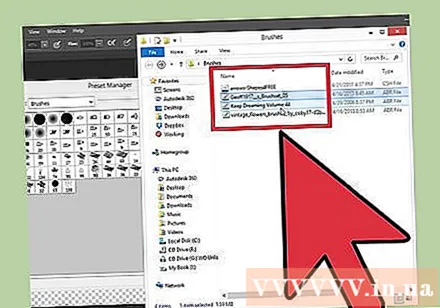
Or, you can click and drag the set of brushes, and drop them into the Photoshop window to add them. It's easy, just click on the .abr file in a window or on your desktop, and then drag and drop into Photoshop. The program will automatically set up the new brush for you. If the two above didn't work, try:
- Click "Edit" in the top bar.
- Click "Presets" → "Preset Manager".
- Make sure "Preset Type:" is set to "Brushes."
- Click "Load" and find a new brush, then double-click the file to install.
Method 3 of 3: Add the brush in bulk
It will be faster if you add multiple brush packs to Photoshop's file system. If you want to add lots of new brushes, just drag and drop them into the appropriate folder. This works on both Windows and Mac computers.
- You must turn off Photoshop before you start.
Navigate to the Photoshop files using one of the two paths listed below. However, on a Mac computer, simply hold down the Cmd key and click the Photoshop icon to open the program folder.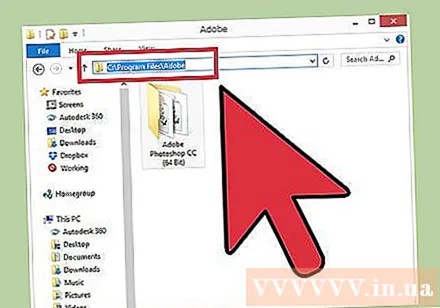
- Windows: C: Program Files Adobe Photoshop
- Mac: / Users / {USER NAME} / Library / Application Support / Adobe / Adobe Photoshop ___ /
Double-click "Presets" and open the "Brushes" folder. This is where all the brushes are arranged, Photoshop will also look for the new brush here.
Click and drag the new brush to drop into this folder. After opening the compressed file, click and drag the file and drop it into the Brushes folder. The next time you open Photoshop, the new brush will be integrated and ready for you to use. advertisement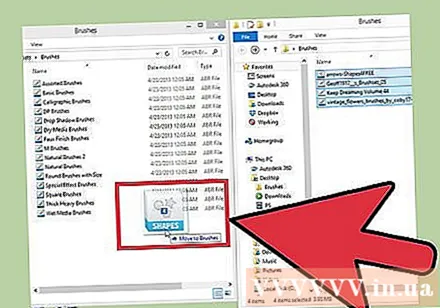
Advice
- If you are using Photoshop on a Mac computer, you need to paste the ".abr" file in the location / Users / {username} / Library / Application Support / Adobe / Adobe Photoshop CS3 / Presets / Brushes


