Author:
Randy Alexander
Date Of Creation:
24 April 2021
Update Date:
1 July 2024

Content
While the results are great, the ear piercing process can be a breeze and it can be a bit risky. If you really want to get your own pierced instead of going to a professional service, follow the steps below to do it safely. Ask your parents to help you if you are a child.
Steps
Part 1 of 3: Prepare your ear piercing
Use a pre-packaged 70% isopropyl alcohol swab to clean your ears. This step will be needed to completely remove any bacteria that may enter your piercing. Wait for the ears to dry before being inserted.
- You can also use hydrogen peroxide or rubbing alcohol to disinfect your ears.

Mark the spot where you will get pierced. It is very important to plan the position you want to pierce in advance; otherwise, your piercing may be skewed, too high or too low. If you want to have both ears pierced, look in the mirror and mark it in balance.- If you already have a piercing and want to have a second or third hole, make sure to leave space between the holes so that the earrings in both holes will not overlap. You also shouldn't have your ears pierced too far apart, or they might look odd.

Disinfecting ear piercing needles. An ear piercing needle is a needle with a hollow gut so you can easily put the earrings in your newly inserted hole. Do not share needles with others to avoid the risk of infection. Ear-piercing needles are widely available online and in piercing shops with relatively cheap prices.- Use a needle larger than the earring you intend to wear 1 size on. With 1.3 mm earrings, you should use a 1.4mm needle to fit.
- You can also choose to purchase an ear piercing set, which includes two sterilized screw-on earrings, available at beauty stores. Be sure to follow the instructions on the product packaging.

Take out the earrings. Whether you have your earlobe pierced or you have cartilage in your ear, the most suitable piercing type is the bead-shaped earrings. It is recommended to have a diameter of 1.3mm and a length of 10 mm; The length of the pier is sufficient unless the ear is swollen and thicker than normal.- Some jewelry stores sell pierced earrings with a pointy point almost like a needle. This type of earring has the advantage that it will go through your ears again when you put it in the new needle pierced hole.
- If possible, buy high-quality metal earrings such as silver or titanium. High-grade metals are less likely to cause infection or allergies. Note that some people are allergic to lesser quality metals, such as gilded metals.
Sterilize the needle over a fire. Don't reuse someone else's needle; You will need to use sterile needles in their original packaging. Heat the needle over the flame until the tip is red. Wear gloves when disinfecting needles to ensure that bacteria on your hands, if present, will not pass to the needle. Make sure the needle is free from soot or dirt. Clean the needle with 10% alcohol or hydrogen peroxide. Note that this is an approximate method of disinfection and will not kill all the germs on the needle. The only way to absolute disinfect piercing tools is by using an autoclave.
- You can also disinfect it by boiling needles. Drop the needle into a pot of boiling water and boil for 5-10 minutes. Use the needle pick up tongs and handle the needle only when wearing sterile latex gloves. Wipe the tip of the needle with rubbing alcohol or hydrogen peroxide.
Wash your hands with soap and water. This step helps to reduce the risk of the spread of bacteria. Wear sterile latex gloves after washing your hands.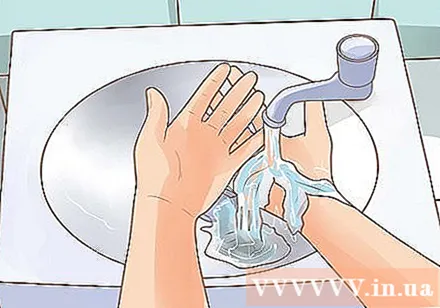
Til off hair so that it doesn't get in your ears. Hair can be sandwiched between the ear and the earring or pushed into the piercing hole when you thread the needle through the ear. If possible, tie your hair up high and away from your ears. advertisement
Part 2 of 3: Ear piercing
Find a hard object to insert behind your ear. You need something to be pressed against your ear to prevent the needle from hitting your neck when you push the needle through your ear. A cold bar of soap or a clean cork is a good choice. Avoid apples or potatoes, even though you often see them used in movies. Apples, potatoes, or any other food can carry the bacteria that cause piercing infections.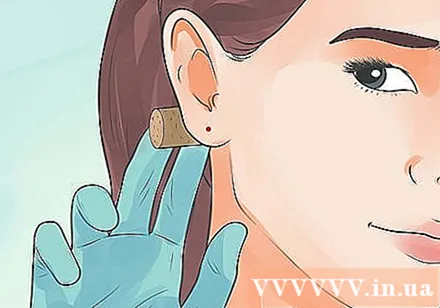
- You can ask someone to help you get your piercing done. Have them hold the cork behind their ears, or, if you trust them with all the confidence, ask them to put the needle through your ear. The piercing process is much easier if you have someone to help you.
Put the needle in the correct position. The piercing needle should be positioned perpendicular to the earlobe, meaning it will form a 90 degree angle from the point you have marked on the ear. When you put the needle like that, it's easier to put the needle through your ear.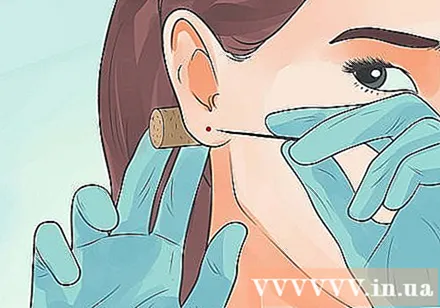
Take a deep breath and pierce the piercing needle through your ear with a smooth motion. Make sure to pierce through the exact spot you have marked. You may hear a “click” as the needle goes through your ear, but don't panic! You keep moving the needle and continue to pierce the right angle. If you are using a piercing needle with an empty gut, you can put your earrings through the hole between the needle.
Wear earrings. After your ear is pierced and the needle is still in position through the ear, place the pin of the earrings into the hole in the center of the needle, then push through the ear. Earrings will fit in the newly pierced piercing.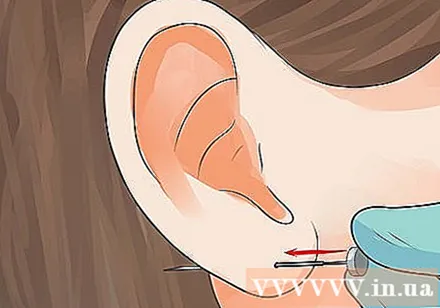
Pull out the piercing needle. Slowly pull the needle out of your ear, making sure the earrings stay in place. Note that this step is often the most painful, but don't rush, lest your earrings fall off or you have to re-pierce your ears from the beginning.
- Note, the piercing you just created may heal in just a few minutes if you don't wear it. If the earrings fall off, disinfect them quickly and try to insert them again. If you can't get your earrings through, you may need to get your ears re-pierced.
Part 3 of 3: Ear care after piercing
Leave the earrings in place for 6 weeks. You should not remove the earrings at any time. After 6 weeks, the earrings can be removed, but you must put on new ones right away. Piercing holes usually take 6 months to a year to be completely shaped and not clogged when you do not wear earrings for a long time.
Wash your piercing daily. Use warm salt water to wash your ears. You should use sea salt or Epsom salt instead of regular table salt. The salt will help clean your piercing and prevent infection. Wash the piercing until it has healed (in about 6 weeks). Do not use alcohol with your ears pierced.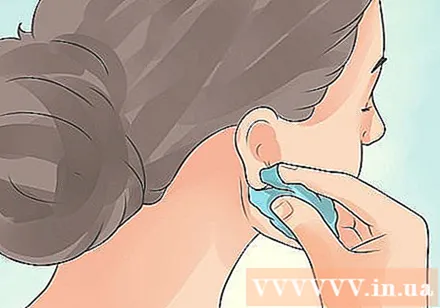
- One simple way to wash your ears is to find a small cup that's about the size of your ear and pour the saline solution into the cup. Place a towel on the bottom of the cup (to catch water overflow). Lie on the sofa and slowly dip your ears in the warm salt water in the cup. Just soak for 5 minutes and you will feel your ears feel right away! "250ml measuring cup type" is suitable for this.
- You can also dip the tip of a cotton swab in salt water to rub around and close to your piercing.
- There are also some new pierced ear wash disinfectants that you can buy at beauty stores. You will also use a cotton swab dipped in the solution to rub around and close to your piercing once a day.
Rotate the earrings while washing. Hold the face of the earrings (the side in front of the ear) and twist so that the pin of the earrings rotates in the ear piercing. This will loosen your ears and help keep them from sticking.
Remove old piercings to wear new ones. You should only replace the new earrings 6 weeks after your ear piercing. Put on new earrings right after removing old piercing and rinsing piercing.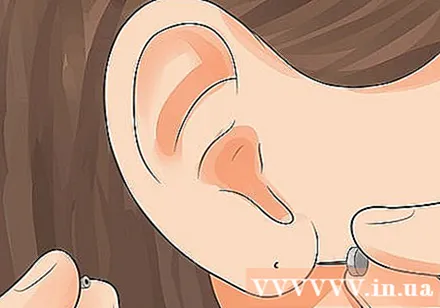
- It is best to wear earrings made of 100% surgical steel, titanium or niobium, as these materials are not as infectious as inexpensive materials.
Advice
- Make sure your sleeping pillows are free from falls. Earrings can become entangled in the fabrics and can be very painful.
- Take Advil or some other pain reliever about half an hour before getting pierced for pain after that. It is thought that pain relievers taken before the piercing of the ear will reduce the likelihood of a blood clot forming at the pierced site. Please consider this risk.
- There is some controversy about whether or not to rotate the earrings often. If not rotated, the earrings may get stuck in the piercing and cause discomfort when you try to remove it. However, rotating the earrings can also cause the wound to heal longer or push dirt into the piercing, creating the risk of infection. If you do decide to rotate the earrings, be careful when doing, and only rotate when washing the ears.
- Don't think of a piercing, because the more you think about it, the more pain you get.
- Anesthetize the ears with ice 5 minutes before the piercing. This will help you with much more pain.
- To clean your ears more thoroughly, you should use a cotton swab to easily wipe around the earrings and reach places that are difficult to reach.
- Do not take aspirin or similar drugs, as they thin the blood and can interfere with the formation of blood clots.
- Try not to scrub, but only dab the solution in your ears when washing.
- Salt water is the best solution for cleaning an ear piercing. Other products like witch hazel, rubbing alcohol and Claire's solution will kill off both harmful and beneficial bacteria. You can also use Dove soap, as it's for sensitive skin.
Warning
- Getting the ear pierced at a professional institution is usually much less effortless than getting it yourself at home.
- Unless you know how to do it, go to a professional piercing shop. Also, do not pierce your ears with an old piercing gun, bandage needle or earrings. The needle does not have a suitable (or safe) material for piercing. Piercing guns cannot be properly disinfected, and old earrings inserted into the ears with strong pressure can destroy tissues in the ear.
- Don't let your piercings become infected! If you accidentally get an infection, do not remove the earrings! If you do this, the infection becomes trapped in the earlobe and leads to many other problems, such as an abscess. Continue to wash your ears with warm salt water. If the infection persists, see your doctor.


