Author:
Charles Brown
Date Of Creation:
8 February 2021
Update Date:
28 June 2024
Content
- Ingredients
- For the basics
- For the topping
- To step
- Part 1 of 3: Making the merengue
- Part 2 of 3: Baking the merengue
- Part 3 of 3: Finishing the pavlova
- Tips
- Warnings
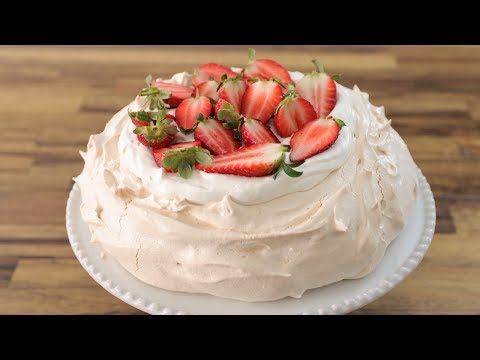
The pavlova is a light, airy merengue topped with whipped cream and sliced fruit or forest fruits. Legend has it that the pavlova was created in honor of the Russian ballerina Anna Pavlova during her visit to Australia and New Zealand sometime in the early 20th century. This creamy dessert is the perfect end to a summer meal. To learn how to make this, go to step 1.
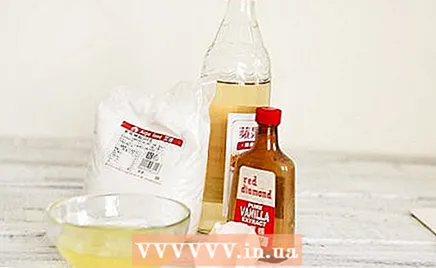
Ingredients
For the basics
- Protein from 4 eggs
- 1 cup of granulated sugar
- 1 tsp. white vinegar
- 1/2 tbsp. cornstarch
- 1 tsp. vanilla extract
For the topping
- 1 cup of whipped cream or crème fraîche
- 1 tbsp. sugar
- 2 cups sliced fruit (such as strawberries or kiwi) or forest fruits
To step
Part 1 of 3: Making the merengue
 Prepare the ingredients. Precisely because Pavlova contains very few ingredients, each ingredient is important. Do not substitute the ingredients for others as the texture of the dessert depends on the chemistry of all ingredients.
  Preheat the oven to 135 ºC. Place an oven rack in the bottom part of the oven, not all the way at the bottom but below the middle part.
  Prepare a baking tray and place a large sheet of parchment paper on top. Draw the outline of a round baking pan with a diameter of approximately 20 cm. on the baking paper. At a later stage you will spread the meringue mixture inside the circle after which it will be baked.
  Combine the sugar and cornstarch in a small bowl. If you want, you can add a pinch of salt here.
  Separate the egg whites from the yolks. It is very important that the egg whites do not contain a single drop of yolk; this prevents the merengue from stiffening.
 - Make sure to pour the egg whites into a very clean, dry metal mixing bowl. Because water or leftover oil can influence the texture of the merengue.
- Save the yolks for another recipe or make an omelet later.
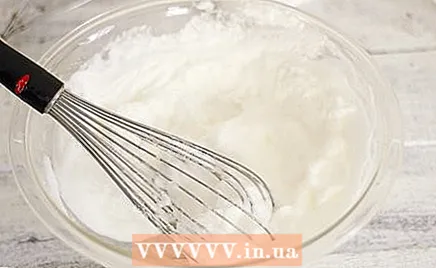 Beat the egg whites. Turn the hand mixer on high for about 5 minutes or beat the egg whites manually with a whisk until soft peaks can be seen.
  Slowly add the sugar mixture, adding a teaspoon at a time until it is finished. In the meantime, keep beating the egg whites until you see stiff shiny buds.
  Add the vinegar and vanilla. Pour the vinegar and vanilla over the peaks and keep beating until well blended. During baking, the vinegar ensures that the merengue remains crispy around the edges and soft in the middle.
Part 2 of 3: Baking the merengue
 Spoon the mixture onto the baking paper inside the circle. Use the back of a spoon to spread the mixture evenly. It should be about the size of a dinner plate.
  Make a small hollow in the center. A pavlova should be round with a small hollow for the cream and topping to enter. It should look like a nest with slightly raised edges.
 - If the shape is elongated rather than round, don't worry - as long as the toppings are left, unusual shapes are acceptable.
 Bake the merengue. Place the merengue in the oven and bake for 60-70 minutes or until crispy. Don't let the merengue get too brown; the color should be cream on the outside when the pavlova is ready.
  Remove the pavlova from the oven and place it on a wire rack to cool. Then put it on a nice plate and prepare for the toppings. Let the merengue cool completely before starting the toppings.
 - There is a tradition that the pavlova should be turned upside down and that the bottom should be decorated because this side is less crunchy. However, sometimes the real reason for this is that small mistakes have been made such as letting the top brown too much. Be that as it may, the crunchiness of the center of the pavlova will soon dissipate from the whipped cream and topping.
Part 3 of 3: Finishing the pavlova
 Prepare the toppings. Beat the whipped cream and sugar until soft peaks form. Cut the strawberries and kiwis or other fruit toppings. If you have time to spare, you can look up the origins of the pavlova and decide for yourself who invented this dish.
  Add the whipped cream. Spread it evenly in the cavity towards the edges of the merengue. Use the whipped cream to cover up any cracks and other imperfections.
 - You can also flavor the whipped cream - try a tsp. vanilla extract, rose water, orange blossom water, lemon extract or almond extract.
- Although whipped cream is traditional, you can also replace the whipped cream with another creamy substance such as custard. Traditional chefs don't like that, but experimental chefs think you can be creative with recipes.
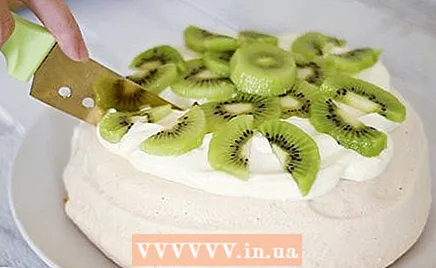
 Place the fruit on top. Place the strawberry or kiwi slices in a nice pattern on the whipped cream. Another popular tradition is to sprinkle a freshly opened passion fruit over the top of the pavlova.
 - Other suitable toppings are a mixture of berries, sliced cherries, apricots, mangoes or peaches, grated dark chocolate or a mixture of chocolate and raspberries.
 Serve the pavlova. The beauty of a pavlova is only for its maker; everyone just wants to eat the pavlova as soon as possible. Don't be surprised how quickly your beautiful creation will disappear.
 Ready.
Tips
- A nice variation is to make this mixture as described here for 4 "mini pavlovas". Simply make 4 small round turrets on the baking tray with a spoon and bake them as described above, but for 50 minutes. These will look like little clouds after baking and have no cavity; best served with a dollop of whipped cream on top and some berry coulis sprinkled over the top (you can also serve the whipped cream on the side). This is a great wedding, buffet or cocktail idea but remember to adjust the quantities of the ingredients according to the number of people you are making this for.
- Use eggs that are at room temperature to beat the egg whites best.
- It is best to eat the pavlova on the day you prepare it; otherwise it will become soggy and quickly absorb the odors of the refrigerator if you leave it in the refrigerator for more than a few hours.
- Australians and New Zealanders love to abbreviate words. The pavlova is often called simply "pav" there.
Warnings
- Never ask yourself at a dinner where both Australians and New Zealanders are openly wondering who invented the pavlova. This will likely add up to a huge discussion.
- Things that can go wrong while making pavlova are: getting too brown due to being left in the oven for too long; burn because you forgot to take the pavlova out in time; or collapse because you opened the oven door prematurely.
- If it is too brown it will probably be tough - but there are those who like it; just put lots of whipped cream and topping on it.
- If it burns you can cut off the burnt piece and spread the remaining pavlova with whipped cream and topping.
- If it collapses, you can also spread it thoroughly with whipped cream and topping. Although the ideal pavlova is symmetrical, balanced and free from imperfections, unless you are a professional chef, it is a recipe where you can make mistakes. And as long as it tastes good, people won't really notice the mistakes.
- If it's completely burned, crumbled, or collapsed, start over. If everything fails, run to the nearby supermarket or bakery - there are often ready-made pavlovas for sale.


