
Content
- To step
- Part 1 of 4: Preparing the rhizomes for planting
- Part 2 of 4: Planting the rhizomes
- Part 3 of 4: Moving the stems out
- Part 4 of 4: Harvesting the plant
- Warnings
- Necessities
Turmeric is a plant that can be harvested to make turmeric powder - a spice with a strong, bitter taste that is somewhat like ginger. To grow turmeric you need to plant a rhizome or rhizome, which is a young stunted turmeric root. Growing turmeric is easy as long as you keep an eye on the rhizome and water it regularly. This shouldn't be too much of a task as the growing process takes place mostly indoors and the plant does not require sunlight. To grow turmeric, buy a few rhizomes from the turmeric plant, plant them in smaller pots or planters, and move them outside after six to 10 months, after which you can harvest them.
To step
Part 1 of 4: Preparing the rhizomes for planting
 Plant your turmeric indoors in late winter. It takes a long time for the turmeric plant to germinate, but luckily you can do this indoors in the winter. The plant also doesn't need light until it starts to germinate, so it won't have to stand in front of the window for five or six months to germinate.
 - In warmer countries, it is possible to plant the rhizomes in the garden to grow turmeric outdoors. This can be done in the winter after the last frost so that the rhizomes sprout in the summer months. However, planting outdoors is not possible if the temperature in winter falls below 10 ° C, and this is therefore not possible in the Netherlands and Belgium.
- If you are planting turmeric outdoors, put it in a container in a greenhouse if possible. The roots of the plant need a lot of space and the plant needs high humidity in order to grow.
 Buy some rhizomes at a market or health food store. To grow turmeric you need to buy turmeric rhizomes. They look a bit like ginger roots and can be bought at most health food stores. Look for rhizomes with a lot of small bumps on the rounded part protruding from the root. These are nodes, and the number of nodes on a rhizome determines the size of the plant.
 - If you can't find rhizomes at a store near you, you can also buy them online.
Tip: if you can't buy turmeric rhizomes from a store near you, go to an Asian food store. Turmeric is a popular ingredient in many Asian and Indian dishes.
 Buy pots that are at least 12 inches deep and 12 inches in diameter. The rhizomes need a lot of space in the pot to grow. Turmeric can reach a height of three feet, so choose a pot that is large enough for the plant as it grows. You can use earthenware or plastic pots or planters just fine.
 - Use a pot or planter with drainage holes in the bottom.
- You can use planters instead of pots if they are the right size and depth.
- If you are planting the turmeric outdoors, consider using a planter to make sure the rhizome has enough space at the bottom to grow. A simple planter with a depth of 30-60 centimeters should be big enough.
 Cut the stem off the rhizome, if it has one. Depending on the type of rhizomes you have purchased, the rhizomes may still be attached to the stem. The stem resembles a thick piece of dried garlic and small hairy twigs can stick out. You can remove the rhizomes by pulling them off if they are dried out. Otherwise, use a knife to cut the stem off the rhizomes.
 - You can cut the rhizomes into smaller pieces if you have smaller pots or planters.
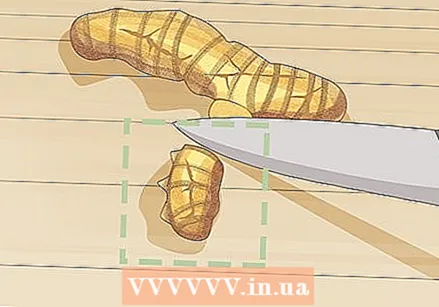
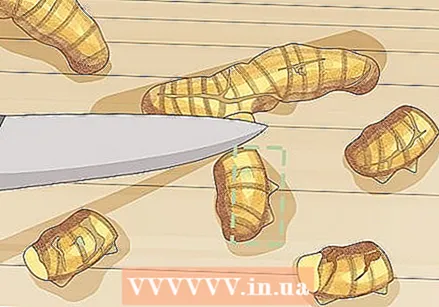 Cut the rhizomes into two to six-inch pieces so that each piece has two or three knots. Look at a rhizome and see how many knots you see. The nodes are the little bumps that stick up from the rhizome. Cut the rhizomes into smaller pieces so that each piece has two or three knots.
Part 2 of 4: Planting the rhizomes
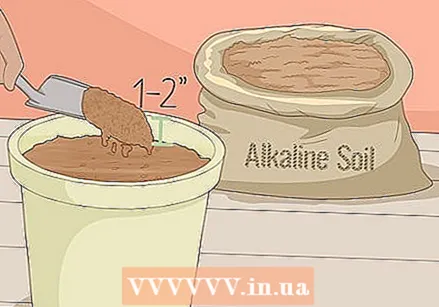
 Fill each pot or planter with eight to fifteen inches of potting soil. Look for a bag of potting soil that is slightly basic and has a pH between six and eight. Put the potting soil in the pot so that the bottom third of the pot is filled. You don't have to press down on the potting soil, but you can move it with your fingers if you want to so that it is flat.
 - The pH indicates how acidic the soil is. Turmeric grows best in soil that is slightly acidic.
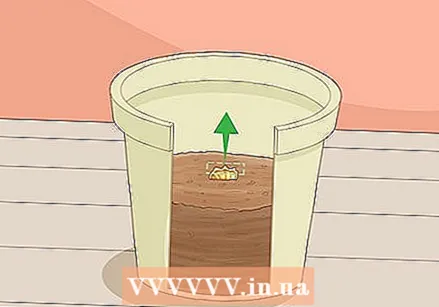 Lay a piece of rhizome flat on the potting soil with the knots facing up. Place a rhizome in the center of the potting soil. Turn the rhizome so that most of the knots are facing up to the opening of the pot. If the knots are on different sides of the rhizome, turn it so that most of the knots are facing the opening of the pot, even if they are angled upward.
 - The stems of your turmeric plant grow out of the knots, so if most of the knots are facing the opening of the pot, the stems will likely grow up towards the opening of the pot.
- Don't worry if a stem grows out of the bottom of the pot or planter. The stem dies because it does not receive sunlight.
 Cover the rhizome with potting soil, leaving three to five inches at the top of the pot. Fill the rest of the pot or planter with potting soil. Tilt the open bag of potting soil over the pot or planter and tilt it down to allow the soil to fall into the pot. Fill all parts of the pot or planter with the same amount of potting compost until you have a little space at the top.
 - Some ancient Asian and Indian methods of harvesting turmeric cover the rhizome with manure, fertilizer or compost. This is not recommended for health reasons.
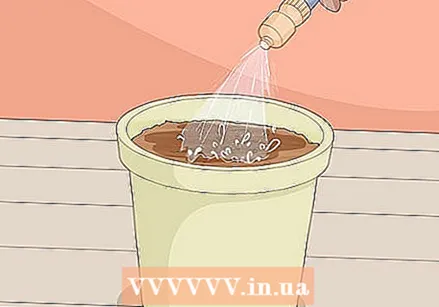 Water the pot or planter thoroughly until the soil is visibly wet. Fill a watering can or large cup with tap water and pour a generous amount of water into the pot or planter until the soil is wet all over. Run water into the pot until the soil is visibly wet. Do this slowly to avoid drowning your rhizome.
 - Make sure your pot or planter is on a saucer if it has drainage holes in the bottom to avoid making a mess.
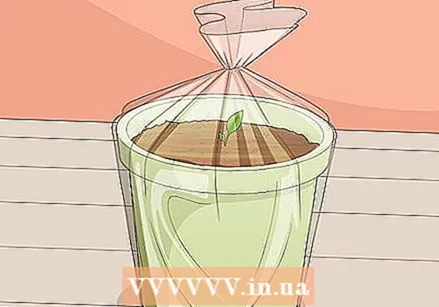 Place the pot or planter in a clear plastic bag. Buy a plant bag or large plastic garbage bag and put the pot in it. Place the jar at the bottom of the bag and fold the bag over at the top so that the opening is slightly smaller. Place the turmeric where you want to grow it.
 - If you are planting the turmeric in your garden, plant it in a greenhouse if possible. If you can't, consider making a small greenhouse for your plants.
- The turmeric can still grow without a plastic bag or greenhouse, but in order for the plant to germinate, it is important that you keep it moist. If you cannot plant the plant in a greenhouse or put it in a bag, spray the turmeric with a spray of water every day.
- You don't have to close the bag. A little ventilation is good to stimulate the growth of the plant.
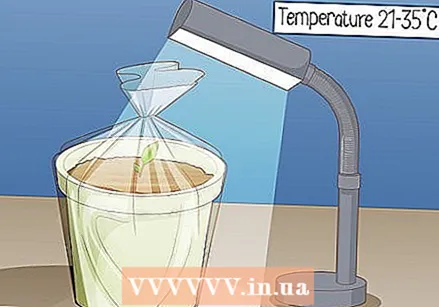 Place the pot or planter in a warm place. The rhizomes of the turmeric plant grow at a temperature between 21 and 35 ° C. If the temperature drops below 10 ° C, the plant may die before it has a chance to germinate.
 - If you don't have a warm place to place the plant, use a heating pad or desk lamp to keep it warm.
- If you don't want to artificially keep the turmeric plant warm and you don't have a good place to put it, put it in a large plastic cooler in a warm place in the house.
- During this part of the growing process it does not matter whether the plant is exposed to light.
 Water the turmeric every two to three days to keep the soil moist. You should water the rhizome regularly, especially when the weather is very hot and the water evaporates quite quickly. Check the turmeric every few days and see if the soil is damp. If the soil is still slightly damp, you can wait another day before watering. Water the rhizomes with tap water until the soil at the top is visibly moist.
 Tip: if it is cold outside or the soil is still wet when you want to water the rhizome, you do not need to water the turmeric immediately. However, if you want to keep the plant moist, feel free to spray it with a water spray.
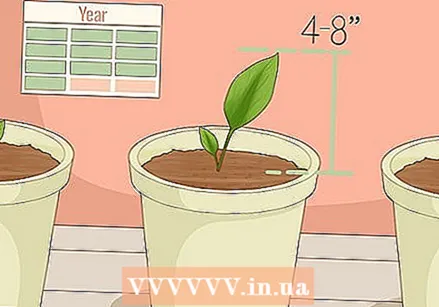 Wait six to 10 months for the turmeric to grow. The turmeric will start to germinate after six to ten months in moist soil in a warm place. When you see a stem sticking out of the pot or planter, the plant starts to grow into an adult plant. Leave the turmeric plant where it is until the stems are 10-20 inches tall.
Part 3 of 4: Moving the stems out
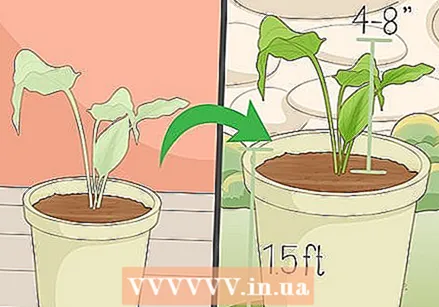 Move the stems to their final pot when they are 10-20 inches tall. When stems are sticking out, move them to a larger pot or planter where they will be exposed to sunlight. To repot a plant, fill the new pot halfway with soil. Dig into the pot with the turmeric plant with your hands to find the rhizome. Carefully remove the plant from the soil and, if necessary, wipe away the top layer of soil. Place plants that you plant in the same pot or planter at least 50 centimeters apart.
 - Use the same soil that you used for planting the rhizome.
- If you grow turmeric in your garden, you don't have to move the plant.
- If you are planting the plant in a planter, dig the hole so that the plant has at least 50 centimeters of space in each direction.
Tip: any pot that is at least twice the size of the original pot should be large enough for your plant.
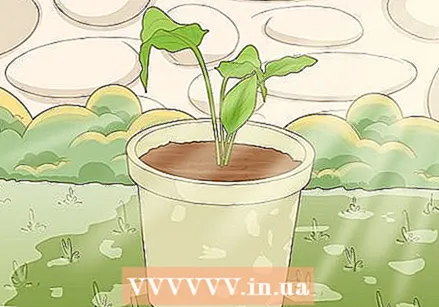 Place the plant in a spot with partial shade if you have planted it in a larger pot or planter. Find a partially shaded spot to avoid burning the leaves as the plant gets used to the sunlight. When you have moved the plant to a larger pot or planter, place it outside so that it can get sunlight and continue to grow. Turmeric doesn't need a lot of light to stay healthy, and placing it in a spot that has shade for at least part of the day will keep the leaves from drying out quickly.
 - You will have to place the plant in front of the window when the outside temperature is below 10 ° C.
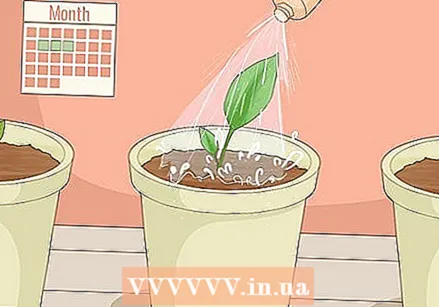
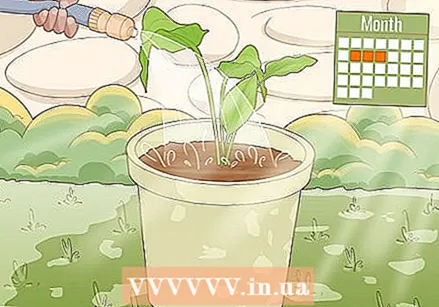 Water outdoor plants every two to three days. Moving the plant outside is important once the leaves have grown, as the plant needs sunlight to grow. Water your plant as often as you did indoors to keep it from drying out. If the plant doesn't get enough water, it will start to die.
 - Spray a fine mist of water on your plant with a garden hose to avoid damaging the leaves.
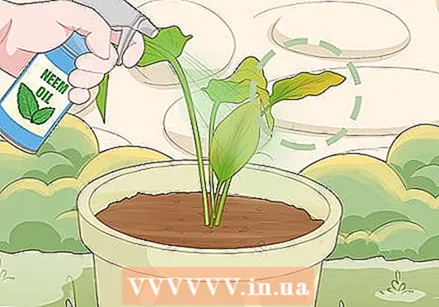 Pay attention to damage and discoloration. If you see that the leaves are damaged in many places, it could be a sign that thrips or caterpillars are eating on your plant. Use a biological pesticide like neem oil or treat the soil with a non-toxic pest control agent. If you examine or remove a rhizome and it is gray or pale in color, it may be that it has been eaten by scale insects. Discard the rhizome to keep the insect infestation from spreading and treat the soil with dimethoate.
 - In regions with a moderate climate, such as in Western Europe, the turmeric plant is often unattractive to many insects. You can even use turmeric powder as a pesticide with some plants.
Part 4 of 4: Harvesting the plant
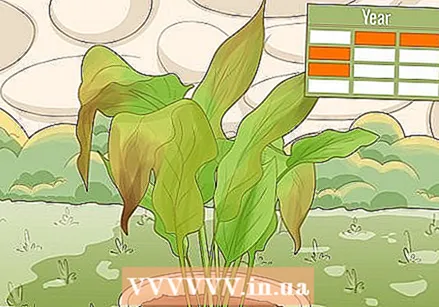 Harvest your turmeric when the leaves and stem start to turn brown and dry. In the next two to three months, the turmeric plant will start to turn brown and dry out. Now is the best time to harvest your turmeric. If you let the plant grow, it will eventually rot and you will no longer be able to harvest turmeric.
 - When the plant hardly absorbs any more water and dries out quickly, it is almost ready to be harvested.
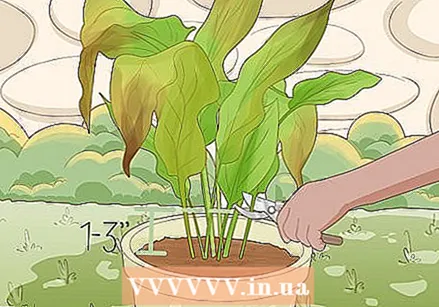 Cut the stems three to eight inches above the plant's soil. To harvest the turmeric, you must be able to reach the mature rhizomes in the soil. To start, trim or trim the stems near the soil with garden shears or a paring knife. Discard the leaves on the compost pile.
 - If the plant is dry enough, you should just be able to break the stems off near the soil.
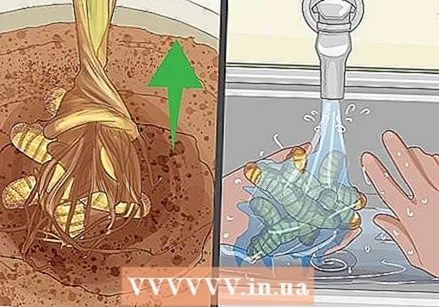 Remove the rhizome from the soil and wash it in the sink. When you have cut the stems, remove the rest of the plant from the soil with your hands. Trim or trim the rest of the stems and rinse the mature rhizome in the sink. Run it under hot water and rub it gently with your hands to remove all dirt and soil.
 - Do not scrub the rhizome. You just need to remove the outer layers of dirt and soil before grinding, using or storing the turmeric.
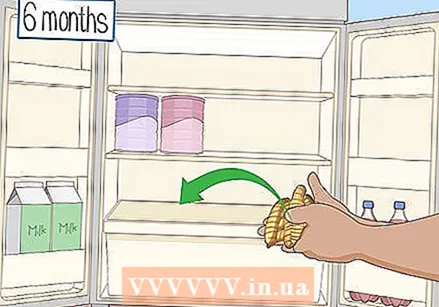 Store mature rhizomes in the refrigerator if you don't plan on using them. Put any rhizomes you don't plan on using in an airtight plastic bag or storage box. You can keep them in the fridge for up to six months without affecting the flavor of the turmeric.
 Tip: if you wish, you can replant the rhizomes after storing them in your refrigerator. If you don't cook or otherwise prepare the rhizomes, you can plant them in the same way as described above.
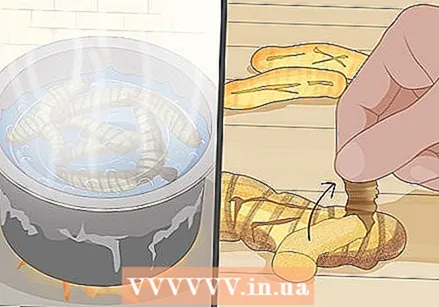 Boil and peel a carrot stick to be able to grind it later. To prepare a rhizome for grinding, boil it in a pan of water. When the water is bubbling, turn down the heat so that the water simmers gently. After 45-60 minutes, drain the pan in a colander or sieve. You can rub the skin off the rhizome after cooking, but you can also leave the skin on.
 - If you can easily poke the rhizome with a fork after cooking, it is ready to be ground.
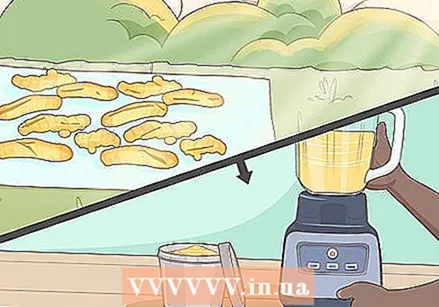 Grind the rhizome to make turmeric powder. Let the rhizome dry out in the sun for several hours. Before making turmeric powder, put on rubber gloves, as the orange powder you make cannot easily be washed off your skin. Cut the rhizome into smaller pieces and grind it in a spice grinder or with a mortar and pestle until you have a fine powder.
 - If you want, you can let the rhizome dry out more quickly in a food dehydrator that you have set at a temperature of 60 ° C. When the rhizome is brittle and dry, you can cut and grind it up. This process usually takes 30-45 minutes.
- Store turmeric powder in an airtight food container for later use.
Warnings
- Do not crush rhizomes that you have treated with a chemical pesticide. Instead, wash them and replant them before using them.
- If your turmeric plant starts to smell while in the house, it could indicate that the rhizome is rotting from too much water.
- Your turmeric plant takes a long time to reach maturity and needs a lot of water to stay healthy. You should not grow turmeric if you know that you will not be home for a long period of time the following year.
Necessities
- Pots
- Planters
- Rhizomes of the turmeric plant
- Potting soil
- Plastic bags
- Cool box (optional)
- Lamp (optional)
- Heat pad (optional)
- Rubber gloves
- Spice grinder or mortar and pestle


