Author:
Janice Evans
Date Of Creation:
26 July 2021
Update Date:
1 July 2024

Content
- Method 2 of 3: Textured bezel
- Method 3 of 3: Hairband
- Tips
- What do you need
- Braided headband
- Textured bezel
- Hair band
- If necessary, use a ruler and tailor's marker to draw stripes before cutting, but the stripes do not need to be perfectly straight.
- For a wide headband, cut into strips 5 cm wide.
- For a narrow bandage, use strips 1 cm wide.
 2 Pull the strips of fabric lengthwise. Grasp the two narrow ends of the strip of fabric and gently pull it out to the sides. Then go to another strip. Repeat this operation with all stripes. As a result, the edges of the fabric will begin to curl and the strips will turn into long tubes. 3 Tape the starting ends of all strips with tape to the table. Align the strips vertically and lay them parallel to each other. You should have two stripes on the left, one in the center and two on the right. Stick the tape across the top ends of the strips to keep them from sliding off the table. 4 Do a five-strand weave with stripes. Take the leftmost strip and slide it over the nearest strip to the right of it. Then take the center strip and slide it over the nearest strip to the left of it. Next, slide the far right strip over the strip closest to it to the left. Then take the center strip and slide it over the nearest strip to the right of it. Repeat these steps until the very end of the weave. 5 Cut the braided strip to fit your head. First measure the circumference of your head, then add an additional 5 cm to it. Trim the weave to this measurement. The extra length is needed to tie the ends of the strips together. 6 Tie the ends of the strips together. Take the end of the first strip from one end of the weave and the end of the first strip from the other end of the weave. Tie the ends with a tight double knot. Repeat the operation for the second, third, fourth and fifth pair of ends. 7 Trim any excess fabric protruding from the knots. Alternatively, they can be included in the weave to hide them. Turn the braided headband over to the other, tidier side so that the knots are inside.
 Method 2 of 3: Textured bezel
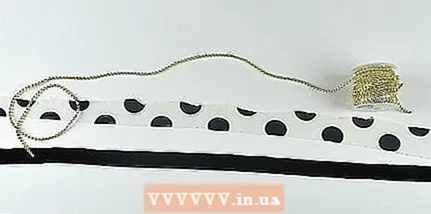 1 Prepare the fabric and ball chain. For bohemian chic, a cotton fabric with a floral pattern is a good choice. For a more eye-catching style, try a colored cord and a strip of leather. Ball chains are available in either silver or gold, so choose the option that works best with your color scheme.
 - The ball chain can be found in the craft store under the beads and beads section. You can also not buy a chain, but take it from some old necklace.
- 2 Open the fabric and cut the chain. Cut out two long strips of fabric / cord / leather, about 1 cm wide and about 75 to 90 cm long.Then cut a piece of ball chain 75–90 cm long.
- If you are using a cord, you will not be able to influence its thickness, so concentrate solely on the length.
- 3 Tape all three pieces to the table with tape. First, lay a piece of chain on the table and make sure that it lies vertically. Then place pieces of other material on the sides of the chain. Secure the ends of the sections with tape so that they do not move.
- If you are weaving a catchy headband, place a cord on one side of the chain and a strip of leather on the other.
- 4 Interlace all three sections together. Slide the left line over the center line, and then slide the right line over the new center line. Repeat these steps until the strip is long enough to wrap around your head (minus 5 cm).
- If the material is too long, trim off the excess. Remember to cut the ball chain with metal pliers.
- 5 Glue the bottom end of the braid to the hair tie. Pass the end of the braid through the hair tie, extending about 1 inch (2.5 cm). Fold the end of the braid and glue it with hot glue or textile glue. The hair tie should be caught in the fabric loop.
- You can also sew on the folded end of the weave.
- 6 Remove the tape from the top end of the braid and do the same operation with it. First peel off the tape from the top end of the braid. Thread this end through the same hair tie, loosening it about 1 inch (2.5 cm). Then tuck and glue in the same way.
- Make sure that the braiding does not twist, otherwise the bezel will turn out to be uncomfortable.
- 7 Wrap the ends of the braid with tape and secure with glue. Cut a small piece of tape 2.5 cm wide. Apply a strip of hot glue to one end of the tape and apply perpendicular to the end of the braid just next to the elastic. Tape the netting tightly in this place and glue the other end of it with glue. This will hide the ends of the braid and give the headband a neat, finished look.
- Repeat this step for the second end of the braid.
- It is best to use a black ribbon, but you can also match the ribbon to the color of the hair tie.
Method 3 of 3: Hairband
- 1 Select a 2.5 cm section of hair behind the ear. It doesn't matter which ear you start with. With the second side, you will do the same.
- This hairstyle works best for people with long hair below the shoulders.
- If you have straight or sparse hair, try adding volume with a texturizing mousse or spray. You can also pre-curl your hair with a curling iron.
- 2 Braid this hair up into a classic braid. Divide the hair section into three equal sections. Keep the strands up as you braid. Secure the end of the braid with a transparent hair tie.
- 3 Repeat the above steps on the other side. You should now have two pigtails dangling behind your ears.
- 4 Comb all the rest of your hair back from your forehead. This will enhance the illusion that you are wearing a real headband. Just run the comb through your hair from the forehead to the back.
- Be careful not to snag the pigtails.
- 5 Flip the braids over your head. Take the left braid and tuck it over your head to your right ear. Take the right braid and also lay it over your head. This time, make sure that it lies next to the first pigtail.
- 6 Secure the braids behind the ears with the bobby pins. They now look like a double braided headband. If necessary, style the loose hair so that it hides the hairs underneath.
- 7 Loosen excess braids if desired. At this stage, the braids can be left as they are. However, for a cleaner look, remove the transparent elastic from the braids and loosen your hair until it is invisible.
Tips
- Use bobby pins that match your hair color.If you can't find suitable invisibility, paint them in the desired color with nail polish.
- If you are using tape, you can burn the ends with a lighter to keep them from opening.
- The amount of material you need depends on the girth of your head.
- If you have short hair but want a headband, try using hairpins.
- If you're going to braid a headband out of your hair, try dyeing the strands with chalk first to add some color.
What do you need
Braided headband
- Old T-shirt
- Fabric scissors
- Disappearing fabric marker and ruler (optional)
Textured bezel
- Patterned cotton fabric
- Ball chain
- Fabric scissors
- Metal nippers
- Scrunchy
- Textile glue or hot glue
- Ribbon 2.5 cm wide
Hair band
- Transparent hair ties
- Invisible
- Comb-brush
- Texturizing spray or hair mousse


