Content
- To step
- Method 1 of 5: Install Java manually (method without RPM)
- Method 2 of 5: The manual RPM method
- Method 3 of 5: Install Java in Ubuntu using menu driven package manager
- Method 4 of 5: Installing Java in Ubuntu with a command window
- Method 5 of 5: Ubuntu OpenJDK 6 method via command window
- Tips
With Java it is possible to create applications that run on Mac OS-X, Linux and Windows (to name just a few operating systems) without the need for customization. You can install Java on any GNU / Linux machine without any problem, and there are ways to do this that are suitable for all users regardless of technical knowledge. Just because you have a Linux computer doesn't mean you should miss out!
To step
Method 1 of 5: Install Java manually (method without RPM)
This is the common method that also works with GNU / Linux clones that do not support RPM. You do not need administrator rights and it is possible to install multiple versions of Java on the same computer.
 Download the JDK.
- Click on the "Download" link above the Java Platform (JDK) 7u9.
- Accept the license and proceed.
 Select the right download option. Under "Product / File Description" choose the corresponding Linux option. For example, if you are running Linux x86 (32-bit), choose the corresponding “ *. Tar.gz”.
  Download the file as .gz. Save it on your GNU / Linux machine.
  Switch to the directory where you saved the file. There is no need to have root rights, and you just need write access to the folder where you want to install Java. If your administrator does not cooperate, you will probably have to install Java in your home directory, or (better still), on a shared network location
  Extract the file. You can do this in your home folder, for example. Extracting will create a folder named “jdk1.7.0_09”. Java is now installed.
 - The installed Java JRE is quite independent and can easily be removed or moved to another location simply by copying the files.
- You can install multiple different JREs this way: they can coexist and be used, should some software require an older version to run.
 Start Java. The Java executable file you need to run is located in a subfolder called "bin." This installation method does not configure a standard Java command for you - you will have to do this manually, or always include the full path in your startup script.
Method 2 of 5: The manual RPM method
This seems to be a more "civilized" way to install Java, as the installer looks at the various dependencies on certain system libraries that may be missing. However, different versions are not simply supported with this method and with some systems that support RPM it may even not work. (Although current Java installations can operate quite independently and usually still meet the minimum system requirements.)
 Download the JDK.
- Click on the "Download" link under Java Platform (JDK) 7u9.
- Accept the license and proceed.
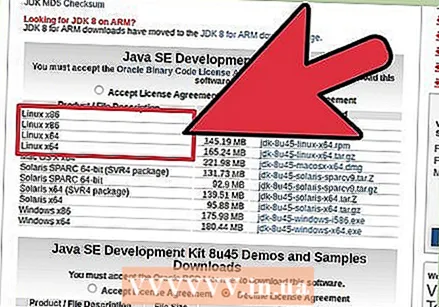 Select the right download option. Under "Product / File Description" choose the correct Linux option. For example, if you are running Linux x86 (32-bit), you will need the corresponding “ *. Rpm” version. So for example: “jdk-7u9-linux-i586.rpm”.
  Download the .rpm file. Save it to your GNU / Linux machine.
  Log in as root and go to the directory where you saved the file. Or become root by running su and entering the superuser password.
 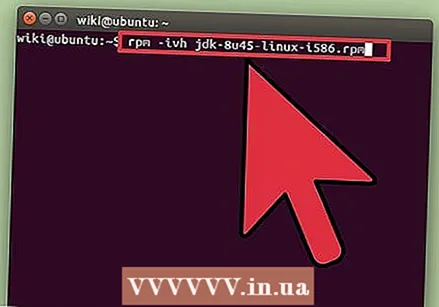 Install the RPM file. Type rpm -ivh filename.rpm, at which filename is the name of your .rpm file. (Such as: jdk-7u9-linux-i586.rpm).
 - You may get a message that the program “rpm” is not installed.
- If so, “rpm” is not installed. You may need to install it by entering sudo apt-get install rpm. Enter your password and you're done.
 Create symbolic links. If you want to run this version of the Java interpreter or compiler from any directory on your GNU / Linux system, you will need to create a few symbolic links:
 - sudo ln -s -v jdk1.7.0_09 / bin / java / usr / bin / java
- sudo ln -s -v jdk1.7.0_09 / bin / javac / usr / bin / javac
- Note that using this method to install may prevent certain dependencies from working. It is better to use the package installer so that it handles all the dependencies for you, because you will not be able to use Java properly if these dependencies are not set properly.
Method 3 of 5: Install Java in Ubuntu using menu driven package manager
 Open a package manager. You can use Synaptic or Adept Manager for this.
 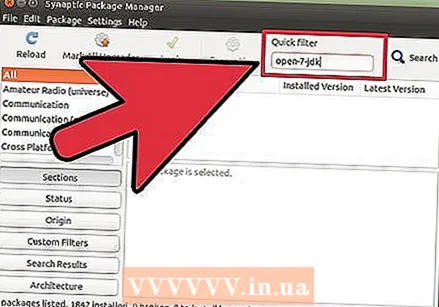 Install Open JDK. Java JDK and JRE cannot be installed with a menu driven Package Manager. Instead, you will have to install Open JDK.
 - Search for openjdk-7-jdk.
- Select openjdk-7-jdk to install. Depending on your package manager, you may be asked if you want to install the required dependencies or they will be installed without your permission. For example, the file "openjdk-7-jre" is pre-selected by Synaptic Package Manager. If you want to use Java as a plug-in for your browser, you will also need to install "icedtea-7-plugin".
 Apply the changes. Click the button to apply the changes. Depending on the package manager, a pop-up window will appear asking if you want to confirm the changes.
 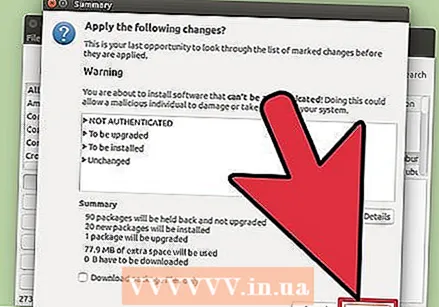 Wait for Java to finish installing.
Method 4 of 5: Installing Java in Ubuntu with a command window
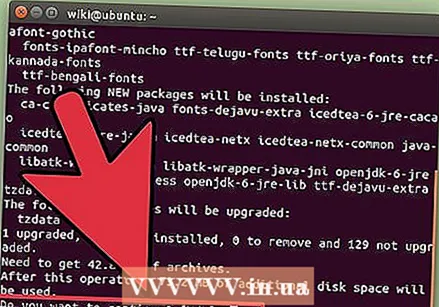
 Enter one of the following commands in the command window (terminal):
- sudo apt-get install openjdk-7-jdk openjdk-7-jre (if you don't want the browser plug-in)
- sudo apt-get install openjdk-7-jdk openjdk-7-jre icedtea-7-plugin (if you want the browser plug-in)
- apt-get automatically handles the dependencies and makes an overview of the changes for verification.
 Type y to confirm the installation.
Method 5 of 5: Ubuntu OpenJDK 6 method via command window
Ubuntu no longer supports the Oracle Java package, but it does support OpenJDK.
 Type one of the following command lines into your command window (terminal):
- Don't want a browser plugin, sudo apt-get install openjdk-6-jre.
- Do you want a browser plug-in, sudo apt-get install openjdk-6-jre icedtea6 plugin
- Do you work on a server without graphics, and you want an environment that is only intended for running server applications (such as Tomcat or Glassfish), sudo apt-get install --no-install-recommends openjdk-6-jre-headless
- If you need the full JDK (for writing Java programs): sudo apt-get install openjdk-6-jdk
- apt-get automatically handles the dependencies and makes an overview of the changes for verification.
 Enter y to confirm the installation.
Tips
- Although this is a bit unfamiliar to you, the console method (the one with the command window) is actually easier than the method with menus.
- If you find a how-to specific to your distribution, you better use it, as some distributions already include Java in the software library (which you can use).
- It is much easier to install from the repositories / libraries than from the download from the Oracle website.
- Another tip to track the progress of the rpm installation is to use "rpm -ivv ..." which turns on the verbose output and gives you more info on the installation process. You can do the same with the other rpm actions to let rpm know a little bit more about what's going on.
- In Red Hat 8.0 Linux, you can start a Nautilus file manager. Go to the directory and click on the name of the rpm file. Activate the installation process. This no longer works in Fedora Core 4 (other FC versions have not been tested). In that case you will get a warning stating that the file is not executable (not executable), when in fact the content of the file is "executable".


