Author:
John Pratt
Date Of Creation:
10 April 2021
Update Date:
1 July 2024

Content
If your computer came with a version of Windows XP installed, but without an installation disc, you may be wondering how to reinstall the system in case something goes wrong. Fortunately, you can create a Windows XP installation disc from the files on your hard drive. Follow the guide below to learn how.
To step
Method 1 of 2: Create a folder for Windows XP
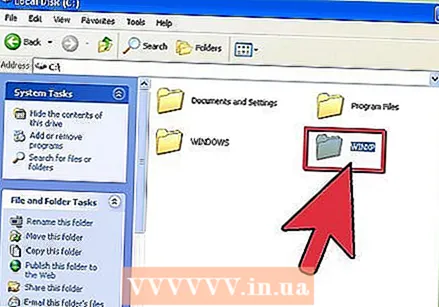 Create a new folder. For simplicity we call it WINXP and place it in the root directory of your hard drive. You should now create a folder “C: WINXP ”. This folder temporarily houses the entire Windows installation files.
 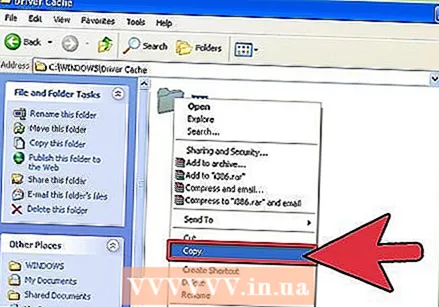 Copy the installation files. To create a bootable installation disc from the Windows folder, you need an i386 folder on your computer. You can find this in the root of your hard drive. The location is usually C: i386 .
 - Copy this folder to the WINXP folder you created earlier. Make sure to copy and NOT move the files. You do this by right-clicking on the folder named i386 folder and selecting Copy. Go to the WINXP folder, right click and select Paste. The files will now be copied. Depending on the speed of your computer, this can take a few minutes.
- After copying you now have a folder i386 folder in the WINXP folder. The directory should now look like C: WINXP i386 .
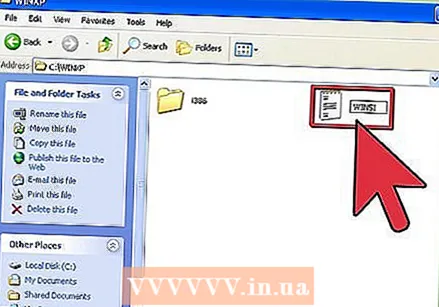 Create the text file for Windows. Navigate to the WINXP folder and right click in the window. Select New then Text Document from the submenu. This will create a new text document in the WINXP folder. In the document, type “Windows” without the quotation marks, followed by a single space. Press Enter once.
 - Click Save and make the file name “WIN51”. Now include the quotation marks to make sure the file is saved without an extension.
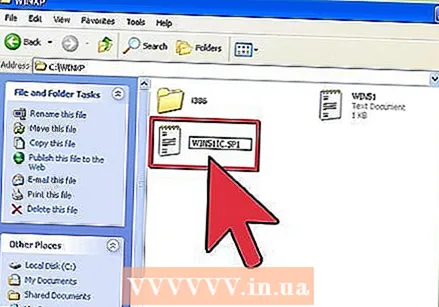 Choose the correct files to copy. Depending on the version of Windows installed, you may or may not have to copy certain files. All files you create should be in the WINXP folder.
 - XP Home: Make a copy of the WIN51IC.
- XP Home SP1: Create the above file together with the WIN51IC.SP1 file
- XP Home SP2: Create the above files together with the WIN51IC.SP2 file
- XP Home SP3: Create the above files together with the WIN51IC.SP3 file
- XP Pro: Make a copy of the WIN51IP file above.
- XP Pro SP1: Create the above file together with the WIN51IP.SP1 file
- XP Pro SP2: Create the above files together with the WIN51IP.SP2 file
- XP pro SP3: Create the above files together with the WIN51IP.SP3 file
 Slipstream the latest update to XP. If you have ever downloaded a Service Pack for Windows XP, you will also need to download the installation. This is because even though the system has been upgraded by installing the Service Pack, it does not mean that the installation file has also been modified.
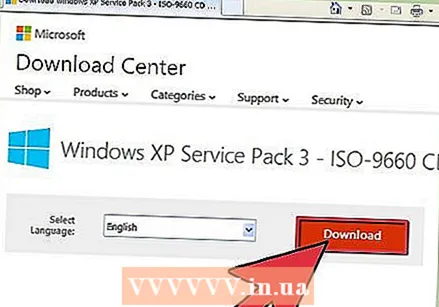
 - Download the Service Pack from Microsoft. Make sure to download the most recently installed SP. This article assumes you want to slipstream SP3. Rename the file to XPSP3.EXE and place it in the root of your C: drive for easy access.
- Open the command prompt (the command window). Click Start and select Run and enter “cmd” in the text field. Hit Enter. This will open the command window. Type the following command and press Enter:
C: XPSP3.EXE / integrate: C: XPSETUP
Method 2 of 2: Burn the disc
 Download the Windows boot sector. You can legally and free download the boot sector online at various places. Make sure you do this from a trustworthy source, and that you download a boot sector for Windows XP in the correct language.
 - Place the boot image in the root of drive C :. This is usually called w2ksect.bin. This is required when burning the disc.
 Download and install ImgBurn. There are several free programs available for creating a bootable disk. This guide assumes that you are using ImgBurn. You will have to adjust the settings of the program before burning.
  Adjust your settings. Open ImgBurn and switch to Build mode. In the output menu you can choose whether you want to burn a blank disc or create an image of your hard drive.
 - Drag your WINXP folder into ImgBurn.
- Select the Options tab. Change File System to ISO9660 + Joliet. Make sure Recurse Subdirectories is enabled.
- Select Advanced and then Bootable Disc. Check Make Image bootable. Select None (Custom) from the drop-down list of Emulation Type. Click the folder icon and select the w2ksect.bin file you downloaded earlier. Change Sectors To Load from 1 to 4.
 Click the Write / Build button. Confirm the changes you have made in the settings. Give the disk a suitable name. The burning process will now begin. How long this takes depends on the speed of your CD burner. When the process is finished, your CD will work just like a regular Windows XP installation disc.
Tips
- Adjust the settings in ImgBurn exactly as described above. If you are using a program other than ImgBurn, you will need the same settings to make a working CD.


