Author:
John Pratt
Date Of Creation:
13 April 2021
Update Date:
26 June 2024
Content
If you plan to sell your computer, it is a good idea to delete the partitions on your computer's hard drive so that it is back to the factory default. By deleting the partitions on your hard drive, the hard drive can be used as one large storage space again. This description only works for Windows 7 and newer. If your operating system is older, you will need to download a program to manage your hard drive. For Mac, this guide should work for all versions of the operating system.
To step
Method 1 of 2: Windows
 Back up any data on the partition that you want to keep. Before de-partitioning your hard drive, you must first delete all data from that partition. See the article on backing up your data for a full explanation.
  Open the Windows disk management utility. This program is standard on your Windows computer. In this utility you can see all drives of your computer and their partitions. Open the utility in one of the following ways:
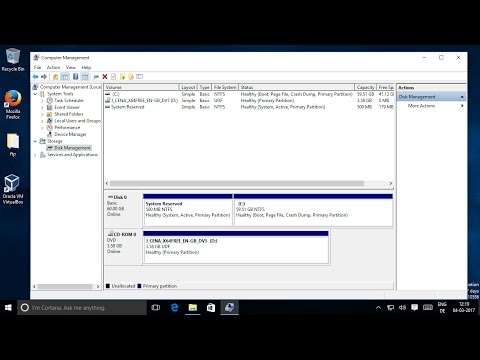
 - Press the start button, type "compmgmt.msc" in the search field and press enter. Select "Disk Management" from the list of options on the left side of the "Computer Management" window.
- Open Disk Management directly by pressing the start button, typing "Disk Management" and pressing enter. The Disk Management window should now open.
 Delete all data from the partition. In the Disk Management window you will see a list of disks, ascending from Disk 0. The partitions of each disk are lined up horizontally next to the disk.
 - Right-click on the partition you want to delete and then click "Delete Volume" in the menu. Look for the name you gave the drive when you partitioned the disk. This will delete all data from this partition. This is the only way to de-partition a drive.
- For Windows 7 or Vista users: Right-click on the same partition and select "Delete Partition" from the menu.
- The partition is now referred to as unallocated space. The partition should now be marked with a black bar at the top, instead of a purple bar in front of the other partitions.
- Right-click on the partition you want to delete and then click "Delete Volume" in the menu. Look for the name you gave the drive when you partitioned the disk. This will delete all data from this partition. This is the only way to de-partition a drive.
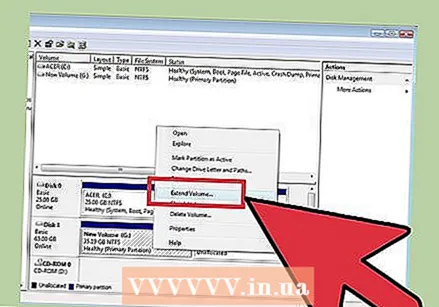 Return the space to the original station. By returning space to the original drive, you remove it from the partition. The original drive is basically absorbing the partition. If the partitioned drive is C, right-click on C and select "Extend Volume" from the menu.
 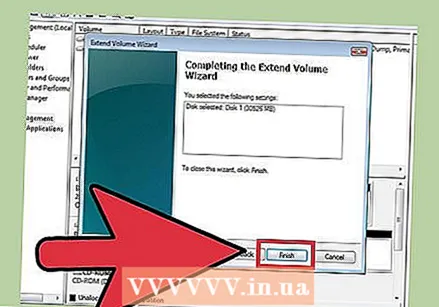 Extend the volume of the drive with the Volume Expansion Wizard. This wizard opens automatically when you click on "Extend Volume".
 - Keep clicking "Next" to move through the wizard. Finally click on "Finish".
 If everything went well, the partition will no longer be visible. Your original drive is no longer partitioned and all space on that drive is now available.
Method 2 of 2: Mac
 Back up any data on the partition that you want to keep. Before de-partitioning your hard drive, you must first delete all data from that partition. See the article on backing up your data for a full explanation.
  Open the Disk Utility. This utility can be found by opening Finder and searching for "Disk Utility" in the search bar.
  Find and click on the correct drive. In the list of drives on the left side of the window, find the drive that contains your partition. If you have not added storage space to your computer, you will only see one hard drive here. The different drives are listed under each disk, so find the disk with the drive you want to remove.
 - Click on the name of the disk, not one of the drives under that disk, such as "Main".
 Click on the "Partition" tab. You will see five tabs at the top of the main part of the window. Click on the tab labeled "Partition". It should be between "Erase" and "RAID".
 - After clicking you will see a heading "Partition Information" under the tabs.
 Select the partition. Under the heading "Partition Layout" you will see the different partitions on the disk as white blocks.
 - After clicking there should be a blue border around the block.
 Click on the minus sign below the blocks. In the dialog box, click "Delete".
 - Again, make sure you have backed up any data you want to keep. This step removes all data from the partition.
 Enlarge the block titled "Head". You should now see an empty gray space where the partition used to be. Click on the three diagonal lines in the lower right corner of the "Head" block and drag the boundary all the way down. As you drag, you will see the size of the station increase.
  Click "Apply" in the lower right corner of the window. Then click on "Partition" in the dialog box.
 - This step may take a while, depending on the amount of data on the drive. The drive will now be reformatted, so give your computer some time.
Tips
- If the partition was created in Mac using Boot Camp, you may encounter problems deleting the partition. In this case, look for a partition manager for Mac.
- Make sure to back up all your important data first.
Warnings
- Deleting a partition also erases all data on that partition.


