Author:
Robert Simon
Date Of Creation:
22 June 2021
Update Date:
1 July 2024

Content
- To step
- Method 1 of 5: Create a Venn diagram
- Method 2 of 5: Create a T table
- Method 3 of 5: Create a flowchart
- Method 4 of 5: Create a summary chart
- Method 5 of 5: Display a cycle
- Tips
- Necessities
Graphic organizers are tools used to make sense of information. They are often used in schools to explain concepts. Graphic organizers help compare and contrast, summarize information, build timelines, and show relationships. There are a few graphic organizers that are more common and commonly used.
To step
Method 1 of 5: Create a Venn diagram
 Draw a circle on a blank piece of paper. It is best to lay the paper horizontally so that you have enough space to draw.
 - If you use a compass to draw the circle, it will be even and neat. If you are using a compass, gently hold both legs of the compass to avoid pushing the end of the pencil outward, making your circle larger and uneven.
- Draw the circle on one side, not in the center.
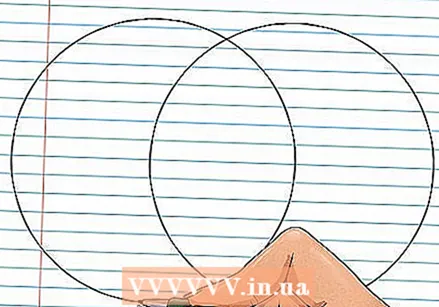 Draw a second circle overlapping the first in the center of the paper. For example, if you draw your first circle more to the right, then this circle should be more to the left, while still overlapping the first.
 - Keep your compass on the same setting so that the two circles are the same size.
 Check that there is enough space to write on both sides of the circles and where they overlap in the middle. If you don't have enough space, the best thing to do is erase things up and start over, or take a new sheet of paper and draw larger circles on it.
  Use the Venn diagram to compare and contrast two things. At the top of each circle, write the things you are comparing, such as books, people, movies, animals, etc. Where the circle overlaps in the middle, write "Both".
 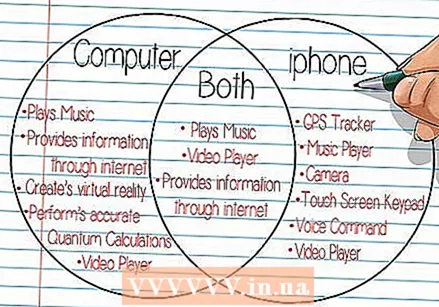 Contrast the two things in the outer circles and compare them where they overlap in the middle. In each of the outer circles, you write data about each thing that makes it distinctly separate and different from the other thing. In the middle, write the information that these two things have in common.
Method 2 of 5: Create a T table
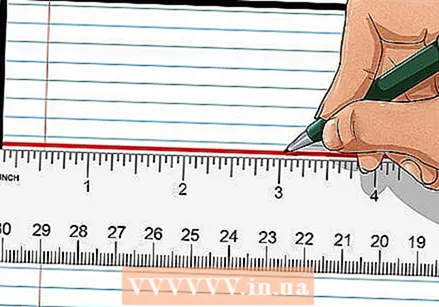
 Draw a vertical line in the center of your paper. Use a ruler to keep the line straight and draw the line from top to bottom.
 - It doesn't matter if your paper is vertical or horizontal - it is your preference based on how much space you would like to have for writing the data.
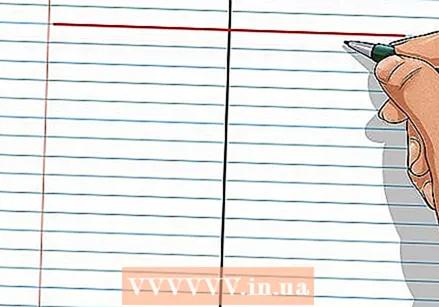 Draw a second horizontal line on the paper so that it intersects with the vertical line. With your ruler, measure about 1–2 cm from the top, leaving room to write headlines at the top of each column.
  Write a heading at the top of each column, in the small space you left between the top of the page and the horizontal line. The T graph is used to compare and contrast things, so you write the two things you are comparing in each header. Examples of things to compare are:
 - Computers
- Smartphones
- Stories
- People
- Cities
- Nations
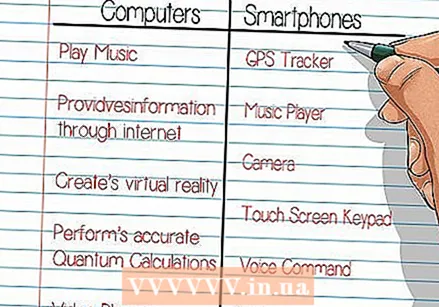 Write down data on every thing that makes it different from the other. Use bullets or numbers to organize your list. Place the data in the correct column.
 - There is no column or space to write what the two things have in common, as in the Venn diagram above. You just indicate how the two things differ.
- For example, you could state how the United States is different from Australia.Under the heading "United States" you would list information such as population size, number of states, constitution and other relevant information. Then you could list the corresponding information about Australia under the heading "Australia".
Method 3 of 5: Create a flowchart
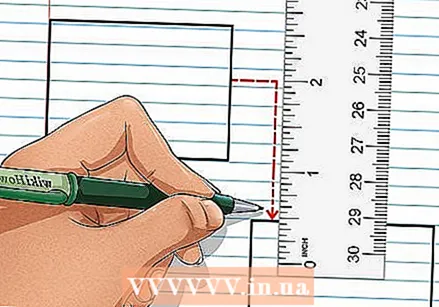
 Draw a box in the top left corner of your paper, which should be horizontal. Use a ruler to help you draw straight lines, making each square about 2 inches (7 cm)
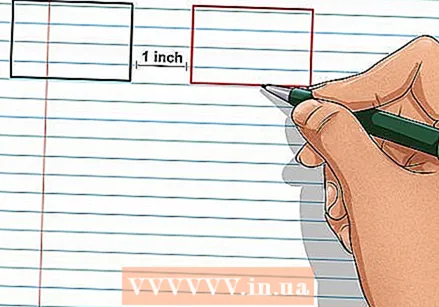 Leave 2-3 cm space to the right of the box, then draw an identical box in the center of the page (7 cm
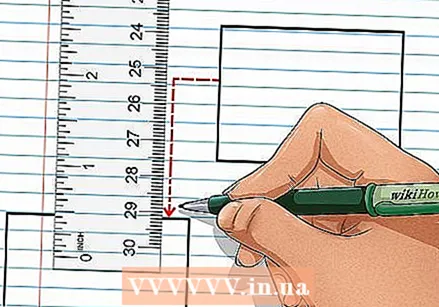
 Measure another 2 cm to the right of the middle box, and complete the top row by drawing a third box with identical dimensions (7 cm
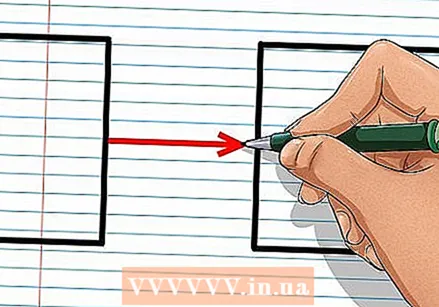 Draw arrows to the right in 2-3 cm space between the boxes, pointing from left to right. You should have an arrow pointing from the left box to the middle box and then from the middle box to the right box.
  Number the left box "1", the middle box "2" and the far right box "3". Keep the numbers small, because you will be writing more data in these boxes.
 - Write the numbers in one of the corners of the boxes, such as the top left corner. You can create an extra small box around the numbers to separate them from the text that will be written in them.
 Go to the bottom of the page and draw three 7 cm boxes again
 Draw left arrows between the boxes going from right to left. Draw an arrow to the left from the right box to the middle box and then from the middle box to the left box.
 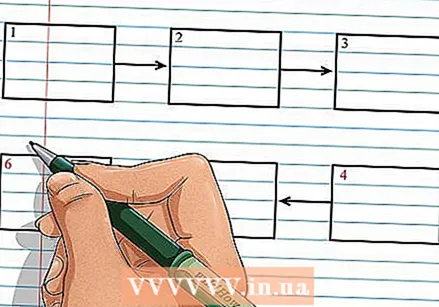 Number the right box "4", the middle box "5" and the left box "6". Don't forget to keep the numbers small so that you leave room to write in the boxes.
 - Again, you can draw small boxes around the numbers to separate them from the text that will be written in them.
- Write the numbers at the same angle as the top row so that the chart is consistent.
- The top row reads "1" to "3" from left to right, and the bottom row "4" to "6" from right to left.
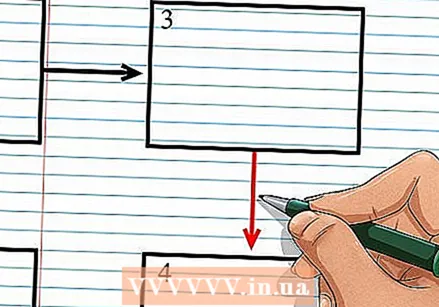 Draw an arrow vertically down from box 3 to box 4. This indicates that the diagram should be read down to the right of it and not diagonally.
 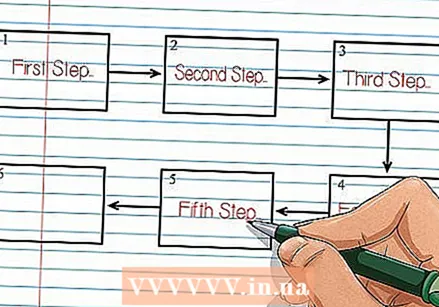 Fill the boxes with information about a series of events or timeline. Flow charts are extremely useful for examining a sequence of events and seeing how one thing leads to another.
 - In this way, depict events in a story, such as the complications leading up to the climax.
- Show how to do something, in the order of "do this first, then do it, etc."
- Significant events in a war or a historic moment, such as the major events of the American Revolution that led to its end.
Method 4 of 5: Create a summary chart
 Draw a large rectangle on paper. The paper can be vertical or horizontal, depending on your preference.
 - You can draw the rectangle just inside the edges of the paper so that it is almost the same size as the paper. For example, you have beautiful, large subjects in which you can write summary information from a story, book, textbook or other reading passage.
- Use a ruler to make the rectangle so that the lines are straight.
 Decide how to divide the rectangle into five rows of the same size. Take the height of your large rectangle and divide it by five to get an estimate of the height of each row.
 - For example, if your paper is vertical, you can divide 12 inches by 5 to get 6 inches for the height of your rows. If the paper is horizontal, divide 20 by 5 and each row will be 4 cm high.
 Measure from the top of the rectangle to the correct distance you found in step two. Make a small horizontal mark with your pencil at that position.
 - Then you need to rotate the ruler horizontally so it's parallel to the top of the large rectangle, and draw a line across the width of your rectangle. It should be perpendicular to the sides of the rectangle.
 Place the end of your ruler on this new line and measure the distance from step 2 again. Then repeat the process of marking a small horizontal line at the correct distance and drawing a horizontal line across the width of your large rectangle.
 - You now have two of the five rows you need for your overview map.
 Measure the distance of step two from the bottom of your second row and make a third small horizontal mark. Draw a line horizontally along your ruler so that you have a third row across the width of your rectangle.
  Place the end of your ruler on the line along the bottom of your third row and measure the distance from step two one last time. Make a horizontal mark at that distance and draw your line across the width.
 - This last line separates row 4 and row 5. You should now have five rows of the same size across the width of your rectangle.
- Do your best to measure each row to the correct size with your ruler.
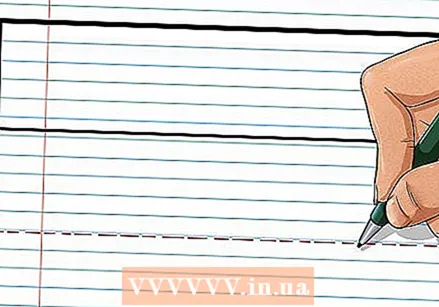
 Measure 2-3 cm from the left side of the rectangle and make a small vertical mark with your pencil. Then use your ruler to draw a line vertically from the top of the rectangle to the bottom at that mark 2-3 cm away.
  Write categories to summarize in the vertical 2-3 cm column on the left side of the overview map. You can use this summary table to summarize a passage in a story, book, or non-fiction. Here's an easy way to summarize most stories or articles so you can write each of them in one of five boxes along the narrow vertical column on the left:
 - Who?
- What?
- When?
- True?
- Why?
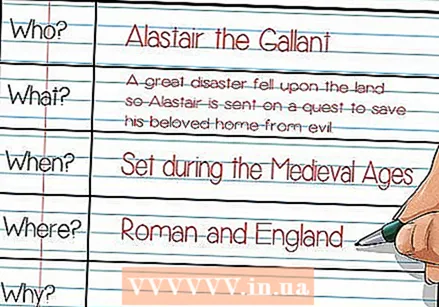 Fill in the rows next to each category with the data from the story or passage that answers that question. You can use bullets, numbers or full sentences.
 - For example, next to "Who" you write the person, people or characters involved. In addition to "Where" you write the setting of the story or where the article takes place. Write the date or time period next to "When". Then, next to "What", you can describe what happened, such as an important plot or the topic of a news article. Finally, next to "Why" explain why that event happened, according to the information in the story, article, etc.
Method 5 of 5: Display a cycle
 Draw a 7x7 square on a sheet of paper laid out horizontally. Place the square about 3-5 cm from the top of the paper, in the center of the width of the paper (there will be a good 10 cm on either side of the square).
 - Use a ruler to draw straight, even lines.
 Move about 1 cm to the right side of the square and then about 5 cm down. Use your ruler to measure these distances.
 - Draw another square of the same dimensions (i.e. 7x7) in this new spot.
- This square should be drawn directly to the right and slightly down from the first square, as if it were a step to the first square.
 Go 1 cm to the left of the first square and then down about 5 cm. Draw a third square with the same dimensions as the previous one using your ruler.
 - This square should also be just off the left side of the first square, also as a step to the first square. The three boxes together should resemble a pyramid shape.
 Draw a curved arrow to the right from the top square to the right square. Then draw a curved left arrow from the right square to the left. Finally, draw a curved right arrow from the left square back to the top square.
 - The three squares should now be connected in a "circle" by the three curved arrows. All arrows of the circle must point clockwise.
 Fill the squares with information about a cycle. This graphic organizer shows how a process takes place and then repeats itself over and over again, because that's what a cycle does. You can add more cells to the "circle" if you need to, but the cells will have to be drawn smaller.
 - Water cycle
- Human body cycles (e.g. circadian rhythm)
- Animal migrations
- Solar system cycles
Tips
- Have a goal in mind for your graphic organizer before creating it. Each type of graphic organizer is used for a specific purpose, so make sure you draw the right one for what you need to analyze or learn.
Necessities
- Paper
- Pencil
- Eraser
- Ruler
- Compass


