Author:
Roger Morrison
Date Of Creation:
3 September 2021
Update Date:
1 July 2024
Content
- To step
- Method 1 of 5: Using a USB stick to install an operating system on a PC
- Method 2 of 5: Create a Windows Vista or 7 installation disc
- Method 3 of 5: Create a Windows XP installation disc
- Method 4 of 5: Creating a "USB PC Repair Toolkit"
- Method 5 of 5: Create an installation disc from your USB flash drive for Mac OS X 10.7 or 10.8
- Warnings
Do you have an old USB stick that you no longer use? Make it an installation disc for Windows, Linux or Mac, or a diagnostic tool for your PC. Follow the steps in this article to learn how.
To step
Method 1 of 5: Using a USB stick to install an operating system on a PC
 Open a command prompt window. You can only do this from an account with administrator rights. Right click on it and select "Run as administrator". You may now need to provide the administrator password.
 - With this method you create a bootable USB stick, or a bootable disk. You can then copy an operating system installation disc onto the USB stick to create a portable installation disc.
- This method only works on Windows Vista, 7, and 8.
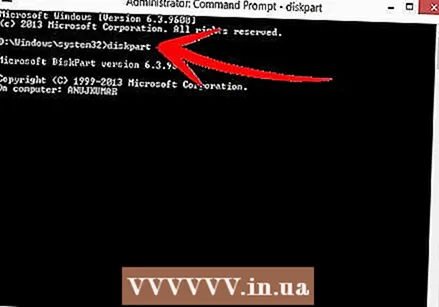 Open the "Disk Management" utility. You open this with the command disk part to enter.
  Display the connected drives. Type the command list disk to display a list of all drives connected to your computer. You should also find your USB stick here. Remember the number listed next to your USB stick.
  Select the USB stick. Type the command select disk #, replacing the “#” with the number listed next to the USB flash drive in the previous step.
 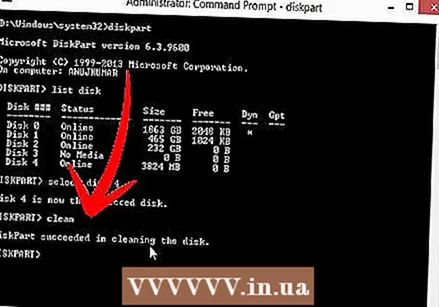 Erase the USB stick. Type the command clean, then the disk management program will check the disk and erase all data that was on the stick.
 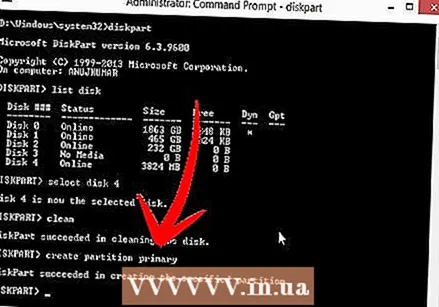 Create a bootable partition. When the USB stick has been erased, type create partition primary. If all goes well, a message will appear that the process has been completed successfully.
  Select the new partition. Type the command select partition 1 and hit Enter. When the confirmation message appears, type active and press Enter. This will activate the partition.
  Format the USB stick. Type the command format fs = fat32. After pressing Enter the program will run for a few minutes (with a 32 GB stick it can even take hours), the progress is displayed with a percentage.
  Assign a drive letter to the USB stick. Type the command assign to assign a letter. Type exit to exit the Disk Management utility.
 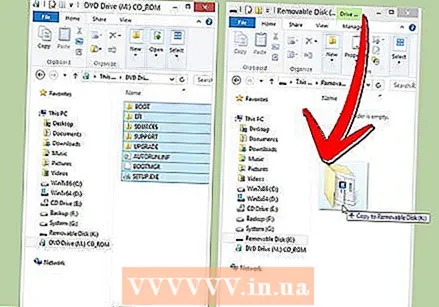 Copy the operating system. Once you have made a boot disk from the USB stick, you can put the installation files of the desired operating system on your stick.
 - Also copy any drivers you might need during the installation to ease the process.
Method 2 of 5: Create a Windows Vista or 7 installation disc
 Create or get the Windows Vista or 7 ISO file. Install software that can burn DVDs, among other things. There are several free programs that you can use to burn DVDs. You need a program that can also create ISO files. If you already have a downloadable ISO file at your disposal by purchasing Windows 7, you can go directly to the next step.
 - Place the Windows 7 DVD in the tray. Open your new software. Look for the option “Copy to Image” or “Create Image”. Select your DVD drive as the source when prompted.

- Save your ISO file. Choose a name and location that are easy to remember. The ISO file will be the same size as the original file you are copying. First, check if there is enough space on your drive.

- Creating the ISO file can take a long time depending on the speed of your computer and DVD drive.
- Place the Windows 7 DVD in the tray. Open your new software. Look for the option “Copy to Image” or “Create Image”. Select your DVD drive as the source when prompted.
 Download the "Windows 7 USB / DVD Download Tool" utility. You can download this program for free from the Windows site. Despite the name, the program also works with Windows Vista ISO files. You can actually use this utility for all versions of Windows.
  Select the source file. This is the ISO file you created or downloaded in the first section. Click on "Next".
  Select "USB device". You can now choose whether to burn a DVD or create a USB device. Select "USB device".
  Select the USB device. Make sure your USB stick is in a USB port. You must have at least 4 GB of free space on the USB stick to be able to copy Windows.
  Wait while the program is running. The program will now format the USB stick so that it can boot properly, then the ISO file will be placed on the stick. Copying can take up to 15 minutes, depending on the speed of your computer.
Method 3 of 5: Create a Windows XP installation disc
- Gather the necessary software and hardware. You need the utilities "USB_Prep8" and "bootsect.exe". These programs, intended for developers, are free to download. You also need a USB stick of at least 1 GB and an installation CD or DVD of Windows XP.
- Insert the USB stick into a USB port and place the CD or DVD in the tray. Close any Windows windows that open automatically.

- Insert the USB stick into a USB port and place the CD or DVD in the tray. Close any Windows windows that open automatically.
 Extract and run the USB_Prep8 program. If you double click on the zip file a folder will be created, start "usb_prep8.cmd" inside this folder. Press any key to format the USB stick with "PeToUSB". Note: In Windows 7 you need to run "usb_prop8.cmd" from a command prompt window, with an account with administrator privileges.
  Start formatting. Do not change any settings in the PeToUSB window. When formatting is complete, leave both windows open and open a new command prompt window by pressing Windows key + R, then type “cmd” in the field.
 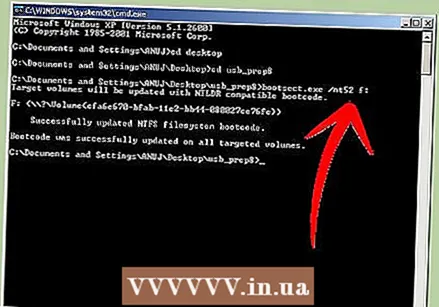 Extract the bootsect program. After that, navigate to the folder of bootsect in the new command prompt window. If you are in the folder bootsect, type “bootsect.exe / nt52 Z:”. Change the letter Z to the letter of your USB stick.
 - You cannot have windows open showing the contents of the USB stick, otherwise the process will fail and you will have to start over.
- Bootsect copies the files needed to boot from a USB stick. When the process is completed, you will get the following message: “Bootcode was successfully updated on all targeted volumes”. Close this window and PeToUSB, but keep the usb_prep8 command prompt window open.
- Adjust the settings of Prep8. When bootsect has finished copying, the usb_prep8 window will display a numbered menu where you can change settings. You have to change the first three settings:
- Press 1 and then Enter. Select the drive containing the Windows XP CD or DVD and press OK.

- Press 2 and then Enter. If you already have a drive on your computer with the letter T, change this option to another letter. Otherwise, you leave it as it is.

- Press 3 and then press Enter. Enter the letter of the USB stick here.

- Press 1 and then Enter. Select the drive containing the Windows XP CD or DVD and press OK.
 Start copying. To do this, press 4 and then Enter. A message will appear stating that this choice will format the virtual disk from the previous menu. Press Y to continue. When formatting is complete, press any key to continue.
 - You will see the files being copied scrolling across the screen. Now press any key again to continue. After a while a window will appear asking if you want to copy the "TempDrive Files". Press Yes and wait about 15 minutes. Then press Yes twice more.

- You will see the files being copied scrolling across the screen. Now press any key again to continue. After a while a window will appear asking if you want to copy the "TempDrive Files". Press Yes and wait about 15 minutes. Then press Yes twice more.
 Start by installing Windows XP. The process has now been completed. Insert the USB stick into the computer on which you want to install Windows XP. Set the BIOS so that the computer boots from the USB stick.
 - When the boot menu opens, select Option 1. Now the installation of Windows XP begins.
- After the computer has restarted, select Option 2 to start the GUI (Graphical User Interface) part of the installation.
- Do not remove the USB stick until the installation is complete.

Method 4 of 5: Creating a "USB PC Repair Toolkit"
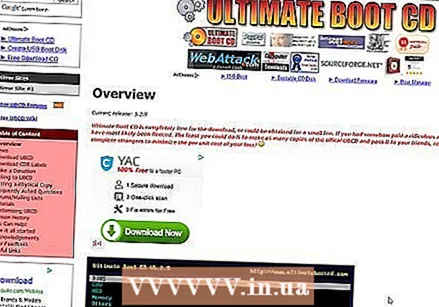 Download the Ultimate Boot CD (UBCD) ISO file. This file can be downloaded for free here. UBCD is a collection of diagnostic tools that can be run before the system is started. It is useful to keep these programs all together on a USB stick. You also need the "Universal USB Installer" program, found here. Put this program in the same folder as the previously downloaded ISO file.
 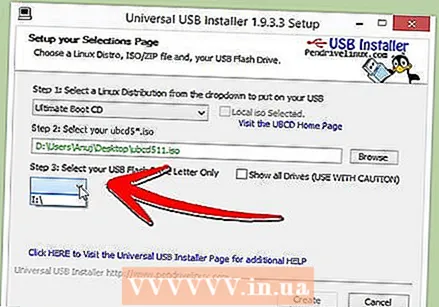 Start the "Universal USB Installer" program. Select "Ultimate Boot CD" from the menu. Select the correct drive letter, that of your USB stick. Click on "Create".
 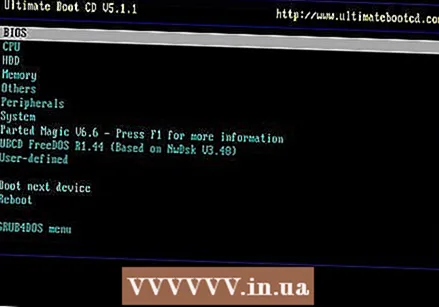 Boot from your USB stick. After the USB stick is formatted, you can boot from the USB stick and run utilities.
Method 5 of 5: Create an installation disc from your USB flash drive for Mac OS X 10.7 or 10.8
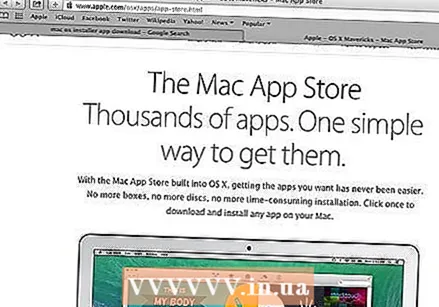 Gather the necessary software and hardware. Your stick must be 8 GB or larger. You also need the OS X installer. Download the program and insert the USB stick into a USB port.
 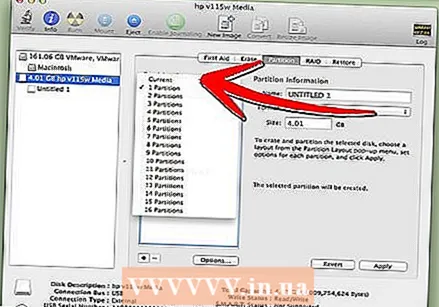 Open Disk Utility. This program can be found in the "Utilities" folder, under "Applications". With this program you can turn your USB stick into a boot disk. Select your USB stick in the left column and open the "Partition" tab. Under "Partition Layout" select "1 partition".
  Select the structure. Click the menu next to "Format" and select "Mac OS Extended (Journaled)". This way you can be sure that the stick can be read by all Macs. Click on "Options" and select "GUID partition table".
  Find the installation file for Mac OS X. This is the app you downloaded from the Mac App Store. You can find it in the folder "Applications". Right click on the file and select "Show Package Contents". Open "Contents" and then "Shared Support". Here you will find a file called "InstallESD.dmg". Drag this file to your desktop.
 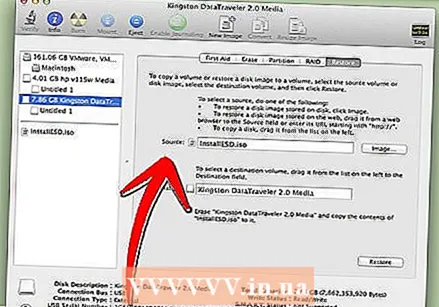 Open Disk Utility again. Click on the USB stick in the left column. Click the "Restore" tab and click the "Disk Image" button next to the "Source" field. Select the file "InstallESD.dmg" on your desktop. As "Target", drag the newly created partition to the field.
  Click on "Restore". You will be asked for confirmation. Click on "Delete" to continue. Depending on the speed of your Mac, it can take up to an hour to complete. After that, you can boot from the USB stick and install Mac OS X the same way you would if you were using a DVD.
Warnings
- Please backup the data on the USB stick before starting the steps as all old data will be erased during the format.


