Author:
Eugene Taylor
Date Of Creation:
15 August 2021
Update Date:
1 July 2024

Content
- To step
- Method 1 of 5: Assess vital signs
- Method 2 of 5: apply CPR
- Method 3 of 5: Continue to do this procedure until the emergency services arrive
- Method 4 of 5: Using an AED device
- Method 5 of 5: Place the patient in the recovery position
- Tips
- Warnings
Knowing how to apply the two methods of cardiopulmonary resuscitation (CPR) to an adult can save lives. However, the recommended method to run cpr has recently changed and it is important that you know the difference. In 2010, a radical change was made to the recommended CPR procedure for cardiac arrest victims after studies have shown that pressure-based CPR (with little mouth-to-mouth resuscitation) is as effective as the traditional approach.
To step
Method 1 of 5: Assess vital signs
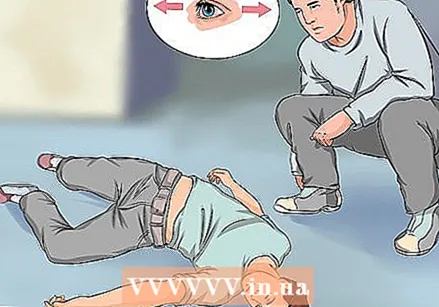 Check the area for immediate danger. Make sure you don't put yourself in danger by applying CPR to someone who is unconscious. Is there a fire? Is the person on the road? Do whatever it takes to get both you and the person to safety.
 - If there is anything that could put you or the victim at risk, find out what you can do to stop it. Open a window, turn off the stove or, if possible, put out the fire.
- However, if there is nothing you can do to mitigate the danger, move the victim to another place. The best way to do this is to put a blanket or coat under his back and drag him.
 Assess the victim's consciousness. Slap his shoulder gently and ask, "Are you okay?" in a loud, clear voice. If he answers "yes", you should not apply CPR. Instead, do first aid and take steps to prevent or treat shock, and check if you need to call emergency services.
 - If the victim doesn't answer, rub their sternum and pinch their earlobe to see if they answer. If he still doesn't answer, check his heart rate on their neck or under their thumb on the wrist.
 Send someone for help. The more people can help for this step, the better. However, if you are alone, you can do this too. Have someone call emergency services. If you are alone, call emergency services before you start.
 - To call emergency services, call
• 112 with a cell phone in the EU (including the UK)
• 100 in Belgium
• 911 in North America
• 000 in Australia
• 999 in the UK and Hong Kong
• 102 in India
• 1122 in Pakistan
• 111 in New Zealand
• 123 in Egypt
• 120 in China - Give the operator your location and inform him / her that you are going to apply CPR. If you are alone, turn on the speaker of your cell phone so that your hands are free to perform the CPR. If someone is with you, do a CPR with two people and keep the emergency services on the line.
- To call emergency services, call
 Check breathing. Make sure the airways are not blocked. When the mouth is closed, lift the head back to open the mouth. Remove any visible obstacles you can reach, but don't push your fingers too far into your mouth. Place your ear close to the victim's nose and mouth and listen for a light breath. See if the chest rises and falls. If the victim is coughing and breathing normally, do not use CPR.
Method 2 of 5: apply CPR
 Place the victim on his back. Make sure it is as flat as possible - this will prevent injuries while you are applying the chest compressions. Lift his head back by placing the palm of your hand on his forehead and pushing his chin.
 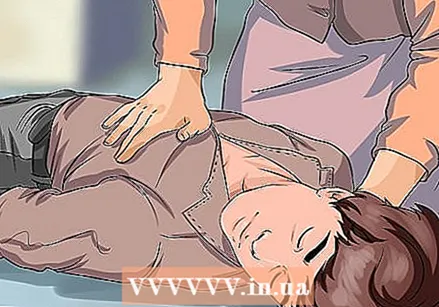 Place the bottom of one hand on the victim's sternum, two fingers above where the bottom ribs meet, just between where the nipples normally sit.
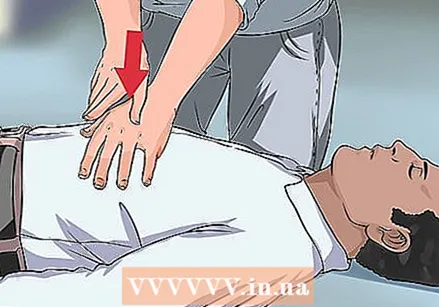 Place your second hand on the first hand, palm down, intertwine the fingers of both hands.
 Place your body directly over your hands so that your arms are straight and slightly stiff. Do not fold your arms to push, but block your elbows and use the strength of your upper body to push.
 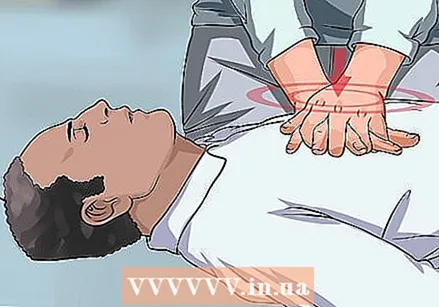 Perform 30 chest compressions. Push down with both hands directly on the sternum to perform a chest compression to help the heart beat. Chest compressions are more important to correct abnormal heart rhythms (ventricular fibrillation or ventricular tachycardia, a heart that vibrates rather than beats).
 - You have to push down about 5 cm.
- Do the chest compressions in a relatively fast rhythm. Sometimes it is recommended to apply the heart massage to the chorus of "Stayin 'Alive," a disco hit from the 1970s.
 Give two rescue breaths. If you are trained in CPR and feel confident, give two breaths after your 30 chest massages. Lift the victim's head and lift the chin. Close their noses and give mouth-to-mouth breaths of 1 second.
 - Make sure you exhale slowly to ensure that the air reaches the lungs and not the stomach.
- As the breath goes into the lungs, you can see the chest lift slightly and you also feel it go into it. Give a second breath.
- If ventilation does not reach the lungs, reposition the head and try again.
Method 3 of 5: Continue to do this procedure until the emergency services arrive
 Keep pauses in the chest massage to a minimum when alternating or preparing for a shock. Try to make the pauses less than 10 seconds.
  Make sure the airways are clear. Place your hand on the victim's forehead and two fingers on his chin and lift the head back to clear the airways.
 - If you think the victim has a neck injury, push the jaw down instead of lifting his chin. If the airways are not being cleared by pushing the jaw down, gently lift his head back and lift the chin.
- If there is no sign of life, place a respirator (if available) over the victim's mouth.
 Repeat the cycle of 30 chest compressions followed by two breaths. If you are also doing the breaths, perform 30 chest compressions followed by two breaths; repeat the 30 chest compressions and two breaths. Continue to perform CPR until someone takes over for you or the emergency services are on the spot.
 - You should perform CPR for two minutes (five cycles of chest compressions and breaths) before taking time to check the heart rate or see if the chest is rising and falling.
Method 4 of 5: Using an AED device
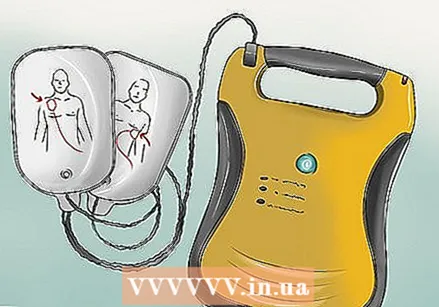 Use an automatic external defibrillator (AED). If an AED is available nearby, use it as soon as possible to get the victim's heart fired.
 - Make sure there are no pools or pools of water nearby.
 Turn on the AED. The device normally has a voice that tells you what to do.
 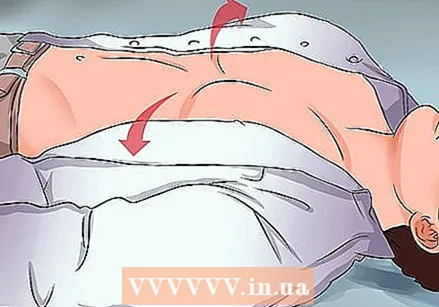 Expose the victim's entire chest. Remove metal chains or bras with metal. Check for piercings or signs that the victim has a pacemaker or automatic implantable defibrillator to avoid shocking you too close to this area. These are usually marked on a medical bracelet, but the victim may not be wearing one.
 - Make sure the chest is completely dry and the victim is not in a puddle. Note that if the person has a lot of chest hair, it is best to shave this chest hair off first. Some AED devices provide razor blades for this purpose.
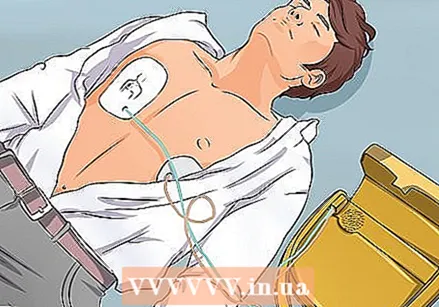 Attach the adhesive pads with electrodes to the victim's chest. Follow the instructions on the AED for placement. The pads should be at least 1 inch (2.5 cm) from any metal piercing or implanted device.
 - Make sure that no one touches the person when you give the shock. Shout loudly "keep your distance!" Before delivering the shock.
 Push "analyze" on the AED. If you need to shock the patient, the machine will inform you. If you give a shock to the victim, make sure that no one is touching him.
 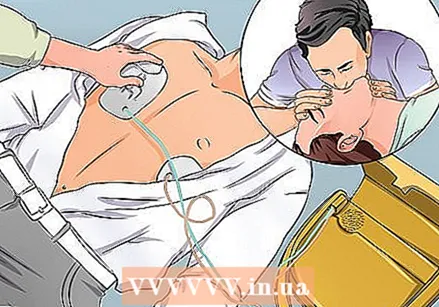 Do not remove the pads and repeat the CPR for another 5 cycles before using the AED device again. Make sure the pads are left in place.
Method 5 of 5: Place the patient in the recovery position
 Place the patient in the recovery position only after the victim is stable and able to breathe on his own.
 Bend and bring one knee joint up, push the victim's hand, which is on the opposite side of the raised knee, partially under the hip of the straight leg. Then place the free hand on the opposite shoulder and roll the victim onto the side with the straight leg. The bent knee / leg is on top and prevents the body from rolling on the stomach. Make sure that the arm that has the hand under the hip is out of the way when you roll the victim onto his side.
  Use the recovery position to help the patient breathe better. In this position, the saliva does not accumulate in the back of the mouth, leaving the airways clear.
 - This position is important when the victim has nearly drowned or overdosed because of the risk of vomiting.
Tips
- Get professional training from a qualified organization near you. Getting training from an experienced instructor is the best way to be prepared in an emergency.
- If you need to move or flip the victim, try to disrupt the body as little as possible.
- If necessary, you can get advice on how to properly apply CPR from an emergency operator.
- CPR is most effective on hard surfaces. It is therefore good to put the victim on the ground before applying CPR.
- Always call the emergency services.
- If you cannot or do not want to apply breathing, then only administer chest compressions. The victim can still recover from cardiac arrest.
- Protect yourself from mouth-to-mouth breathing with a cloth or a thin discharge.
Warnings
- Do not relocate the victim unless he is in immediate danger or in a life-threatening location.
- If the person has normal breathing, coughing, or movement, do not give chest compressions.
- Don't panic. Although cardiac arrest is very stressful, you need to stay calm and think clearly.
- As long as you place your hands correctly, don't be afraid to use the force of your upper body to push on the adult's sternum. You just have to have enough force to push the victim's heart against his back to pump blood around.
- Remember that the CPR differs for adults, children and babies; this CPR can only be administered to an adult.
- Do not whack the victim to wake him up, and especially do not blame or frighten him or her.Squeeze his earlobe or push his sternum.
- Remember, you need to ask permission from a victim who can respond to help. You have to wait for them to nod or say "yes". If no one can give consent, you have tacit consent.
- Regulations exist for first responders.
- If possible, wear gloves and a mouthpiece to prevent the transmission of disease.


