Author:
Alice Brown
Date Of Creation:
25 May 2021
Update Date:
1 July 2024
Content
This article will show you how to record audio using VLC media player on Windows and Mac OS X computer.
Steps
Method 1 of 2: Windows
 1 Launch VLC. Click on the orange cone icon with white stripes.
 - If you don't have VLC on your computer, install it.
 2 Open the menu View. You will find it in the menu bar at the top of the screen. A menu will open.
  3 Click on Additional controls. You will find this option in the middle of the menu. Additional controls appear above the play button.
  4 Open the menu Media. You will find it in the menu bar at the top of the screen.
  5 Click on Open capture device. You will find this option in the middle of the menu.
  6 Click the icon
  next to the "Audio device name" option. A menu will open. Select the sound source in it:
 - Click on the Microphone option to record sound from your computer's microphone.
- Click on the "Stereo Mix" option to record audio from your speakers.
 7 Click on Play. You will find this option at the bottom of the Source window.
  8 Click on the "Record" button to start audio recording. This button is marked with a red circle and is located above the play button.
 - Play an audio file if you want to record sound from your computer speakers.
 9 Click the Record button again to stop recording.
 10 Click on the "Stop" button. This button is marked with a black square and is located to the right of the play button.
  11 Play the recorded audio file. To do this, open the "Start" menu
  , click "File Explorer"
  , click on the "Music" folder on the left pane of the window and click on an audio file whose name starts with "vlc-record-" and ends with the date and time of recording.
 - By default, VLC sends generated audio files to the Music folder and video files to the Videos folder.
Method 2 of 2: Mac OS X
 1 Launch VLC. Click on the orange cone icon with white stripes.
 - If you don't have VLC on your computer, install it.
 2 Open the menu File. You will find it in the menu bar at the top of the screen. A menu will open.
  3 Click on Open capture device. You will find this option in the middle of the menu.
  4 Check the box (in the form of a white checkmark) next to the "Audio" option.
 5 Open the Audio menu and select an audio source. The menu displays the computer options. Select the source of the audio to be recorded:
 - Click on the Built-in Microphone option to record audio from the built-in microphone.
- Click on the "Audio Input" option to record audio from an external microphone or other audio source that is connected to your computer.
- Install the Soundflower software and select the "Soundflower" option to record sound from your computer speakers.
 6 Click on Open. You will find this blue button at the bottom of the Source window.
 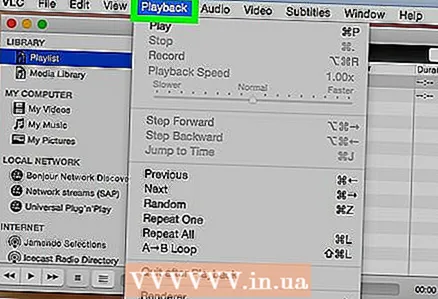 7 Open the menu Playback. You will find it in the menu bar at the top of the screen.
  8 Click on Recordingto start audio recording. It's the third option at the top of the menu.
 - Play an audio file if you want to record sound from your computer speakers.
 9 Click on the "Stop" button. This button is marked with a black square and is located at the bottom of the window.
  10 Play the recorded audio file. To do this, open a Finder window (click on the blue face icon in the Finder), click on the Music folder in the left pane of the window, and click on an audio file whose name starts with “vlc-record-” and ends with the date and time of the recording.
 - By default, VLC sends the generated audio files to the Music folder.


