Author:
Sara Rhodes
Date Of Creation:
14 February 2021
Update Date:
1 July 2024
Content
This article will show you how to draw different lines in Microsoft Word on a Windows or Mac OS X computer.
Steps
Method 1 of 3: On Windows
 1 Start Word. Click or double-click the white "W" icon on a blue background.
 - If you want to draw a line in an existing Word document, double click on it to open and skip the next step.
 2 Click on new document. It's in the upper-left side of the page.
  3 Click on the tab Insert. It's on the blue ribbon at the top of the Word window.
 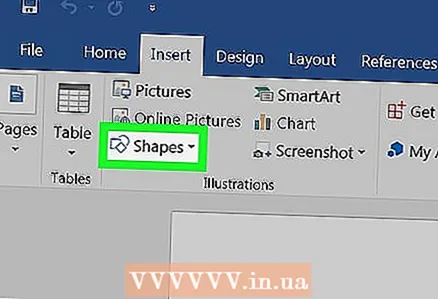 4 Click on Shapes. It's on the Insert toolbar. A menu will open.
  5 Select the shape of the line. In the "Lines" section, click on the line of the required type.
  6 Draw a line. Hold down the mouse button and drag the crosshair over the area of the document where the line should appear.
 - To move a line, click on it and drag it to a different position. To change the length and orientation of a line, click on it and drag one of the round handles at the ends (or center) of the line.
Method 2 of 3: On Mac OS X
 1 Start Word. Click or double-click the white "W" icon on a blue background.
 - If you want to draw a line in an existing Word document, double click on it to open and skip the next step.
 2 Click on new document. It's in the upper-left side of the page.
  3 Open the menu Insert. It's on the gray ribbon at the top of the Word window.
  4 Click on Figure. It's on the Insert menu. A pop-up menu will appear.
  5 Expand the menu. It's at the top of the pop-up menu.
  6 Click on Lines and connectors. This option is on the menu.
 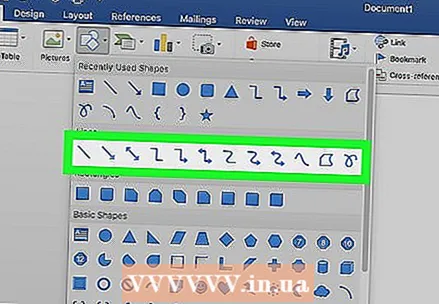 7 Select the shape of the line. In the pop-up window, click one of the line types (for example, a straight line).
  8 Draw a line. Hold down the mouse button and drag the crosshair over the area of the document where the line should appear.
 - To move a line, click on it and drag it to a different position. To change the length and orientation of a line, click on it and drag one of the round handles at the ends (or center) of the line.
Method 3 of 3: Using the keys
- 1 Fall asleep how this method works. You can use the keys to draw a simple horizontal line from the left margin to the right margin of the page.
 2 Start Word. Click or double-click the white "W" icon on a blue background.
 - If you want to draw a line in an existing Word document, double click on it to open and skip the next step.
 3 Click on new document. It's in the upper-left side of the page.
  4 Click where you want the line to appear in the document. Do it on an empty line, because this method will not work if there is text before or after the cursor.
 - A horizontal line will be created from one field to another. The line will not cross the specified fields.
 5 Enter the “-” (dash) character three times. You will find it on the key in the row of number keys at the top of the keyboard or on the number pad.
  6 Click on ↵ Enterto convert dashes to a solid line. It will be positioned directly below the previous line of text.
 - Note that the line will not occupy the space of the line of text, but will be positioned between the lines of text.
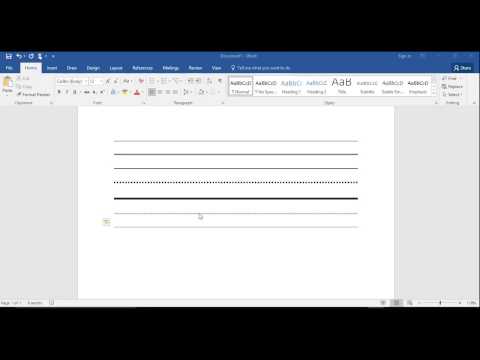
 7 Use different symbols to create lines of different types. For example:
 - Enter *** and press ↵ Enterto create a dashed line.
- Enter ___ (three underscores) and press ↵ Enterto create a bold solid line.
- Enter === and press ↵ Enterto create a double line.
- Enter ### and press ↵ Enterto create a triple line with a bold line in the center.
- Enter ~~~ and press ↵ Enterto create a broken line.
 8 Move the line down. To do this, enter the text above the line and press ↵ Enter.
 - If you delete text above a line, it will move up.


