Author:
Eric Farmer
Date Of Creation:
12 March 2021
Update Date:
1 July 2024

Content
- Steps
- Method 1 of 4: Outlook 2010/2013
- Method 2 of 4: Outlook 2007
- Method 3 of 4: Outlook 2003
- Method 4 of 4: Submitting automatic replies without an Exchange account
- Tips
If you plan to leave your home office for a while - take a sick leave or go, for example, on vacation, then it would be nice to inform all those with whom you communicate by e-mail about this. If you have an Exchange account, this functionality is already built into Outlook. If you don't have an Exchange account yet, you can still set up an automatic reply to emails - it's just a matter of setting a couple of rules. This article will teach you everything there is to know about this matter.
Steps
Method 1 of 4: Outlook 2010/2013
 1 Turn on automatic replies. Select the Exchange folder, then select a folder from your Inbox. To see the “Automatic Replies” option, you must have the Exchange folder selected. Open the “Automatic Replies (Out of Office)” menu. It can be found by clicking on the File tab and selecting the Info tab.
  2 Customize your responses. In the Automatic Replies menu, click on the Send Automatic Replies field. You can set the time when the assistant turns on by setting the appropriate date and time interval.
  3 Write your answers. For emails going through your exchange server, use the “Inside My Organization” tab. To reply to messages sent by everyone else, use the “Outside My Organization” tab. When you finish formulating your answers, click OK.
 - 4 Disable the automatic replies feature. If you have specified a time interval, then this function will act, as they say, from and to. Otherwise, Outlook will send out automatic replies until you open the Automatic Replies menu and select “Do not send automatic replies”.
Method 2 of 4: Outlook 2007
 1 Enable the “Office Assistant” option. Select the Tools tab, then select “Out of Office Assistant”. Select the “Send Out of Office replies” option. You can set the time when the assistant turns on by setting the appropriate date and time interval.
  2 Write your answers. For emails going through your exchange server, use the “Inside My Organization” tab. To reply to messages sent by everyone else, use the “Outside My Organization” tab. When you finish formulating your answers, click OK.
  3 Disable the “Office Assistant” option. If you have specified a time interval, then this option will act, as they say, from and to. Otherwise, Outlook will send out automatic replies until you open the Automatic Replies menu and select “Do not send automatic replies”.
Method 3 of 4: Outlook 2003
 1 Enable the “Office Assistant” option. Select the Tools tab, then select “Out of Office Assistant”. Select the option “I'm currently Out of Office”.
  2 Write your answers. In the field “AutoReply only once to each sender with the following text” write, in fact, the very text that should be in the letter.
  3 Add rules. In Outlook, you can use special rules, for example, redirect messages from one sender to another recipient, etc. To set the rule, click on the “Add Rule” button. For example, you can set a rule according to which letters from a serious client will be forwarded immediately to your assistant.
  4 Turn off the “Office Assistant” option. Outlook will send out automatic replies until you open the Automatic Replies menu and select “Do not send Out of Office replies”.
Method 4 of 4: Submitting automatic replies without an Exchange account
 1 Create your template. The Automatic Reply option is not available without an Exchange account. However, setting up automatic replies is still possible - you need a template and rules for that. Start by creating a new email, this will be the template.
 - Choose a topic that is appropriate for the situation, for example “On vacation until date>”. You can write in the subject the phrase “This is an automatic response” so as not to confuse the interlocutor.
- Write a small message suitable for all potential recipients. Write how else it will be possible to contact you (or someone else).
 2 Save the template. Once you're done with your email, save it: click Save As and select Outlook Template from the Save as type drop-down menu. This will save the email as an Outlook template.
 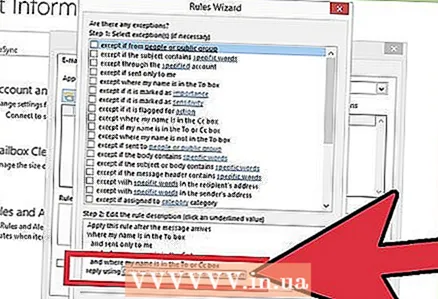 3 Create rules. In order for the automatic replies to be sent out as needed, you will need to work on the rules that streamline this process. In Office 2003/2007, click on Tools - Rules and Alerts. In Office 2010/2013, respectively, File - Info - Rules and Alerts. This will give you access to the E-Mail Rules menu.
 - Click on the “New Rule” button, the system will ask you to create a template. In the “Start from a blank rule” section, select “Check messages when they arrive”. Click “Next”.
- Decide which messages you will reply to. If you want to reply to all incoming, then check the option “where my name is in the To box”. However, the criteria can be narrowed down by specifying specific senders or letters with specific words in the subject. Finish with this, click “Next”.
- Upload your template. Select the “reply using a specific template” option in the next window to download the previously created message. Click on the link in the description field for the “specific template” job. Opens an explorer window, select “User Templates in File System”. Open the message you created earlier.
- Set exceptions. When the template is loaded, you can set exceptions to the rules that will prevent you from responding to specific senders, to specific types of messages, etc. Finish with this, click “Next”.
- Specify a name for the created rule. This is essentially the final stage. The name should be such that you can easily recognize and remember the rule in the future. Check the box “Turn on this rule” to activate the rule, then click Finish.
 4 Disable the rule. Back in the office, you can turn off the rules by re-opening the “Rules and Alerts” menu, selecting the “Out of Office” rule from the list of active ones and deleting it.
Tips
- The word "organization" usually hides your company and the people who have Exchange Server accounts in your mail system.
- The Tools menu appears in the main Outlook window — in the same place as the File, Edit, View, Go, Actions, and Help menus. In the windows where you create letters, save contacts and set tasks, there is no link to this menu.
- When the “Auto-reply to people outside my organization” option is active, the corresponding tab marked “On” is displayed next to the tab name.
- The contact must exist in your Exchange Server Contacts folder. If the contact only exists in a folder that is part of a personal folders (.pst) file, no automatic replies will be sent.


