Author:
Virginia Floyd
Date Of Creation:
9 August 2021
Update Date:
1 July 2024

Content
HTML is short for English Hyper Text Markup Language (hypertext markup language). This is the code, or language, in which the basic markup of sites is created. Learning may seem daunting if you have never programmed, but in reality all you need to get started is a basic text editor and internet browser. You may even recognize some examples of HTML markup that you have come across on internet forums, custom custom pages, or wikiHow articles. HTML is a useful tool for any internet user, and learning the basics will take less time than you think.
Steps
Part 1 of 2: Learning HTML Basics
 1 Open an HTML document. Most text editors (Notepad or Notepad ++ for Windows, TextEdit for Mac, gedit for GNU / Linux) can be used to generate HTML files. Create a new document and save it using File → Save As in Web Page Format, or change the file extension to .html or .htm instead of .doc, .rtf or another extension.
 - You may receive a warning that the file will be saved as "plain text" instead of RTF format, or that formatting and images will not be saved. This is fine; for HTML these options are not needed.
 2 Open the generated file in a browser. Save the blank file, find it on your computer and double-click it to open it. A blank page should open in the browser. If it doesn't, drag the file to the address bar of your browser. As you edit the HTML file, you can refresh this page to see the changes.
 - Please note that this is not how you create a website on the Internet. Other people won't have access to this page, and you don't need an internet connection to test your local page. The browser simply interprets the HTML code, "reading" it as if it were a website.
 3 Understand what markup tags are. Unlike regular text, tags do not appear on the page. Instead, they tell the browser how to display the page and its content. The "opening" tag contains instructions. For example, it can tell the browser that the text should be displayed as bold... It also needs an "end" tag to show the browser where the instruction ends. In this example, the text between the start and end tags will be displayed in bold. Tags are written inside unequal signs, but the end tag starts with a forward slash.
 - The opening tag is written between the inequality signs: opening tag>
- In the closing tag, a forward slash is placed before the tag descriptor (name): /end tag>
- Read on to learn about the use of the different tags. For this step, you just need to remember the recording format. Tags are written between the inequality signs:> and />
- In some tutorials, HTML tags are called elements, and the text between the opening and closing tags is called element content.
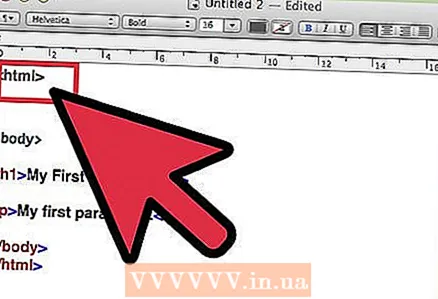 4 Type html> tag in the editor. Every HTML file must start with a tag html> and end with a tag / html>... These tags tell the browser that all content between the tags is in HTML. Add these tags to your document:
 - Often HTML files start with the line ! DOCTYPE html>which means that browsers must recognize the entire file as HTML. This line is not required, but it can help you troubleshoot compatibility issues.
- Dial html> at the top of the document.
- Press Enter or Return multiple times to create multiple blank lines, then type / html>
- remember, that the whole the code you will create in this article will need to be written between these two tags.
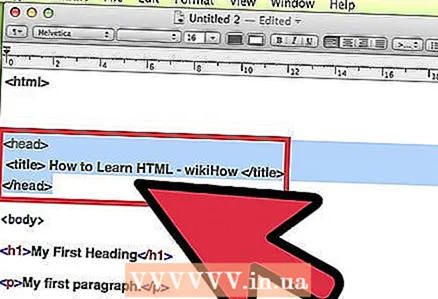 5 Create a head> section in the file. Between the html> and / html> tags, create an opening tag head> and the closing tag / head>... Add some blank lines between them. Content written between the head> and / head> tags is not displayed on the page itself. Follow these steps and you will see what this tag is for:
 - Between the head> and / head> tags, write title> and / title>
- Between the title> and / title> tags, write How to learn HTML - wikiHow.
- Save your changes and open the file in a browser (or refresh the page if the file is already open). See the text that appears in the page title above the address bar?
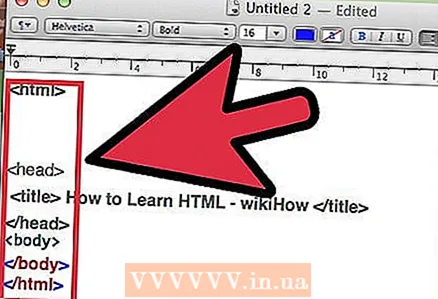 6 Create a body> section. All other tags and text in this example are written in the body section, the content of which is displayed on the page. After closing tag / head>, but before tag / html> add tags body> and / body>... For the rest of this article, work with the body section. Your file should look something like this:
html>
head>
title> How to Learn HTML - wikiHow / title>
/ head>
body>
/ body>
/ html> 7 Add text using different styles. It's time to add the real content to the page! Anything you write between the body tags will be displayed on the page after being refreshed in the browser. Do not use symbols or >as the browser will try to interpret the content as a tag instead of text. Write Hello! (or whatever you like), then try adding these tags to the text and see what happens:
 - em> Hello everyone! / em> makes the text "italicized": Hello!
- strong> Hello everyone! / strong> makes the text "bold": Hello!
- s> Hello everyone! / s> strikethrough text:
Hello! - sup> Hello everyone! / sup> displays the font as a superscript:
- sub> Hello everyone! / sub> displays the font as a subscript: Hello!
- Try different tags together. How it will look em> strong> Hello everyone! / strong> / em>?
 8 Divide the text into paragraphs. If you try to write multiple lines of text in an HTML file, you will notice that line breaks are not displayed in the browser. To divide text into paragraphs, you need to add tags:
 - p> This is a separate paragraph. / p>
- This sentence is followed by a line break br> before the start of this line.
This is the first tag that does not require an end tag. These tags are called "empty" tags. - Create headings to show the section titles:
h1> heading text / h1>: largest title
h2> heading text / h2> (second level heading)
h3> heading text / h3> (third level heading)
h4> heading text / h4> (fourth level heading)
h5> heading text / h5> (smallest title)
 9 Learn to create lists. There are several ways to create lists on a web page. Try the options below and decide which one you like best. Note that one pair of tags is needed for the list as a whole (for example, ul> and / ul> for a bulleted list), and each list item is highlighted with a different pair of tags, for example, li> and / li>.
 - Bulleted List:
ul> li> First line / li> li> Second line / li> li> And so on / li> / ul> - Numbered list:
ol> li> One / li> li> Two / li> li> Three / li> / ol> - Definition list:
dl> dt> Coffee / dt> dd> - hot drink / dd> dt> Lemonade / dt> dd> - cold drink / dd> / dl>
- Bulleted List:
 10 Layout the page using line breaks, horizontal lines, and Pictures. It's time to add something other than text to the page. Try the following tags or follow the links for more information. Use an online hosting service to create a link to the image you want to post:
 - Horizontal line: hr>
- Insert picture: img src = "image link">
 11 Add links. You can use these tags to create hyperlinks to other pages and sites, but since you don't have a website yet, you'll now learn how to create anchor links, that is, links to specific places on a page:
 - Create an anchor with the a> tag where you want to link on the page. Come up with a clear and catchy name:
a name = "Tips"> The text you are linking to. / a> - Use the href> tag to create a relative link or link to an external resource:
a href = "link to the page or anchor name within the page"> Text or image that will serve as the link. / a> - To link to a relative link on another page, add a # sign after the main link and the name of the anchor. For example, https://en.wikihow.com/learn-HTML#Tips links to the tips section of this page.
- Create an anchor with the a> tag where you want to link on the page. Come up with a clear and catchy name:
Part 2 of 2: Advanced HTML
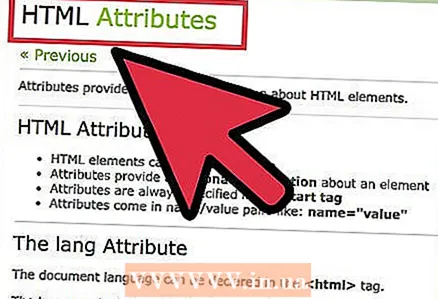 1 Get to know the attributes. Attributes are written inside the tag, indicating additional information. The format of the attributes is as follows: name = "value", where title defines an attribute (for example, color for a color attribute), and the value indicates its value (for example, red for red).
 - Attributes have actually been used in the previous section on HTML basics. The img> tag uses the attribute src, relative link anchors use the attribute nameand the links use the attribute href... As you have already noticed, all attributes are written in the format ___='___’.
 2 Experiment with HTML tables. The creation of a table involves the use of various tags. You can experiment, or read more detailed instructions.
 - Create table tags:table> / table>
- Enclose the contents of each row in the table in tags: tr>
- The column heading is defined by the tag: th>
- Cells in subsequent lines: td>
- An example of using these tags:
table> tr> th> Column 1: month / th> th> Column 2: savings / th> / tr> tr> td> January / td> td> 5000 rubles / td> / tr> / table>
 3 Learn the additional head section tags. You've already learned the head> tag that comes at the beginning of every html file. Besides the title> tag, there are other tags for this section:
 - Meta tags that contain metadataused by search engines to index the site. To make your site easier to find in search engines, use one or more opening meta> tags (closing tags are not required).Use one attribute and one value per tag: meta name = "description" content = "page description">; or meta name = "keywords" content = "comma separated keywords">
- Link> tags that point to third-party files such as style sheets (CSS), which are created using a different type of encoding and allow you to change the HTML page using color, text alignment, and many other features.
- The script> tags used to attach JavaScript files to the page. These files are needed to modify the page interactively (in response to user actions).
 4 Experiment with the HTML code of other sites. Viewing the source code of other web pages is a great way to learn HTML. You can right click on the page and select View Source or something similar from the top menu of your browser. Try to figure out what an unfamiliar tag does, or search the Internet for information about it.
 - Although you cannot edit other people's sites, you can copy the source code into your file to experiment with tags later. Please note that CSS markup may not be available, and colors and formatting may look different.
 5 Start exploring more detailed guides. There are many sites on the Internet dedicated to HTML tags, such as W3Schools or HTMLbook. There are also paper books on sale, but try to find the latest edition as standards change and evolve. Better yet, master CSS to have much more control over the layout and appearance of your site. After learning CSS, web designers usually learn JavaScript.
Tips
- Notepad ++ is a great free program, similar to regular Notepad, but you can save and test your code in your browser online. (It also supports almost any language - HTML, CSS, Python, JavaScript, and so on.)
- Find some simple page on the net, save the code to your computer and experiment with it. Try moving text, changing the font, replacing images - whatever!
- You can keep a notebook where you write tags so that you always have them at hand. You can also print this page and refer to it.
- When you write code, do it carefully so that you and other people can understand it. Use! - Insert comment here -> for HTML comments: they will not be reflected on the page, but will be visible in the code document.
- XML and RSS are gaining popularity. The code of pages containing XML and RSS technologies is more difficult for an inexperienced user to read and understand, but these tools are quite useful.
- Markup tags in HTML are case-insensitive, but it is recommended that you use only lowercase letters (as in the examples in this article) for both standardization and XHTML compatibility.
Warnings
- Some tags have gone out of use over the past few years and have been replaced by new ones that give the same or some additional effects.
- If you'd like to test your page, head over to the W3 site and check out the modern HTML requirements. HTML standards change over time, and some tags are replaced by new ones that work better in modern browsers.
What do you need
- A text editor such as Notepad (Windows) or TextEdit (Mac)
- Paper / notepad (not necessary)
- HTML editor such as Notepad ++ (Windows) or TextWrangler (Mac) (not necessary)


