Content
- Method 2 of 2: Decorate empty eggs
- Tips
- Warnings
- What do you need
- Removing the inner contents of eggs
- Decorating empty eggs
- You can use both regular and masking tape.
- Most often, chicken eggs are taken for crafts. However, any egg can be blown out. Ducks and turkey eggs are larger than chicken eggs, and quail eggs, on the contrary, are smaller.
 2 Use a pushpin to poke a small hole at the top end of the egg. Gently press the tip of the button into the very top of the egg through the tape glued to it. Once the button is in, twist it gently to slightly widen the hole (about 3 mm).
 - If you don't have a button handy, you can use any thin, sharp object, such as a needle or small nail.
Additional ways to create holes in an egg
Use a hammer to carefully drive in a very thin carnation to the top of the egg.
Purchase a dedicated egg piercing tool at your local kitchen supply store or online store.
Make a hole small drill or hand drill.
3 Flip the egg over and punch a slightly larger hole at the bottom end. It is through this hole that you have to blow the egg white with the yolk. Turn the egg with the blunt end up and through the tape stick a button into the very center of the shell. Once the button is in, gently twist it to make the hole slightly wider than the hole you made at the top end of the egg. - The hole should be no more than 8 mm in diameter.
- Work on a bowl or sink in case the contents of the egg start to leak from the hole at the top end.
4 Insert a straightened paperclip into any of the egg holes and wiggle inside. This will pierce the yolk so that it comes out of the egg with less resistance. Bend the wire of the paperclip into a straight line and then stick it into the top or bottom hole of the egg. After immersing the wire in the egg, wiggle it inside, as if mixing its contents. - You can also do this with a pin, toothpick, or needle.
- Be careful not to wiggle the paper clip too much, or the shell may burst.
5 Blow into the small top hole of the egg to blow the contents out through the hole at the bottom end. Place your lips on the top of the egg over the hole. Inhale through your nose and forcefully release the air through your mouth, thereby blowing through the egg. At the same time, the white and yolk should come out through the lower opening of the egg. - Hold the egg over a bowl to collect the contents of the egg.
- If you are having difficulty extracting the yolk, try enlarging the bottom hole in the egg slightly or shaking the egg to break down the yolk more.
- If you don't want to touch the egg with your lips, you can insert the tip of a rubber ear bulb into the opening of the egg and squeeze it to blow out the white and yolk. Alternatively, you can attach a cocktail straw to the hole and blow the egg through.
6 Rinse empty shells and let dry overnight. Rinse the shells carefully to rinse off any remaining egg white and yolk. Hold the egg under running water with the pointed end up so that the water will flow out through the bottom hole. Then place all the eggs you have prepared to dry on a towel. - If you are going to paint or paint the eggs next, make sure they are completely dry. Otherwise, paint may leak and smear.
- You can also put the eggs in an empty cardboard box to dry or skewer on bamboo skewers. If using skewers, carefully thread them through both holes in the shell.
- To sanitize the eggs while rinsing with water, use a little extra dish soap or vinegar.
Method 2 of 2: Decorate empty eggs
- 1 Cover the eggs with a solution of decoupage glue in water to make your craft last longer. Mix one-to-one decoupage glue and water in a small bowl. Apply the solution to the outside of the eggs with a small brush, and then use a pipette to squeeze 2-3 drops of the solution inward through one of the holes. Cover both holes with your fingers and shake the solution inside the egg. Then leave the eggs to dry.
- You can buy decoupage glue at handicraft stores or online.
- Place a towel underneath the eggs as they dry, as excess solution may drip off.
- 2 Color the eggs with food coloring to turn them into vibrant spring decorations. In a small bowl or mug, mix half a glass of hot water (120 ml) with 1 teaspoon of vinegar and 10–20 drops of food coloring. Submerge the egg completely in the solution and let it sit for 5-10 minutes. Once the egg is the color you want, remove it from the staining solution with a spoon or tongs and place it on a paper towel to dry. {
- The longer the egg is in the dye, the richer its color will be.
- Get creative with your choice of colors and patterns. Try, for example, combining different colors or painting the eggs with fun designs.
Additional methods for coloring eggs
To decorate the egg with stripes, stick a strip of tape on it before painting. Everything that will be sealed with tape will not stain. A similar effect can be achieved by gluing round stickers to the shell - in this case, you will get polka-dot eggs.
To create an ombre effect Use tongs to dip only the bottom of the egg into the dye. After 3 minutes, dip the egg a little deeper into the paint (about an additional five millimeters) and hold it there for another 3 minutes. Continue in the same way to color the egg layer by layer until the very end.
If you want to give the egg some sheen apply metallized decals to it when the paint is dry. Place the decal gently over the egg and rub it over with a damp cloth before peeling off the backing paper.
To make funny faces out of eggs, after staining, glue eyes with movable pupils on the eggs and draw mouths and noses with a permanent marker.
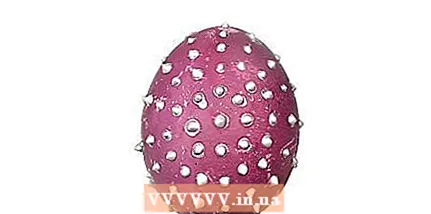 3 Paint the patterns with voluminous textured paints if you want to give the eggs a certain texture. Squeeze acrylic textured paint onto the surface of the egg to create three-dimensional stripes, spirals, or dots. Then leave the colored egg to dry for 2-3 hours.
 - Textured paint can also be used to create embossed patterns on eggs. To do this, cover the dried volumetric image with ordinary acrylic paint - you will get a convex pattern.
- To prevent the paint from smudging while it dries, string the egg onto the bamboo skewer through the holes provided. Place the skewer upright or place it on the edges of an empty container so that the egg is suspended in mid-air.
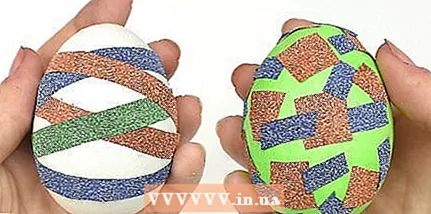 4 Use decorative tape to make the eggshell look even more colorful. At your craft store, you can find decorative tapes in a wide variety of colors, patterns, and textures. Stick 2-3 strips of adhesive tape on the egg, if you want the shell to be visible from under it, or cover the egg completely.
 - If you want to create a mosaic effect, cut the decorative tape into small pieces and spread them over the surface of the egg, leaving small gaps of the white shell between them.
- You can also pre-paint the eggs with acrylic paint for a more colorful effect. Wait until the paint is completely dry (about 2-3 hours), and then cover the eggs with decorative tape.
- 5 Attach eyelets to the eggs so they can be used as hanging Christmas tree decorations. To do this, bring the two ends of the spring loop together and thread them into the hole at the top of the egg. As soon as the ends of the spring are inside, they will return to their original position and fix the fastening loop on the egg. Hang the egg from the eyelet on string, ribbon, or Christmas tree wire.
- You can purchase fastening loops for Christmas tree decorations at handicraft stores or online stores. They usually appear on sale during the pre-New Year period.
- Instead of buying new fastening loops, you can use loops from unnecessary or broken Christmas tree decorations.
- For festive egg decorations, paint them in festive colors or decorate with pretty stickers before you attach the eyelets.
Tips
- Be sure to tape the ends of the eggs before piercing to prevent the shells from cracking.
- Work with eggs at room temperature whenever possible. This will make the yolks less dense and easier to blow out.
- If the yolk does not come out of the egg, try to break it down harder inside with a paper clip, or shake the whole egg.
- Don't waste the contents of the eggs! You can make scrambled eggs or other dishes from it, provided that you have used clean equipment in your work.
Warnings
- Wash your hands and all equipment you use with warm, soapy water both before and after handling raw eggs, as they can be a source of Salmonella.
- Empty eggs are very fragile, so handle them carefully.
What do you need
Removing the inner contents of eggs
- Raw eggs
- Drawing pin
- Clip
- A bowl
- Towel
Decorating empty eggs
- Decoupage glue
- Water
- Small brush
- Pipette
- Towel
- Vinegar
- Food coloring
- Mugs or small bowls
- Egg spoon or tong
- Scotch
- Decals
- Permanent markers
- Acrylic paint
- Fastening eyes for hanging Christmas tree decorations
- Thread or wire for Christmas tree decorations
- Stickers
- Textured paints
- Decorative tape


