Author:
Bobbie Johnson
Date Of Creation:
10 April 2021
Update Date:
1 July 2024
Content
- Steps
- Part 1 of 2: Prepare the Equipment
- Part 2 of 2: Conduct an experiment
- Tips
- Warnings
- What do you need
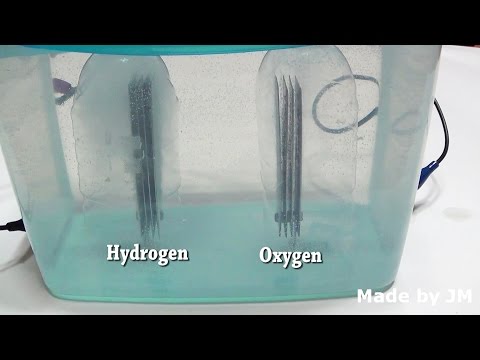
Water splitting process (H2O) into its constituents (hydrogen and oxygen) using electricity is called electrolysis. The gases obtained as a result of electrolysis can be used on their own - for example, hydrogen serves as one of the cleanest energy sources. While the name of this process may sound a bit clever, it is actually easier than it might seem if you have the right equipment, knowledge, and a little experience.
Steps
Part 1 of 2: Prepare the Equipment
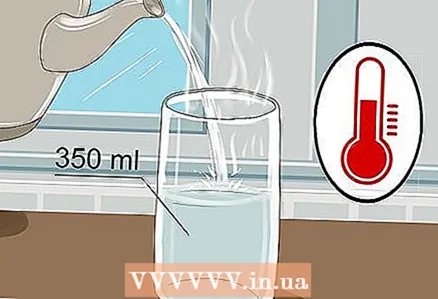 1 Take a 350 ml glass and pour warm water into it. There is no need to fill the glass to the brim, just a little water is enough. Cold water will do, although warm water conducts electricity better.
 - Both tap water and bottled water will do.
- Warm water has a lower viscosity, which makes it easier for ions to move around.
 2 Dissolve 1 tablespoon (20 grams) of table salt in water. Pour salt into a glass and stir the water to dissolve. This will create a saline solution.
 - Sodium chloride (i.e. table salt) is an electrolyte that increases the electrical conductivity of water. Water itself does not conduct electricity well.
- After you increase the electrical conductivity of the water, the current created by the battery will more easily pass through the solution and more effectively break down the molecules into hydrogen and oxygen.
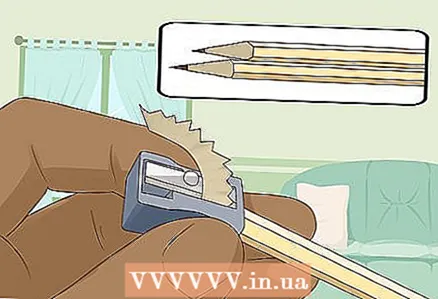 3 Sharpen two hard-soft pencils at both ends to expose the lead. Don't forget to remove the eraser from your pencils. A graphite rod should protrude at both ends.
 - The graphite rods will serve as insulated electrodes to which you connect the battery.
- Graphite is well suited for this experiment because it does not dissolve or corrode in water.
 4 Cut out a sheet of cardboard large enough to lay on top of the glass. Use a fairly thick piece of cardboard that won't sag after you punch two holes in it. Cut a square piece out of a shoebox or similar.
 - The cardboard is used to hold the pencils in the water so that they do not touch the sides and bottom of the glass.
- Cardboard is non-conductive, so you can safely put it on a glass.
 5 Use pencils to poke two holes in the cardboard. Pierce the cardboard with pencils - in this case, they will be tightly clamped and will not slip. Make sure that the graphite does not touch the sides or bottom of the glass, otherwise it will interfere with the experiment.
Part 2 of 2: Conduct an experiment
 1 Connect one wire with alligator clips to each battery terminal. The battery will serve as a source of electric current, and through the wires with clamps and graphite rods, the current will reach the water.Connect one wire with a clamp to the positive and the other to the negative terminal of the battery.
 - Use a 6 volt battery. If you do not have one, you can use a 9-volt battery instead.
- A suitable battery can be obtained from an electrical supply store or supermarket.
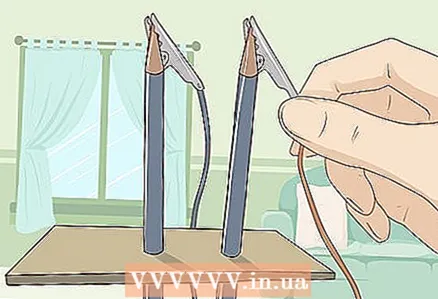 2 Connect the other ends of the wires to the pencils. Attach the metal wire clamps firmly to the graphite rods. You may need to peel off some more wood from the pencils to keep the clips from sliding off the graphite rods.
 - Thus, you will close the circuit, and current from the battery will flow through the water.
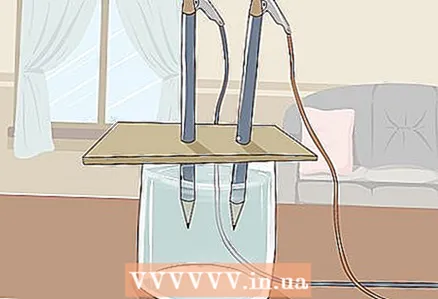 3 Place the cardboard on the glass so that the free ends of the pencils are submerged in the water. The sheet of cardboard should be large enough to rest on the glass. Be careful not to disturb the correct placement of the pencils.
 - For the experiment to be successful, the graphite must not touch the walls and bottom of the glass. Check this again and adjust the pencils if necessary.
 4 Watch the water split into hydrogen and oxygen. Gas bubbles will begin to rise from the graphite rods immersed in the water. These are hydrogen and oxygen. Hydrogen will be released at the negative pole and oxygen at the positive pole.
 - As soon as you connect the wires to the battery and the graphite rods, an electric current will flow through the water.
- More gas bubbles will form on the pencil that is connected to the negative pole, since each water molecule is made up of two hydrogen atoms and one oxygen atom.
Tips
- If you do not have pencils with graphite rods, you can use two small wires instead. Just wrap one end of each wire around the corresponding battery pole and dip the other into the water. The result will be the same as with pencils.
- Try using a different battery. The amount of current flowing depends on the voltage of the battery, which, in turn, affects the rate of splitting of water molecules.
Warnings
- If you add an electrolyte, such as salt, to the water, keep in mind that the experiment will generate a small amount of a by-product such as chlorine. It is safe in such small amounts, but you can smell a slight chlorine smell.
- Perform this experiment under adult supervision. It is associated with electricity and gases and can therefore be hazardous, although unlikely.
What do you need
- Two hard-soft pencils
- One 6 or 9 volt battery
- Glass with a volume of 350 milliliters
- 2 wires with crocodile clips
- Sharpener for pencil
- Salt


