Author:
William Ramirez
Date Of Creation:
22 September 2021
Update Date:
1 July 2024
Content
- Steps
- Part 1 of 4: How to Download Ubuntu
- Part 2 of 4: How to create a virtual machine
- Part 3 of 4: How to Install Ubuntu
- Part 4 of 4: How to set up Ubuntu
- Tips
- Warnings
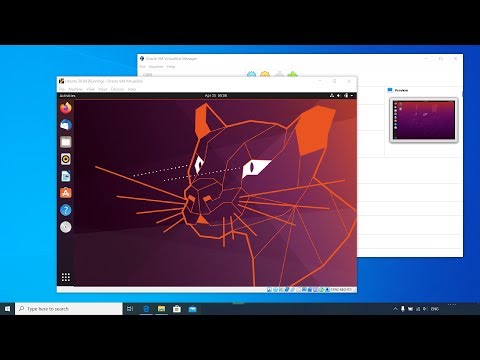
This article will show you how to install Ubuntu Linux on your computer in VirtualBox. VirtualBox is a program in which you can install an additional operating system without changing the main system of your computer.
Steps
Part 1 of 4: How to Download Ubuntu
 1 Open the Ubuntu website. Go to https://www.ubuntu.com/download/desktop in your computer's web browser. You can download the Ubuntu disk image (ISO file) here.
  2 Scroll down to the latest version of Ubuntu. You will find it at the bottom of the page.
  3 Click on Download (Download). It's a green button to the right of your selected Ubuntu version. A new page will open.
  4 Scroll down and tap Not now, take me to the download (Not now, start downloading). This link is in the bottom left corner of the page.
  5 Make sure to start downloading the ISO file. Otherwise, click on the Download now link at the top of the page. While the ISO file is downloading, create and configure a virtual machine in VirtualBox.
Part 2 of 4: How to create a virtual machine
 1 Install VirtualBox. Do this if your computer (Windows or Mac OS X) does not have this program.
  2 Start VirtualBox. Double-click (or single-click on a Mac) the VirtualBox icon.
  3 Click on Create. It's a blue icon in the upper left corner of the VirtualBox window. A pop-up menu will open.
  4 Enter a name for the virtual machine. Enter any name (for example, Ubuntu) in the Name text box at the top of the pop-up menu.
  5 Select "Linux" from the "Type" menu. Open this menu and select "Linux".
  6 Select "Ubuntu" from the "Version" menu. In this menu, the "Ubuntu" option should appear by default when you select "Linux" from the "Type" menu; otherwise, open the Version menu and click Ubuntu (64-bit).
 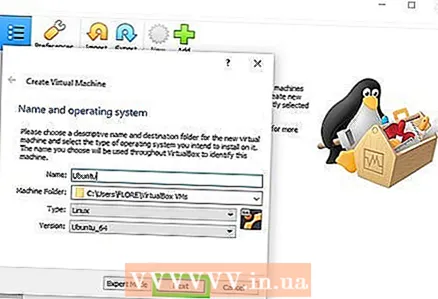 7 Click on Further. This button is at the bottom of the menu.
 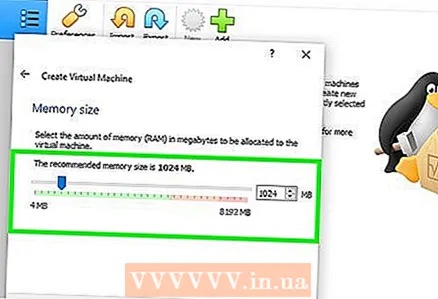 8 Specify the size of the RAM. Drag the slider left or right to decrease or increase the amount of RAM that will be used by the Ubuntu virtual machine.
 - By default, the optimal amount of RAM will be selected.
- Don't drag the slider over the red area - make sure the selected value is within the green area.
 9 Click on Further. This button is at the bottom of the menu.
  10 Create a virtual hard disk for the virtual machine. A virtual hard disk is a partition on a computer's hard disk that will be used to store files and programs in a virtual machine:
 - click "Create";
- click "Next";
- click "Next";
- specify the capacity of the virtual hard disk;
- click "Create".
 11 Check if the Ubuntu image has downloaded. If so, install this system in VirtualBox.
Part 3 of 4: How to Install Ubuntu
 1 Double click on the name of the created virtual machine. It's on the left side of the VirtualBox window. A menu will open.
  2 Click the folder-shaped icon. It's in the lower right side of the menu. A new window will open where you can select the downloaded ISO file.
  3 Select the ISO file. Go to the folder with the downloaded file and click on it.
  4 Click on Open. It's in the lower-right corner of the window. The ISO file will open in VirtualBox.
  5 Click on Run. It's near the bottom of the menu. The Ubuntu installer will launch.
  6 Click on Install Ubuntu. It's on the right side of the VirtualBox window.
  7 Check the boxes for both options in the Preparing to Install Ubuntu window. This will install the full version of Ubuntu.
 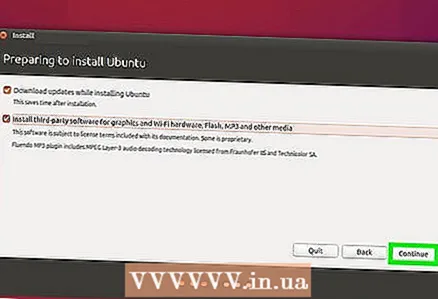 8 Click on Proceed. It's in the bottom-right corner of the page.
  9 Check the box next to Erase Disk and Install Ubuntu. Don't worry - the information stored on your computer's hard drive will not be damaged.
  10 Click on Install. It's in the lower-right corner of the page.
  11 Click on Proceedwhen prompted. This will confirm that the virtual disk will be cleaned up (there is nothing on it anyway); The Ubuntu installation process starts.
Part 4 of 4: How to set up Ubuntu
 1 Select your time zone. On the map, click on the time zone in which you are located.
  2 Click on Proceed. It's in the bottom-right corner of the page.
  3 Activate the onscreen keyboard. Click the person-shaped icon in the upper-right side of the window, and then click the On-Screen Keyboard switch to open it. You need drivers to use a physical keyboard, so you won't be able to use it until you've configured Ubuntu.
 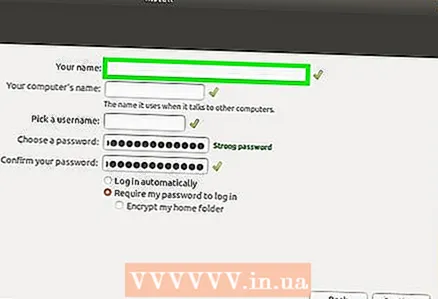 4 Please enter your name. Do this in the Name text box at the top of the window.
 - When you enter a name, a computer name in the virtual machine will be automatically created; if you want to change the computer name, enter it in the Computer Name field.
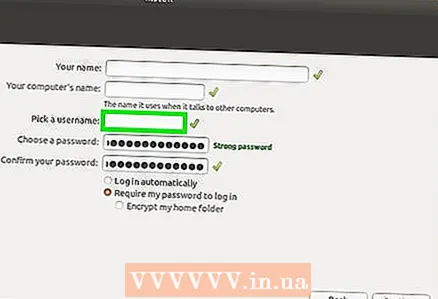 5 Enter your username. Do this in the Username text box.
 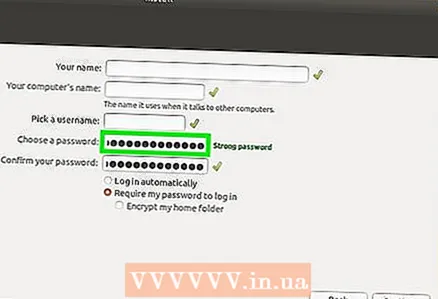 6 Create a password. Enter your password in the Password text box, and then enter it again in the Confirm Password text box.
  7 Click on Proceed. This button is at the bottom of the page.
 - If necessary, change your login settings below the Confirm Password text box.
 8 Wait for the Ubuntu installation to complete. This will take from a few minutes to half an hour, depending on the speed of the computer.
 - The whole process will take place automatically, that is, your participation is not required.
 9 Restart the virtual machine. When the "Restart Now" button appears on the screen, do the following: click "Exit" in the upper right (Windows) or upper left (Mac) corner of the window, check the box next to "Turn off the machine", click "OK", and then double-click by the name of the virtual machine.
  10 Log in to the virtual system. When the virtual machine starts, choose your name, enter your password and click Login. Ubuntu will run in a virtual machine, but you can work with this system like a regular (non-virtual) system.
Tips
- You can install programs on a virtual system, but remember that the capacity of a virtual hard disk is limited.
Warnings
- The virtual system will not run very fast, but that's okay, because you are actually running two operating systems on the same computer.
- Make sure the physical hard disk has enough space to create the virtual hard disk. For example, if VirtualBox prompts you to create an 8 GB virtual hard disk, make sure the free space on the physical hard disk is greater than 8 GB.


