Author:
Bobbie Johnson
Date Of Creation:
10 April 2021
Update Date:
1 July 2024

Content
- Steps
- Method 1 of 6: Choosing Drywall
- Method 2 of 6: Verifying the Installation Site
- Method 3 of 6: Marking and Cutting Ceiling Plasterboard
- Method 4 of 6: Marking and Cutting Drywall Walls
- Method 5 of 6: Putty and tape drywall
- Method 6 of 6: Finishing and sanding
- Warnings
- What do you need
- Additional articles
Installing drywall, also known as drywall, stone, or wall panels, is an important part of building a home. Before drywall was used, construction took a long time to build a base that would hold the paint or wallpaper. Now you can easily install your drywall in literally hours, depending on the size of the room you want.
Steps
Method 1 of 6: Choosing Drywall
 1 Drywall is usually supplied in 4'x8 '(1m x 2.40m) sheets. You can take sheets 4'x12 '(1m x 3.60m), but they are more difficult to work with and, as a rule, they are used by professionals, working in several hands. Usually, these sheets break easily during transport to the job site, but they require less work because there are fewer joints around the perimeter.
 - Usually drywall is installed vertically, but if desired, the sheets can be arranged horizontally.
 2 Remember that the thickness ranges from 1/4-5/8 (0.6cm - 1.6cm), 1/2 (1.2cm) is the most popular. 1/4 (0.6cm) sheets are commonly used as overlays on existing drywall and are not intended for use in new construction. Check local building codes for your area.
 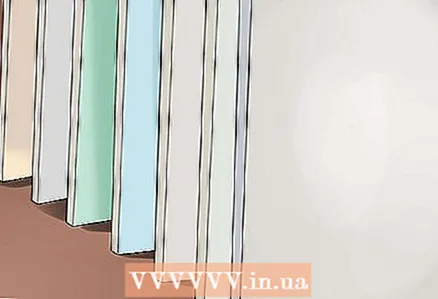 3 Pay attention to the composition of the drywall. When choosing drywall, choose a structure appropriate for the room in which it will be installed. For example, there are moisture resistant solutions called "green stone" and are intended for use in high humidity areas such as garages and bathrooms. Check with your local hardware store for availability before purchasing.
 - It may be overkill to roll up the entire house with green drywall, but it can be useful in places with high humidity, such as bathrooms, while not being used in the area where a bath or shower is installed. Green drywall is not very suitable for wet locations. To do this, use a fiberglass-reinforced plate in the shower or bath area.
Method 2 of 6: Verifying the Installation Site
 1 Prepare the area of the wall that your drywall will occupy. Remove old drywall, nails, screws, and anything else that will prevent new drywall sheets from adhering to the uprights.
 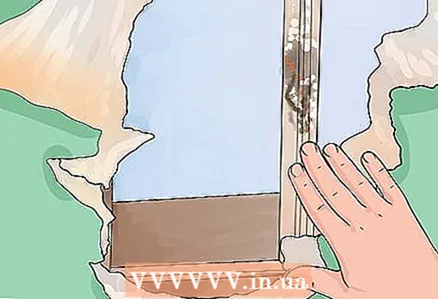 2 Inspect and repair hidden damage. Make sure that loose fittings, moisture damage, termites will not be a problem during installation. Do not be surprised if you find installed metal racks instead of wooden ones. Steel uprights are generally better than wood ones as they provide added strength, termite protection, and fire resistance. When mounting on metal racks, the only difference is that you need to use screws instead of nails to fasten the drywall.
  3 Check the insulating tape stapled to the uprights. Use paper-backed Kraft tape for repairs to improve heat retention.
  4 Use triple expansion foam to seal cracks and breaks in exterior walls. Look for tough, moisture-proof / water-repellent foam that will last long and won't shrink. Do not apply foam to or around doors and windows.
Method 3 of 6: Marking and Cutting Ceiling Plasterboard
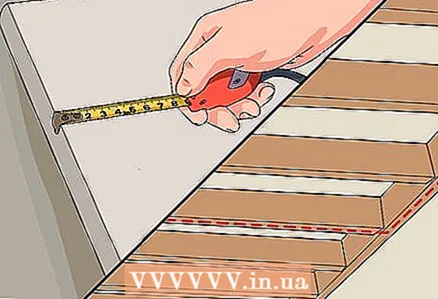 1 Measure from the corner and mark your drywall so that the ends lie on the rafters or crossbars. Never leave the edge of the drywall unsecured. The edge must always be screwed to the rafters or cross member.
 - If the edge of your drywall does not end with a rafter or crossbeam then try the following:
- Measure the length from the farthest point of the part to the center of the support and transfer this measurement to drywall.
- Place the T-ruler along the line on the drywall and use the blade to run along the line formed by the T-ruler.
- Break the sheet along the cut line.
- Double check that the end of the drywall rests on the center of the rafter or crossbeam.
- If the edge of your drywall does not end with a rafter or crossbeam then try the following:
 2 Apply a drop of glue to each of the rafters or crossbars to which the drywall will be attached. Do this right before you attach the drywall.
  3 Lift the drywall up to the ceiling, starting from the corner of the room. You want the edges to be perpendicular to the rafters or crossbars and fit snugly against the wall.
  4 Drive five screws in a straight line through the drywall into one rafter or crossbar. Repeat this for each of the rafters or crossbars underneath the drywall.
 - Make sure the five screws are evenly spaced along the rafter or crossmember.
- Leave 1/2 inch (1.27cm) buffer zones around the edges when driving in the screws. Do not screw too close to the edge of the drywall.
- Sink the heads of the screws directly into the drywall, but not deep enough to break through the surface.
 5 Continue lifting, gluing, and screwing on the drywall until one row of the ceiling is completely covered. Start the next row from the edge of the wall next to the previous row, but place the seams between the ends of the first row at least 4 feet (1.22m) from the seams of the second.
Method 4 of 6: Marking and Cutting Drywall Walls
 1 Mark the location of all posts used with a nail finder. Don't assume that all your racks will be 16(40cm) or 24 '(60cm)' as it should be. Due to the developer's careless carpentry work, some of the racks may be offset by 1/2 (1.2cm) in different directions. It is a great idea to run masking tape along the floor while you have bare posts, and mark the center line of each post on it with a thick marker.
  2 Measure the wall with a piece of drywall to determine if the edge will fit into the center of the rack. Again, you may need to cut some drywall pieces to center the edge on the center of the rack.
 - When cutting drywall, use a T-piece and a sharp knife to mark a line on the drywall paper. Place your knee on the opposite side of the cut and briskly pull the piece of drywall towards you while pushing your knee away from you, breaking the drywall along the line. Use a knife to cut the paper at the fold.
 3 Apply a drop of glue to each rack or cross member that will hold the drywall. Do this right before you attach the drywall.
  4 With the help of someone else, lift the drywall up onto the wall and, using a drill, screw five screws into the upright in the center of the wall panel. Start in the center and work from it. Install five screws in each post.
 - Additional screws can help in some cases, but are usually unnecessary; they may require additional filler and sanding, which will be distracting when finishing.
- Consider using a spring accessory with a depth stop. It is designed for automatic countersinking of each drywall screw and, when the desired depth is reached, begins to vibrate, giving a signal that it is time to release the drill.
 5 Use a drywall saw to cut uneven holes such as arches. Continue overlapping drywall to window and door openings. You can cut off excess dry plaster later. At the same time, make sure that the seams do not line up with the corner of the window or door, and do not sew panels around the cutouts for now.
 - There is a good way to install drywall over protruding pipes.Place the drywall on the pipe and tap it lightly with a flat board until a small indentation forms on the back. Then set the drywall aside and, using a drywall saw or compass, make a perfect hole along the groove. It is much easier to do this than if you knock out a large hole, which requires 3-4 times of putty to complete.
 6 Continue lifting, gluing, and screwing on the drywall until one row of the wall is completely covered. Start the next row from the edge of the wall next to the previous one.
 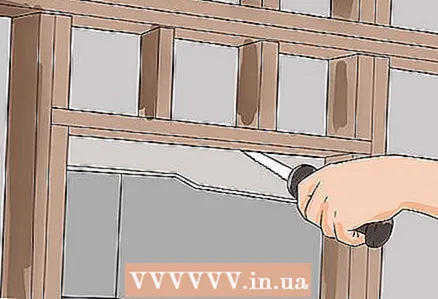 7 Cut off any pieces of drywall that protrude over the frames of windows and doors. Fasten drywall around the perimeter of doors and windows and then cut the required pieces with a rotary drill or drywall saw.
Method 5 of 6: Putty and tape drywall
 1 Dilute your starter compound or putty to a sour cream consistency. Once you get the first layer of putty, which you applied directly to the seam, smooth it out a little, this will allow the tape to adhere better to the putty.
  2 Use a putty knife to apply the correct amount of putty. Don't worry if you don't get it perfect the first time; you will remove the excess after applying the tape. Make sure to cover the entire seam.
  3 Apply drywall tape over the joint you applied the filler to. Use 6 (15cm) or 8 (20cm) trowel to level the tape, starting at one end and pulling it out in one stroke along the length of the tape.
 - Pre-cut and soak pieces of drywall tape in clean water, but do not saturate it too much.
- Some contractors do not use perforated and fibrous tape as they do not work perfectly and require additional filler and sanding to get the job done correctly. Get the job done the way you like and based on your budget.
 4 Remove the filler around the tape with a putty knife. Remove excess putty to obtain a smooth and flat joint surface.
  5 Check the newly taped seam for air bubbles. If necessary, wet the spatula blade and smooth it out.
 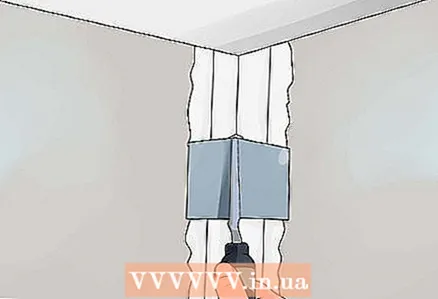 6 Use a perforated corner used for both outside and inside corners to glue corners. This will make your work truly professional.
 - Apply tape and putty in the same way. Apply the required amount of compound. If you haven't already, bend the tape exactly in the center and press down on the fold a couple of times. Apply the tape so that the crease is exactly in the center of the corner. Remove excess filler with a putty knife.
 7 Apply at least two or three layers, using a wider trowel for each additional layer. Let the putty dry before applying the next coat. If you are in a hurry, it will be with bubbles!
 - More finishing putty will give better results, but it will take patience to dry.
- Do not add putty to newly taped seams. Give them one day to dry completely between coats, unless you use a quick dry putty that hardens within an hour. It is a good idea to use a pink putty, which turns white after drying, indicating that it is ready to overcoat.
 8 Remember to apply a layer over each screw. There should not be any edges left after covering the joint or the groove of the screw with a putty. Keep the trowel blade flat on the drywall and pull it evenly but firmly towards you. Practice on an old piece of drywall for proper technique.
 - Run some filler over drywall with minor flaws that may arise during installation, such as excess nail / screw holes.
 9 Repeat these steps until all seams are taped.
Method 6 of 6: Finishing and sanding
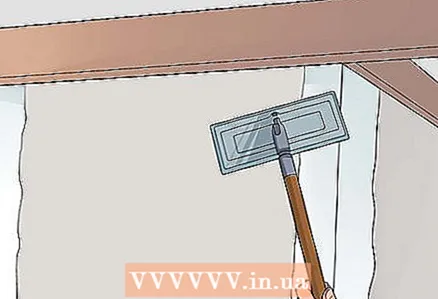 1 Once the finish coat has dried, use a drywall sanding squeegee to sand hard-to-reach areas. Don't get carried away too much and sand until the surface of the paper appears. This process will go quickly, since the putty is easy to sand.
  2 For sanding everything else, use a hand sander with fine sandpaper. Again, proceed with caution. All that is needed is a couple of passes at the seams.
 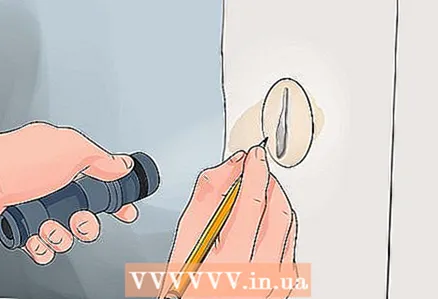 3 Using a pencil and a flashlight, go over the entire putty surface and check for imperfections. The light will help you bring out flaws. Outline the problem areas with a pencil. Use a sanding sponge or sanding block to remove any imperfections in these areas.
  4 Prime all walls, then sand again. Apply a coat of primer to the walls, then lightly sand the entire area using a sanding squeegee. While many beginners skip this step, it is very important to get a good, smooth finish and to avoid the lint left over from the initial sanding.
  5 Do not over-sand. Sanding may sound like fun and fun, but some people get too carried away and sand right through the tape. If this happens, add a little putty and sand after dry.
Warnings
- Drywall breaks easily, so don't let it sag too much in the middle when moving.
What do you need
- Roulette
- Drywall
- Drill
- Drywall screws (large wood screws, small metal screws for metal posts)
- nozzle with depth stop
- Level
- Drywall tape (preferably paper)
- drywall putty
- Finishing putty for drywall
- Plastic or metal filler tray
- Blade knife
- 6 "(15cm) trowel
- 10 "(25cm) drywall trowel
- drywall sander
- Medium grit sandpaper
- fine-grained drywall paper for the finishing layer
Additional articles
 How to remove a jammed screw
  How to drill holes in concrete
  How to make a skateboard ramp
  How to fill a hole in an asphalt road How to install (put) a wooden fence post
  How to cover grout with sealant
  How to install piles in water for a dock or pier
  How to remove a broken screw
  How to make concrete bricks
  How to break concrete
  How to make artificial stones from concrete How to cut PVC pipes
  How to build a deck around an above ground pool
  How to work with sandpaper


