Author:
Virginia Floyd
Date Of Creation:
9 August 2021
Update Date:
22 June 2024

Content
Heating a pool with inexpensive solar panels is a fairly inexpensive and simple project that you can do yourself. While these self-made black plastic solar panels are much less efficient than expensive, high-quality solar panels, you can make your own using aluminum, steel, glass, and copper. The volume of heat energy per dollar of investment and ease of installation are undoubted advantages.
Steps
 1 Before starting, assess the climatic conditions in your area. Nighttime temperature drops usually neutralize all daytime energy storage, even during the sunny season. Be sure to cover the pool at night to avoid losing thermal energy accumulated during the day. An in-ground pool cools faster than an above-ground pool because the ground remains cold at great depths even during the summer season. Do you have enough space for solar panels to receive sunlight all day long? Will you remember to put away your solar panels before thunderstorms and during strong winds, as well as in winter? Can you keep your pool clean even at low water levels? Homemade solar panels are cheap enough to experiment, though. Moreover, plastic solar panels will increase the comfort of bathing in summer, but will not prolong the bathing period at all - in the cold season you still cannot do without gas heating.
 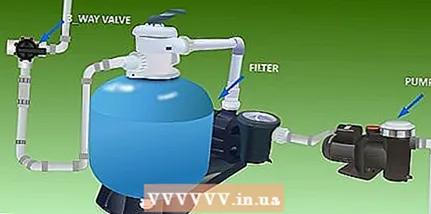 2 Install a three-way valve after the pump and filter to allow water to flow to the panels and to the pool. Try to find a valve that can be operated automatically if you want to connect the valve remotely or by timer in the future.
 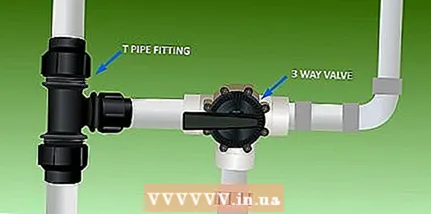 3 Install the T-pipe in conjunction with the 3-way valve on the same line around the edge of the pool. Water from the solar panels will be piped to the valve and then back to the pool. Prepare your system for the winter season by purchasing valves that can be disassembled, drain all water and avoid freezing.
  4 Your pipe should be the same size as the bypass pipe (usually 3-5 cm) in and out of the solar panel. If the panels are to be installed on the roof, the plastic piping hanger will securely anchor the pipes to the walls and eaves. At the edge of the roof, install a spigot connection on each pipe to make it easier for you to remove the panels in cold seasons, windy weather, or for roof replacement. Even if your solar panels are on the ground, fittings will help with seasonal replacement. It is better to place pipes underground so that they are not scattered all over the yard.
 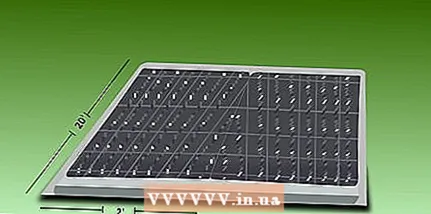 5 Plastic solar panels come in a variety of sizes, but 5x50cm is the most common size. Buy at least two. Each panel will cost approximately 5,000 rubles. Try with two panels first, then you can add more. It is generally worth purchasing enough panels to theoretically cover your entire pool area. A pool with a diameter of 45 meters will require approximately 6 panels. But it is possible to buy fewer panels to start with, until you have appreciated all the advantages and disadvantages of this design. The more panels you install, the more pump power you will need. Typically you will need to increase the pump power by 186W to place panels above one floor or supports longer than 250 cm.
 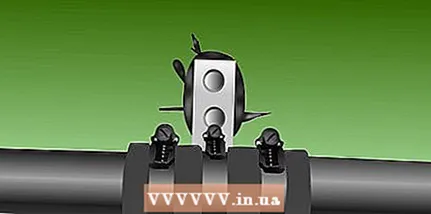 6 Attaching the panels to the roof can be the most difficult step, so you can make it easier for yourself to set the panels on the ground. Use stainless steel bolts available from your local store or online. Measure the distance between the rafters of your roof and place the bolts slightly wider than the size of the panels (60 cm). Apply roofing mastic to each bolt to avoid leaks. An aluminum cross bar with holes at both ends should be positioned on the panel and cover the bolts. Secure with steel spacers and nuts to easily remove panels if necessary. In most places, you will need to submit construction plans to the local cooperative and obtain special permission for them if you want to install panels on the roof. Perhaps installing them on the ground will prove to be an easier alternative.
 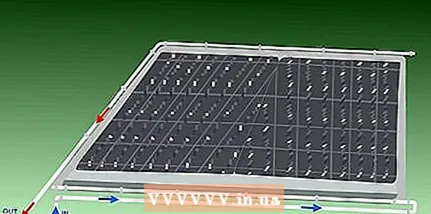 7 Once the solar panels are in place, connect them together and connect to the spigot connections. Pay particular attention to which end of the pipe is inbound and outbound. If you install the panels incorrectly, air can become trapped in them. If the panels are installed at an angle, the outgoing end should be facing up.
 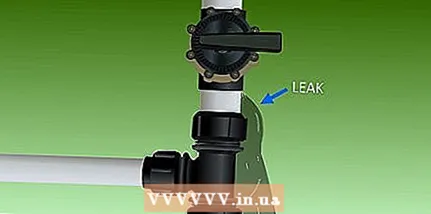 8 After connecting the pipes, turn on the pump and open the valve to the panels. Check that nothing leaks. In theory, the stronger the flow, the more efficient your design (since the cold water in the pipes will absorb more heat). The water flowing from the panels is usually only 3-4 degrees warmer, but given the length of the day, the water in your pool will heat up significantly. If the nights in your area are not too cold, the water will gradually warm up by a few degrees each day. Even for a small pool, it will take about a week. In warm regions, three panels will be enough for the summer season, without any gas heating. To extend the swimming season, you can add a couple more panels.
  9 If you live in an area where temperatures drop below freezing, install a drain at the lowest point in the system, or plan pressure distribution in the pipes to avoid damage from ice.
 10 For about 15,000 rubles. You can purchase a solar energy control system that includes temperature sensors, valves, locking mechanisms to automate the system.
Tips
- Most pools take about 6 hours to clean. Solar panels will usually lengthen this time: a heated pool usually takes more hours to clean than a cold one.
- If the panels are frozen, you will need to drain the water from them. An extra padding at the top can make this easier.
- Do not start circulating the water until the weather is sunny. Working panels can cool your pool in the evenings and nights.
- Pool solar detectors can measure the temperature in the pool and in the panels to open the valves whenever the pool needs heating and close when the pool needs cooling. The detectors are sold with a timer to control the pump, but this tamier will cost you a lot and will require 120V and 24V wiring, as well as wiring for the temperature sensor.
Warnings
- Do not run concentrated chlorine into a solar heater. Chlorine is always added after heating.
- In most areas, you are not legally allowed to install anything on your rooftop without prior permission. The installation technique for roof panels also varies by location.
- Although polymer light panels are light enough on their own, they become very heavy when filled. Be sure to securely attach the panels to the roof to prevent the structure from collapsing in the wind.
- If you are unsure of your skills and knowledge, do not tackle wiring, pipes, or roof work. Ask for help.


