Author:
Marcus Baldwin
Date Of Creation:
15 June 2021
Update Date:
1 July 2024

Content
- Steps
- Method 1 of 3: Loading new brushes
- Method 2 of 3: Adding New Brushes in Photoshop
- Method 3 of 3: Adding lots of brushes
- Tips
Brushes are, in fact, ready-made shapes that you can move around the image. But in addition to creating lines and repeating shapes, brushes can be used to lighten an image, create texture, digital painting, and more. Brushes allow you to add incredible depth and fluidity to your artwork, but it's all in vain if you can't install them.
Steps
Method 1 of 3: Loading new brushes
 1 Search online for free new decorative brushes to find the perfect one for you. If you're not sure what you are looking for, just type the following query into your favorite search engine: "Photoshop brushes set." Hundreds of different options will be displayed in front of you, from painting kits to special relief brushes for shading or drawing grass. Stay with a basic set of brushes for now and find the one you like. Below is a list of several reliable download sites:
 - Deviantart
- Creative Market
- Design cuts
 2 Download.zip archive to your computer. Most of the brushes will be in .zip files, which are regular folders containing brushes. Once you've found a suitable set, download it to your computer. Your computer should be able to open .zip files, but fear not - almost all modern computers are equipped with programs to open zip archives.
 - If you're worried about losing your brushes after you download them, drag them to your desktop. So you can easily find them later.
 3 Open up.zip file. Download ZIP Extractor if you don't have another archiver, although usually you should. Double click on the .zip file to open it. If you can't find it, check your Downloads folder.
 - If you are not sure if you can open the zip archive, right-click on it and select "Extract" or "Open With". The standard programs for working with archives are ZIP Archive and WinRAR.
 4 Make sure that the folder contains a file with the extension “.abr "... The extracted folder will contain several files. But for you only the file with the ".abr" extension will be important. If you can't find the .abr file, delete the folder and search the internet for another set of brushes.
Method 2 of 3: Adding New Brushes in Photoshop
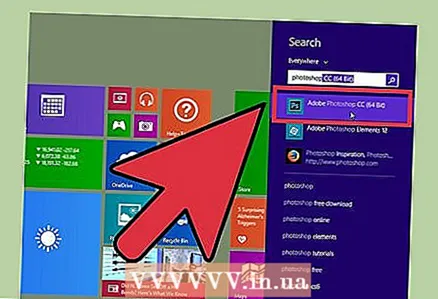 1 Start Photoshop. You don't even need to open the image. Just run the program to install your brushes.
 - Open the brush location in Finder or File Explorer. You need to know where they are.
 2 Press the B key on your keyboard or select the Brushes tool to display the brush editing window at the top of the screen. The window at the top of the screen changes depending on which tool you are currently using. Press the B KEY to switch to the Brushes tool.
  3 In the Brushes toolbar, click on the small arrow pointing down. It is usually located next to a small dot in the upper left corner of the screen. This will open the Brush Preset Management.
  4 Click on the gear and then select Load Brushes. You will see a window in which you need to specify the path to your brushes. Go back to the zip archive and find the .apr file - these are your new brushes.
  5 Double click on the file.apr to install the brushes... This will add your brushes to the current set. You can view them at any time by opening Manage Brush Presets. Just click on the little gear symbol and find your new brush set at the bottom of the dropdown menu.
  6 You can also add brushes by dragging and dropping them into the Photoshop working window. How much easier? Just click on the .apr file in the window or desktop and then drag and drop it into Photoshop. The program will automatically add your brushes. If none of these methods worked, try this:
 - Click on the "Editing" tab in the panel at the top.
- Click Sets → Manage Sets.
- Make sure the Set Type: is set to Brushes.
- Click the Download button, select your brushes and double-click to install them.
Method 3 of 3: Adding lots of brushes
 1 To save time, add multiple brush sets to your Photoshop system folder at once. If you want to add a bunch of new brushes, then make your life a lot easier by simply dragging and dropping them into the desired folder. This method works on both Windows and Mac computers.
 - Close Photoshop before starting.
 2 Find Photoshop files using the following paths. Below are two different paths. On a Mac, just Cmd + click on the Photoshop icon to open its system folder.
 - Windows: C: Program Files Adobe Photoshop
- Mac: / Users / {Your Username} / Library / Application Support / Adobe / Adobe Photoshop ___ /
 3 Open the Presets folder, then Brushes to see all of your brushes. This is where Adobe stores all your brushes and Photoshop looks for new ones.
 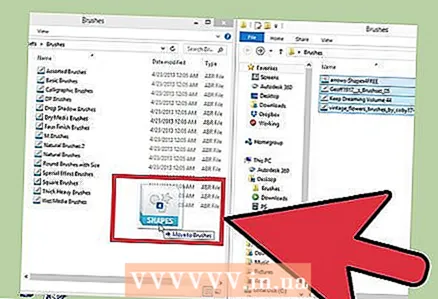 4 Drag new brushes into this folder. When you open the .zip file, drag and drop the .apr file into the Brushes folder. The new brushes will be ready to use the next time you start Photoshop,.
Tips
- If you are using Photoshop on a Mac, you need to locate the “.abr” files in / Users / {username} / Library / Application Support / Adobe / Adobe Photoshop CS3 / Presets / Brushes.


