Author:
Carl Weaver
Date Of Creation:
25 February 2021
Update Date:
1 July 2024

Content
Having a fireplace surround can dramatically improve the look of any fireplace, as well as being the focal point of a room's decor. You can purchase a fireplace set to give your fireplace the look you want. Assembling and installing the fireplace surround is quite simple. With a couple of simple tools, you can easily install your fireplace surround.
Steps
Method 1 of 2: Installing the portal
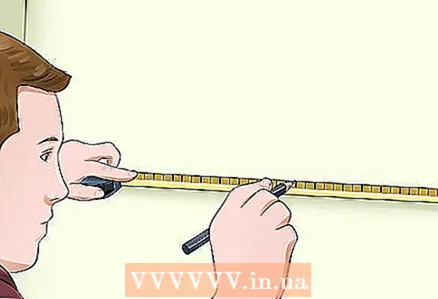
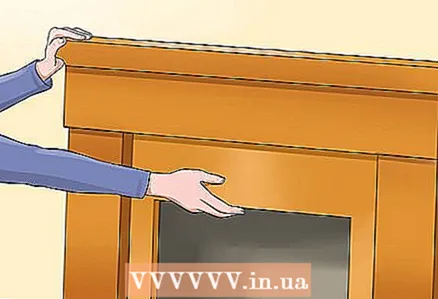 1 Place the portal around the fireplace. Carefully align the portal so that the fireplace is exactly in the middle and the portal protrudes evenly on both sides of the firebox. Using a tape measure, make sure to position the portal correctly and then align it horizontally using a level.
 - It is necessary that the portal be leveled not only in the horizontal plane, but also in the vertical one. Use the dashboard level to check the level in the vertical plane.
 2 Mark the area. With a piece of chalk or a pencil, draw a contour along the edges of the portal, along the top and sides of the fireplace. Once you're done with the markings, move the portal away from the fireplace and lay it face down on a flat surface.
  3 Mark the area for the mounting plate. Draw a second set of lines that will serve as the outer edge of the fastening strips, also called "guides".
 - You can measure the bar by attaching it to the back of the portal.Using a tape measure, measure from the top edge of the portal to the bottom edge of the plank. Let the tape follow the line drawn in the second step, and then, using the new measurements, draw a second line just below the first. For example, if the distance from the top edge of the portal to the bottom edge of the plank is 7.5 cm, measure 7.5 cm down the wall and draw a second line.
- You can also choose a different method and measure the inside of the portal from the top edge of the shelf to where you intend to install the plank. Then find out the length of the side of the plank with which it will be attached to the wall. Add the resulting dimensions together. For example, if the distance from the framing shelf to the edge is 5 cm and the length of the plank is 3.5 cm, then the sum of these two values will be 8.5 cm. Draw a new line on the wall using this data.
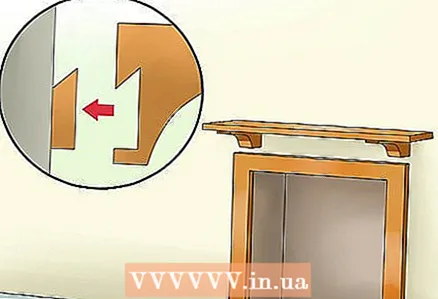
 4 Prepare the mounting plates. Mounting plates will be attached to the wall around the firebox at strategic points, creating the foundation for the portal. You will need at least 3 mounting strips - one for the top and one for the sides, although more can be used.
 - Compare the size of the mounting plates with the new markings on the wall and cut them with a saw. The top bar should be 30 cm shorter than the shelf.
- Install the mounting plates on the portal. Install the top plank first, then the side planks. They should fit snugly together, but not necessarily perfectly aligned. If necessary, make adjustments to the length of the planks.
 5 Find and mark the racks. If you are attaching the portal to drywall, then you will need to attach the planks to three posts behind the portal. Once you find the posts, mark them in the center along the planks.
 - The uprights are designed to support and hold drywall in interior walls. When hanging heavy items like a portal, make sure to hang them on racks. Racks are easiest to find with a rack detector available from any hardware store.
- The uprights are evenly spaced in the wall. In most houses, they are located 40 cm apart. As a rule, the width of the posts does not exceed 4 cm. When attaching something to the post, be sure to attach it to its center, which is located two centimeters from the edge.
- Find an electrical outlet on the wall. One side of the socket will be nailed to the rack. To find out which one, it will be enough just to knock. Use your knuckles to lightly tap the wall on both sides of the outlet. If the wall is hollow, then the rack is not there. After determining which side the stand is on, measure 2 cm away from the outlet. This should be the center of the rack. Using a tape measure, mark the racks along the wall every 40 cm.
- There is another way to find racks, for this you need to look at skirting boards. The skirting boards are nailed to the uprights, so if you find any holes or indentations that have been painted over or covered up, step back 40-60cm from that spot to find additional uprights.
 6 Attach the mounting strips to the wall. Press the plank against the wall and line up the bottom with the second set of lines. The bottom edge of each plank should align with the top of the second line. Use a level so that the top plank is completely horizontal from left to right, and the side planks are perfectly vertical from top to bottom.
 - Drill holes in the wall through the planks. Make sure each hole is drilled in the center of the posts marked earlier. If you don't want to drill holes, you can simply nail the mounting strips to the uprights.
- If your walls are made of bricks, make sure to drill a hole in the brick and not in the cement. Cement is not very strong, so you probably won't want to attach a shelf to it. Use a hammer drill, concrete screws, and a stone drill. If you are drilling soft rock, a carbide drill should be enough for you.Drilling into a brick will take a lot of effort and time, so make sure you drill in the right place.
- Once you're done with the holes, screw the planks into place using the drilled holes. Before proceeding, be sure to switch the hammer drill to normal mode.
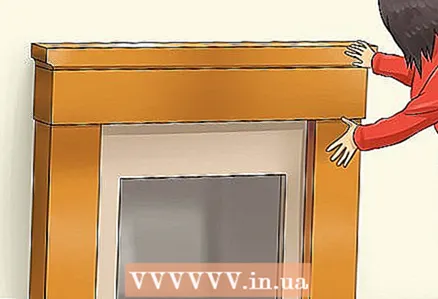 7 Install the portal. Attach the portal to the wall using the drawn lines. The portal should fit between the planks that will hold it in place. Then use a drill to screw the bolts into the planks through the portal. The bolts should be spaced approximately every 40 centimeters. Secure the portal to the top plank and two on the sides.
 - You can nail the portal to the mounting strips if you like.
 8 Add finishing touches. Attach a decorative strip. A gap will appear between the wall and the portal, which must be hidden with a decorative overlay. You can use nails to install it.
 - Cover the bolt heads with wood putty, spreading the putty evenly over the entire surface of the portal. Let the putty dry and then apply paint to completely cover the holes.
Method 2 of 2: Installing a mantel
 1 Place the shelf against the wall. Determine the exact location of the mantel above your fireplace. Most mantels are placed 125-150 cm above the floor. When installing the shelf, be aware of the fire height. Since wood is a combustible material, there are laws and regulations that must be followed when placing a mantel over a fireplace's combustion chamber.
 - If the shelf is 25 cm wide, the minimum distance from the top edge of the fireplace is usually 48 cm.For a 20 cm wide shelf, the distance should be 43 cm, and 38 cm for a 15 cm wide shelf.
- With the shelf aligned, draw a line on the wall to match the edge of the mantel. Make a mark in the very center of your fireplace. You need to make sure your fireplace is not one-sided.
 2 Plank preparation. It is the plank that will hold the shelf on the wall. It should be long enough to fit the width of your shelf.
 - Measure the length of the shelf. Then, using this value, find the center line and mark it on the plank. You must align the mark with the one you made in the first step. You will line this mark up with the mark you made on the wall in Step 1.
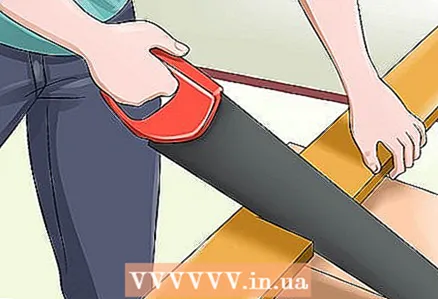
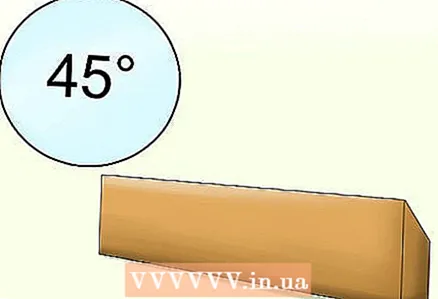
- The top of the plank should have a slanted edge, not a straight edge. Take a saw and cut one side of the plank lengthwise at a 45-degree angle. This is what the shelf will be hung on.
- Place the corner edge of the plank against the shelf. Make sure they fit snugly together so the mounting plate can support the shelf.
- If you don't want to make a corner edge, then you can use a flat edge plank. Make sure the bar is wide enough to screw the shelf onto.
 3 Mark the plank line on the wall. Attach the mounting plate to the shelf. Using a tape measure, measure the distance from the top edge of the shelf to the bottom edge of the plank. Using this value, draw another line below the one from the first step.
 - If you don't want to measure the two pieces together, find out the shelf length and plank length. Add these two values together to determine how far from the first line to draw the second.
 4 Find the racks in the wall. To hang the shelf on the wall, you must definitely attach it to the uprights. For the mantel, you will need at least 3 uprights. Racks are easiest to find with a rack detector available from any hardware store.
 - In most houses, they are located 40 cm apart. As a rule, the width of the posts does not exceed 4 cm. When attaching something to the post, be sure to attach it to its center, which is located two centimeters from the edge.
- If you don't have a rack detector, find an electrical outlet on the wall. One side of the socket will be nailed to the rack. To find out which one, you just need to lightly knock your knuckles on the wall on both sides of the outlet.If the wall is hollow, then the rack is not there. After determining which side the stand is on, measure 2 cm away from the outlet. This should be the center of the rack. Using a tape measure, mark the racks along the wall every 40 cm.
 5 Attach the mounting plate to the wall. Align the flat bottom edge of the plank with the bottom line. Make sure the plank is level before you attach it to the wall.
 - If you are attaching the shelf to a brick, you will need about 5 bolts. If you are attaching the shelf to a cardboard box, screw or nail it to the uprights.
- Drill holes in the wood before attaching the shelf to the wall. Then it won't crack.
 6 Install the shelf. If you are using a trim strip, place the shelf on the mounting strip, making sure it fits snugly against the wall. Check that the shelf is level.
 - If you are using a flat strip, install the shelf on the mounting strip. Then secure the shelf to the strip along the back edge. You can secure the shelf to the plank with either nails or bolts. When installing the mantel, be sure to drill or hammer in the center of the plank.
Tips
- Depending on the weight of the fireplace surround, the number and length of the slats used may vary slightly. Light edging can be installed using small planks, while heavy ones will require longer planks.
- Make sure the drill bit is slightly smaller than the countersunk bolts you are using. Then the bolt will sit very tightly, which allows for closer contact of the mantel with the wall.
- Installing a mantel with a partner is much easier than trying to install it alone.
- Be sure to check that the size of your portal meets or exceeds the required value according to the rules for handling combustible materials. For most masonry fireplaces, you will need at least a fifteen centimeter gap on the sides of the firebox, and a twenty centimeter gap above it. Please note that the depth of the fireplace can affect these values. While adding a bezel certainly enhances the visual quality of the fireplace, you shouldn't forget about these requirements and choose the right fittings for the installation. Be sure to read these rules before installing the bezel.
What do you need
- Roulette
- Level
- a piece of chalk
- Drill and drill
- Countersunk bolts and screwdriver
- Wooden planks for planks
- Hand-held circular saw
- Wood putty


