Author:
Florence Bailey
Date Of Creation:
19 March 2021
Update Date:
27 June 2024

Content
- Steps
- Part 1 of 2: Getting Ready to Install New Speakers
- Choosing new speakers
- Preparing for installation
- Part 2 of 2: Installing New Speakers
- Tips
- Warnings
The stock speakers found in most new cars are often too plain, to put it simply. Fortunately, off-the-shelf speakers are often not only a relatively inexpensive way to improve the sound in your car, but they are also usually easy to install (although the wide range of speakers suggests there are some that are more difficult to install). Read below to find out how to install your new speaker set!
Steps
Part 1 of 2: Getting Ready to Install New Speakers
Choosing new speakers
 1 Examine the stereo system to which you are going to connect the new speakers. Some systems are just stereo audio systems that have limited power and two or four channels, so it makes no sense to put 100-watt speakers on these, or put 8 or more of them. Attempting to install too many speakers will, in fact, reduce the sound quality, or even harm the system.
 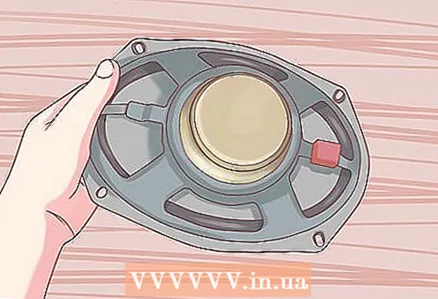 2 Measure your factory speakers so that you need a minimum of work to install new ones. Speakers come in a variety of shapes and sizes, so when planning a replacement, keep in mind that if the original speakers were 6 x 9 inches (15.24 x 22.86 cm) oval, similar speakers will be preferred over 4-inch round speakers (10, 16 cm) and will suit you better.
  3 Don't forget about quality. Fabric cone speakers are noticeably better than paper cone speakers, and the rugged ceramic magnetic speakers significantly outperform electromagnetic speakers at the same power level.
  4 Choose speakers with whatever cladding you like. You will find many different styles and colors of cladding and shapes in one price range, so it makes sense to choose ones that not only sound good, but also look good.
  5 Examine the electronic characteristics of your speakers. Some include a coil to prevent crosstalk and static, some support parallel daisy-chaining to add extra bass and ultra-tweeters where you need it, and some only daisy-chain to maintain correct system impedance.
  6 Check the power requirements of your new speakers as this will affect wiring. High power speakers may not be supported by factory wiring, and replacing the wires with thicker wires will be challenging as factory wiring tends to be in hard-to-reach places.
Preparing for installation
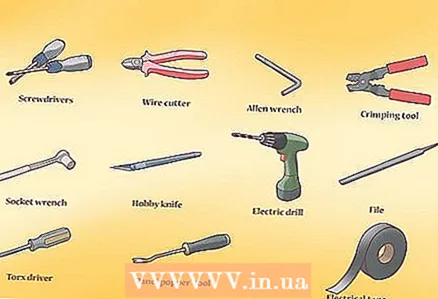 1 Pick up a tool. As noted in the introduction, there are thousands of options when it comes to commercial speakers. Therefore, any list of instruments will be incomplete for installing some speakers, and completely suitable for others. The tools you'll need to install a new set of speakers will likely include most of, but not necessarily all, of the following:
 - a set of screwdrivers (slotted, Phillips and others);
- nippers;
- crimping Tools;
- hex keys;
- socket wrenches;
- scalpel knife;
- soldering iron;
- electric drill;
- file;
- star screwdriver;
- a tool for dismantling the cladding;
- insulating tape.
 2 Make sure the speakers you choose fit your vehicle. Many purchased speakers will fit in the factory seats, but some will require minor modifications such as installing a mounting plate, drilling new holes, and so on. Be sure to take this into account when buying new speakers - installing disproportionate or irregular speakers can be difficult.
 - Keep in mind that many speaker sellers offer tools on their sites to determine which of their products will work best for your car.
 3 Protect yourself from electric shock by disconnecting the vehicle battery. As with all electrical work, it is important to secure yourself and the electrical system before starting work. Disconnecting the battery prevents the risk of electric shock or short-circuit damage to the car electronics, so be sure to consider this before working on your car's electrical system.
  4 Check the instructions included with your new speakers. Since there are many different types of speakers, it is almost impossible to write a manual that fits all perfectly. The instructions below are very general and may not fit every set of speakers on the market. If necessary, refer to the manual that came with your speakers, as it is specifically designed for this product.
Part 2 of 2: Installing New Speakers
 1 Remove all panels or grids. Almost all the speakers in the car are covered with some kind of protective panel or mesh. Remove this protection before removing the speaker. Lift the mesh with a suitable tool, such as a flat screwdriver, if necessary by unscrewing any screws or screws holding it.
 - The steps required to access the factory speakers depend on the make and model of your vehicle. In a worst-case scenario, for example, you may need to remove the seats, climb into the trunk to access important bolts or cables, or even remove the door cards completely to access the speakers.
 2 Remove the factory speaker. Note that the speaker is usually, but not always, attached to the wiring harness, so take care not to rip it when removing it. You may also find that you need to unscrew one or more small bolts and / or break off the adhesive mass or glue that holds the speaker in place.
 - If you think that you will have to reinstall the factory speakers in the future (for example, when selling a car), do not forget to keep the screws you unscrewed.
 3 Connect the new speaker to the car's wiring harness. Usually, to connect a new speaker, simply plug the speaker connectors into the connectors on the car. However, if your car does not have this simple type of connection, you may need to connect the speaker by soldering or twisting the wires.
 - Make sure to match the polarity of the car wiring and speaker connections. Typically, the positive connector on the speaker is the larger of the two and is marked with a “+” or small dot.
- Duct tape can be a risky choice for wiring, especially on the dashboard, as temperature changes can weaken the tape and cause problems on the road.
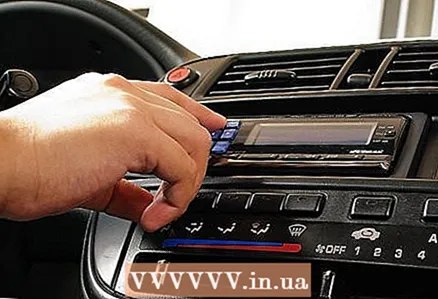 4 Check your speaker. Now that you have connected the speaker, it is important to test the connection so that you do not have to waste time on repairs later. Turn on the battery and turn on your car radio. Listen to the sound of your new speakers, look for visible vibrations at high volumes. If the speakers are not working, there is a problem with the electrical connection.
  5 Replace the new speaker. Once you are sure that the speaker is working properly, reinstall it in the door or panel. If you're in luck, the new speaker will fit in the original location.However, it may be necessary to install a special mounting kit (usually comes with the speaker), drill new holes for the self-tapping screws, and / or use an adhesive to hold the speaker in place. Follow the instructions included with the speaker.
  6 Install and test subwoofers. Subwoofers are responsible for the ultra-low "thumping" bass sound that some car owners admire. If your car initially has factory subwoofers, installing new ones will be a simple substitution of one for another, replacing the old ones and connecting to the wiring. If there were no factory subwoofers or you want to install additional ones, your task will be much more difficult. You may need to expand the mounting locations of the factory subwoofers, or make significant changes to your car if you are installing larger subwoofers. For example, many who want to add multiple subwoofers to their car install a special panel in the trunk to accommodate them.
 - Subwoofers often have high power requirements and complex wiring diagrams. You may want to buy and supply a separate wiring kit to simplify the process of connecting your subwoofers.
- If not, you may need to connect the subwoofer directly to the battery and car stereo and manually ground.
- Subwoofers often have high power requirements and complex wiring diagrams. You may want to buy and supply a separate wiring kit to simplify the process of connecting your subwoofers.
 7 Install and test the tweeters. As with subwoofers, installing tweeters that produce ultra-high frequencies can be easy or difficult, depending on the machine's factory components. If you have had tweeters in your car, you just need to install the new ones in the existing places and connect them to the existing wiring. If, however, there is no room for tweeters, you will need to make new ones (or expand old ones using installation kits if the existing space is small). Fortunately, the tweeters are significantly smaller than the subwoofers, so relatively fewer modifications will be required.
 - As with subwoofers, if your car does not already have tweeters, you may need to connect them directly to the battery and car radio and ground them to the car body.
 8 Remove all panels and speaker grilles. Once all the components of your new system are installed, you can remove any speaker grilles or panels that had to be removed to install the speakers. Be sure to save any screws that you had to unscrew to get the grate or panel so that you can put them back in the correct position if necessary.
 - Congratulations - your new audio system is ready!
Tips
- Once you've reached the final stage, there are a couple more things you can do. Replacing your factory radio with a purchased one will add power to the new speakers. Also, if you want to keep the original radio, or maybe features like the switches built into the steering wheel, you can boost the factory radio.
- If you still have your factory radio installed, installing purchased speakers may not improve the sound quality for you. You may find that the radio does not produce deep bass like it did with the original speakers. This is because original speakers are usually designed with paper cones, which need less power to reproduce bass.
Warnings
- Make sure the new speakers match your car stereo. Most of them have power rating and impedance like 25W and 8 ohms


