Author:
Florence Bailey
Date Of Creation:
20 March 2021
Update Date:
1 July 2024

Content
 2 Park, raise the handbrake, straighten the chains, and then slide them over the wheels. Try to ensure that the chains cover the top three quarters of each wheel and make sure the side sections of the chains hang straight.
 - Some types of chains have rings attached. These rings should be located on the inside of the ramp; chains in addition need to be placed so that the rings are at the bottom, almost on the ground. That is, during the installation process, you will not only have to climb under the car, but also show some ingenuity.
3 Pull the machine forward a little to loosen the remaining chain quarters. Engage in gear, lower the handbrake and move forward a little. Do not forget that only small pieces of chains are not put on, so you need to drive just a little bit. When you decide that you have advanced enough to secure the remaining quarters, then stop and raise the handbrake again. 4 Connect the ends of the chains. Engage the hooks at the edges of the chains, starting at the inner surfaces of the wheels (around the axle). Repeat these steps for the outer surfaces of the tires. Using the special link supplied in the kit, tighten the chains tightly so that they "walk" as little as possible during the ride. - If your chains are equipped with lug links, refrain from using a special tightening tool. However, traditional snow chains are tightened with just such attachments.
- There is a widespread way to achieve additional chain tension (it is especially relevant if your chains are not equipped with individual tensioners) - to use tie cords. These cords can usually be found in the same stores as the chains themselves.
 5 Make sure the inside and outside sections of the chain are laid the same. If the inside of the chain is tight and the outside is loose, then you need to distribute the chain more evenly. 6 Repeat the same for the rest of the car's wheels. With your hand full, you can try installing chains on both front (or rear) wheels at the same time - this way, you will noticeably speed up the process. 7 Drive a short trip of about 500 m and retighten the chains. In the process of movement, the chains on the wheels will sit down and, accordingly, loosen. Therefore, it is worth tightening them again to achieve the most snug fit.
 Method 1 of 1: Avoiding Common Mistakes
- 1 Decide how many wheels you are going to use in the chain. Many people don't know which wheels to wear snow chains. The rule of thumb is: put chains on driving wheels your car.For example, if you have a front wheel drive car, then the chains must be put on the front wheels. If the car is all-wheel drive (4WD or AWD), then all four wheels are shod in the chain.
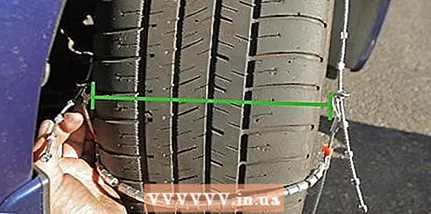
- 2 Get chains of the correct size. In order to determine the correct chain size for your vehicle, you need to know the size of your tires. Look for a long line of letters and numbers on the outer side of the wheel. The first number indicates the width of the tire; the second number indicates the ratio of the height of the tire to its width, expressed as a percentage; the third number is the diameter of the wheel (usually expressed in inches). You will need all this information to purchase the correct snow chains.
- 3 Don't rely on the chains to ride until you make sure they fit your wheels. It sounds primitive, but many make this stupid mistake: people think that the chains are pulled like gloves, and when it comes time to put them on the wheels, it suddenly turns out that the chains cannot be used, because they simply do not fit. Don't drive yourself into a corner. For iron confidence, put the chains on the wheels once in greenhouse conditions - before the time of serious testing comes.
 4 Allow yourself enough time to put on the chains; Also, don't forget to dress properly. Since the algorithm for putting on chains seems so simple, many people mistakenly believe that it is a matter of a few minutes, and then you can rush about your business. Not so fast. Under normal conditions (wet, cold, dark) putting on the chains can take an hour or more. And if you do not want to freeze, get wet to the skin and get covered with an even layer of mud, then instead of your usual ski suit, put on waterproof work outerwear.
 - 5 Remove the snow chains as soon as you reach a clean road. If the weather has improved, or you have passed a sign indicating that the chains are no longer needed, remove them immediately. Do not continue to ride with the chains on, as this will cause potholes and deform your wheels unnecessarily.
Tips
- Chains are always fitted to the drive wheels to ensure maximum traction while riding. Therefore, if you have a rear wheel drive car, then put chains on the rear wheels. For a front-wheel drive vehicle, the opposite is true. For 4WD vehicles, the chains must be fitted to all four wheels.
- Check with your dealer for the maximum speed your chains are rated for. In most cases, chains should not be driven faster than 50 km / h.
- For a more accurate placement of the chains, it makes sense to do the following. After hitting the chains, get out of the car and check that the wheels are correctly positioned on the chains. Otherwise, back out, straighten the chains, roll onto them again and check again.
Warnings
- Make sure the points of all hooks are facing outward, otherwise you could damage the tire sidewalls while driving.
- Do not use chains on a slope, but on a level surface.
- Before starting to move back and forth, look around and make sure that you do not hit anyone.


")