Author:
Virginia Floyd
Date Of Creation:
5 August 2021
Update Date:
1 July 2024
Content
- Steps
- Part 1 of 3: Measuring and Cutting Laces
- Part 2 of 3: Securing the ends of the laces
- Part 3 of 3: Lace up your shoes
- Tips
- Warnings
- What do you need
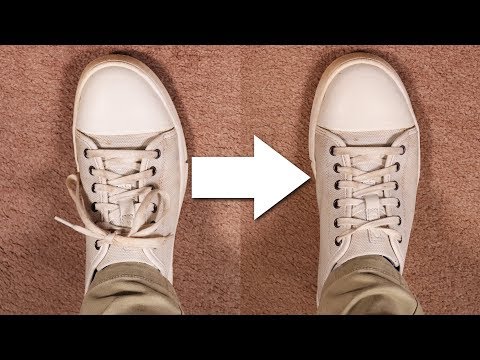
Have you ever had to buy new shoes and find that the laces are too long? In addition to stepping on them and ruining your shoes, you can trip over the laces and injure yourself. But that doesn't mean you have to go out and buy a new pair of laces. With a few common items found in any home, you can easily shorten your laces and forget what it means to "trip over long laces."
Steps
Part 1 of 3: Measuring and Cutting Laces
 1 Put on your shoes. How long you need to cut can be determined by eye, but it is better to put on shoes and see how much extra length is on each side. Lace your shoes as comfortably as possible and pay attention to the length of the laces to decide how much to cut.
 - When deciding how long to cut your laces, also think about how you prefer to tie your laces. If you don't want to tie your laces in a double knot, tie in the usual way and estimate how much to cut on each side.
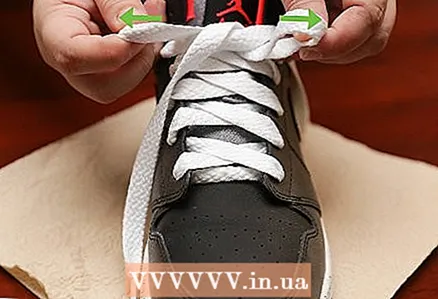
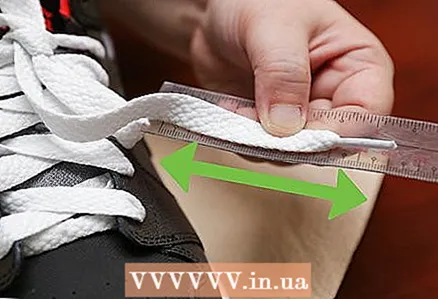 2 Mark your laces. You will need to know the exact location of the cut, and marking in the correct place will help with this. With a felt-tip pen, draw lines at each end and mark the length you want to get rid of.
 - You can keep your shoes on when marking the laces, but it is usually easier to put on your shoes and measure the length to be removed from each side with a ruler. And then you need to pull out the laces and put a mark.
- Laces come in standard sizes such as 75 cm, 100 cm or 140 cm. So in the future you will know where to mark similar laces.
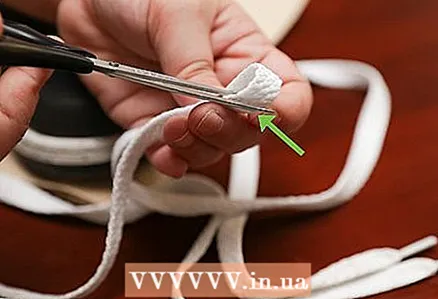
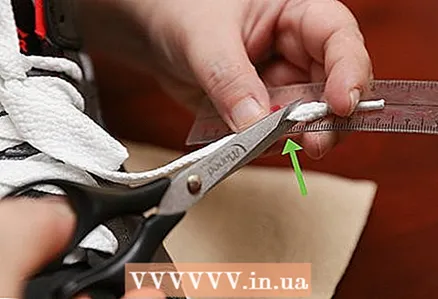 3 Cut the laces. They are usually easy to cut, and any household scissors will do. Make sure they are sharp, however, so that the ends will be as loose as possible when cutting. Cut according to your marks so as not to be mistaken with the cut length.
 - Do not trim any excess length on one side of the lace only. You end up with one finished and one raw edge, which will look odd when you re-lacing your shoes.
 4 Try trimming off the excess from the middle of the lace. Instead of cutting the laces from the edge and then finishing the ends, you can get rid of the excess length in the middle: you get two pieces, each with an egglet on one side. All you have to do is pin these halves together.
 - Try on your shoes; Use a ruler to determine which length is unnecessary on each side of the lace, add these numbers and cut the resulting length from the middle of the lace.
- Tie the pieces of lace together as tightly as possible, secure the knot with a little instant glue and let it dry. If extra pieces of lace stick out from the knot, cut them off. You can also sew the two halves of the lace together.
Part 2 of 3: Securing the ends of the laces
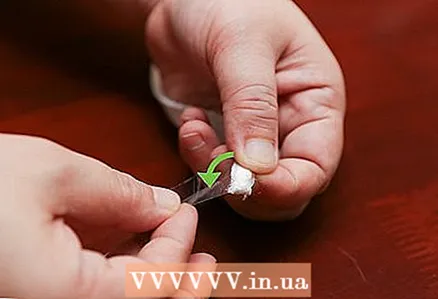 1 Wrap the ends with duct tape. Place the tape on a flat surface, sticky side up and place the lace in the middle. Wrap a piece of duct tape tightly and neatly around the end of the lace to create a sturdy cap called an eglet. If the ends stick out after the egglet, cut them off with scissors.
 - To make the egglet more durable, you can put a few drops of glue on the end of the tape and then wrap it around the string.
- The ends, secured with duct tape, resemble egglets on ready-made laces, so you can trim off any excess length from just one end of the lace if you prefer.
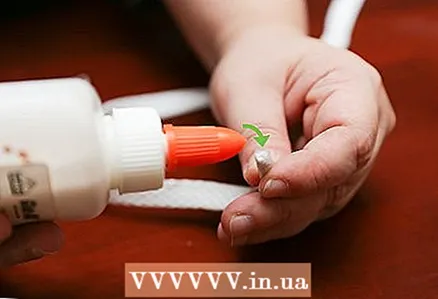 2 Apply glue to the ends. Apply a drop of glue to the very end of the laces, and when the glue begins to dry, squeeze so that the lace absorbs the glue better and becomes thinner. When the glue is completely dry, you can trim off the excess and apply another thin layer of glue to improve the strength of the eglet and give it a neat look.
 - Do not use instant glue such as Super Moment, as it will stick to your skin and the lace tip will not be able to form.
- Acetone-based glue is best suited: "Moment-crystal" or similar. Such glue is waterproof and becomes transparent when dry, so it can be used to make the perfect egglet.
- If you don't have glue on hand, you can use clear nail polish instead.
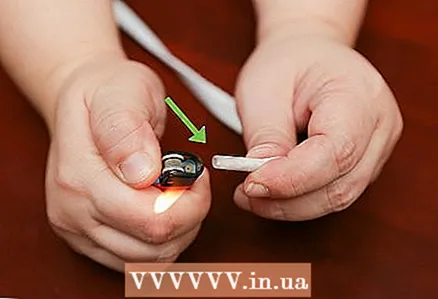
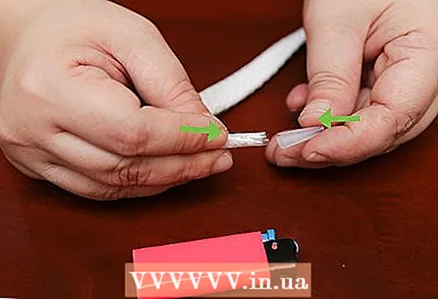 3 Use heat shrink tubing. Typically, such tubes are used to insulate electrical wires. But they are also quite sturdy and flexible to make an Eglet. You need to cut a length that fits a standard egglet; it is usually about 1.3 cm. Place a tube over each end of the string and heat them with a tribe of candles, lighters, or other flame source so that the tube material shrinks.
 - Select the diameter of the tube so that the lace can be threaded into it. In most cases, 4–5 mm will do.
- When threading the end of the lace into the tube, use a twisting motion to avoid fraying the loose end of the lace.
- It doesn't take much heat to shrink the tube, so keep it at a sufficient distance from the flame source. If the pipe starts to smoke or bubble, the temperature is too high.
- If you have a mini hair straightener, you can use it to safely heat up the heat shrink. Squeeze the tube gently with an iron for 5-10 seconds so that it begins to contract and form an egglet.
- The transparent heat shrink tubing will be the most similar to the factory-made Eglet.
 4 Melt the tips. If the laces are made of synthetic material, you can simply melt them to get a smooth, neat tip. Hold the end of the string over a candle, matches, lighter, or other flame source long enough to create a sealed edge.
 - Do not hold the lace too close to the flame, otherwise you may ignite it completely. It is best to do this over a sink, in case of possible flames.
- Do not touch synthetic material when it starts to melt because it can stick to your skin.
Part 3 of 3: Lace up your shoes
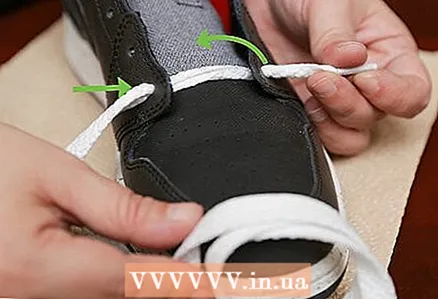 1 Start at the bottom eyelets. When inserting laces into shoes, always start with the holes closest to the toe. This allows you to tighten the lace in two opposite holes to create the most comfortable fit. Thread the ends of the laces through the holes and pull them out so that the ends are of equal length on both sides.
 - Regardless of which method you choose to secure the ends of the laces, the key is to give the Eglets enough time to dry and cool before you lace up the shoes.
- Many pairs of shoes have two rows of parallel eyelets, one closer to the tongue and one further away. If you have a wide foot, use the eyelets closer to the tongue to give your foot more space. For narrow feet, lace through the eyelets farther from the tongue for a tighter fit.
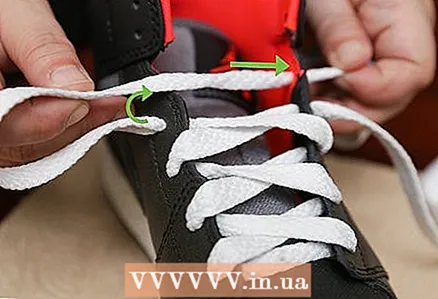 2 Lace up the shoe in a zigzag pattern. There are many different ways to lace up your shoes, but zigzag lacing works well for most people. Passing the laces through the bottom holes, cross the ends of the laces: insert the right end into the next hole on the left, and the left end into the right. Continue crossing the ends in front of each hole to the last row.
 - Zigzag lacing usually provides the most comfort as the criss-cross occurs between the two halves of the shoe and the laces do not press on the foot.
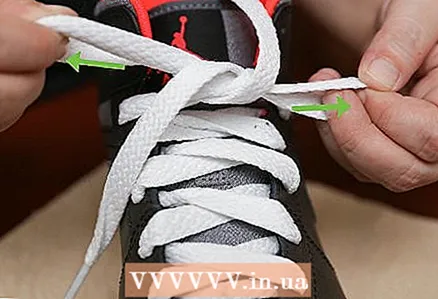 3 Tie your laces. Tie the laces as usual, but since they are now shorter, there is no need to tie them with a double knot or bow. When you tie your shoelaces, you can tell if you have cut the length.
 - If you haven't shortened the laces enough, cut some more and repeat the steps for styling the ends.
Tips
- You can experiment with scotch tape or heat shrink tubing when making lace egglets. Both the tape and the pipe come in a variety of colors, so you can create unique Eglets in the colors of your school, team, or just your favorite color.
- If you are afraid to burn your fingers when you "seal" the ends of the shoelaces - wear garden gloves or something similar: in them, the movement of your hands will be quite precise in order to shape the ends safely. They will also keep your hands safe if you use Eglet glue.
Warnings
- Always keep a fire extinguisher handy when using a flame to “seal” the ends of shortened laces. The flame can get out of control very easily and quickly.
What do you need
- Shoes
- Laces
- Scissors
- Felt-tip pen
- Scotch
- Acetone based glue or clear nail polish
- Heat-shrink tubing
- Lighter, candle or matches


