Author:
Marcus Baldwin
Date Of Creation:
19 June 2021
Update Date:
1 July 2024

Content
- Steps
- Part 1 of 2: Creating an inductive coil
- Part 2 of 2: Installing an inductive coil
- Tips
- Warnings
- What do you need
Want to impress your friends, family or teacher? A wiretapping is a small device in the form of a coil that can intercept the signal from the AC wiring of a certain system (in this case, a telephone), copy it, and redirect it to another system, for example, an amplifier, with which a telephone conversation will be heard in much the same way good, as with normal phone calls. You must not abuse this device in any way by secretly intercepting phone calls, as this is illegal in most countries of the world.
Steps
Part 1 of 2: Creating an inductive coil
 1 Gather the required materials. To make sure you don’t have to interrupt while creating a coil, first collect all the necessary materials and prepare your work area. Place the soldering station sufficiently stable on a level surface and at the desired height. The target of your inductive coil experiments will be a regular telephone line, also known as POTS. To create a device, you will also need:
 - Enamelled copper wire (the solenoid is the ideal donor for this)
- Ferrite latch filter
- Industrial alcohol
- Nippers
- Heat shrink tubing or electrical tape
- Soldering iron
- Solder
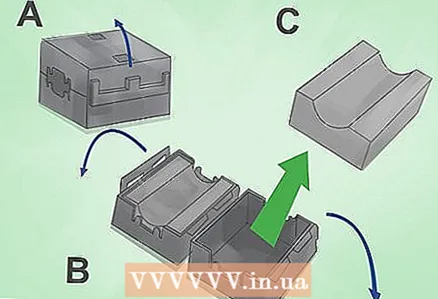 2 Open the filter and take out one of the ferrite core pieces. Your snap ferrite filter should be composed of an outer casing and magnetic cores made from an alloy of iron oxide and other metals. Cores are generally dark in color and are often used in electrical transformers and inductive coils where components such as a solenoid wire are wound around an inner core.
 - Snap ferrite beads are usually cylindrical in shape with a round hole in the center for the cord. They can be opened from the opposite side of the hinge.
- Your cores can be round or rectangular in shape, but regardless of this, you must position the ferrite filter so that it is open, like a book. Without opening the ferrite core, it will be difficult to wind the solenoid wire around it to make an inductive coil.
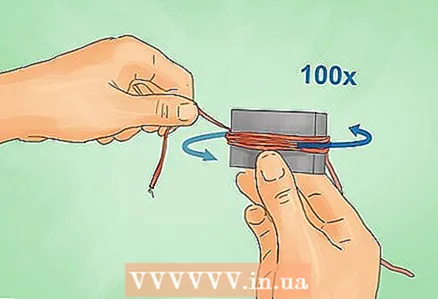 3 Wind 100 turns of the electromagnetic wire along the half of the core. Leave a five to ten centimeters of wire on each side. They will later be used to connect the audio plug.
 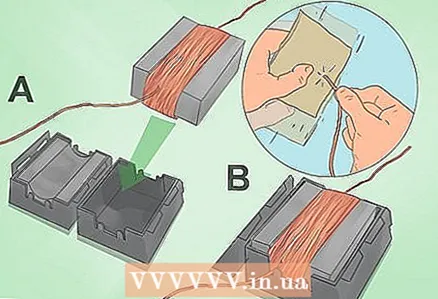 4 Place the wound core back into the housing. Now, using fine sandpaper or other soft abrasive material, remove the enamel coating from the ends of the wire.
 - Be careful when removing the enamel coating. It is very easy to make a notch on the wire, which can lead to malfunction of the entire inductive coil.
 5 Insert both ends of the wire into the heat shrink tubing and pull it further down the wire; after that it will be needed to isolate the soldering. The heat shrinkage will protect the inductive coil from damage and short circuits with bare wires. Be sure to leave enough headroom at the ends of the wire so you can plug in the audio plug.
 - You can also use electrical tape instead of heat shrink tubing for insulation.
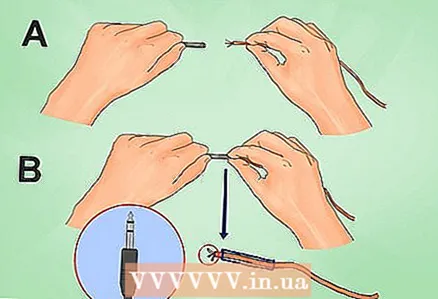
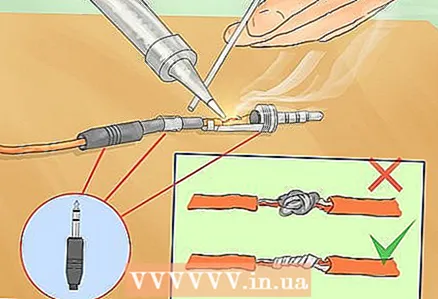 6 Solder the two ends of the coiled 6.35mm wire to the jack plug. You must solder the ends of the wires to the pins of the jack plug. Do not overheat the wire, otherwise it will become brittle and may break.
 - The surfaces that have been previously cleaned and wiped with technical alcohol are best soldered.
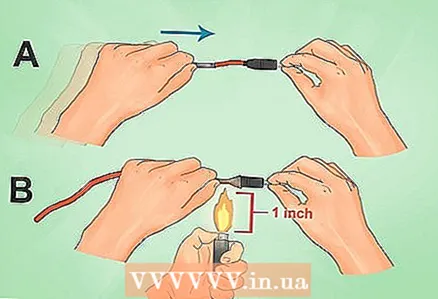 7 Place your heat shrink tubing over the soldering point. Precipitate it with a heat source. This will allow the heat shrink tubing to fit tightly around the soldered area.
 - When using a lighter, keep the flame 3-4cm apart. from heat shrinkage.
- If you are using electrical tape, then this step should be skipped.
Part 2 of 2: Installing an inductive coil
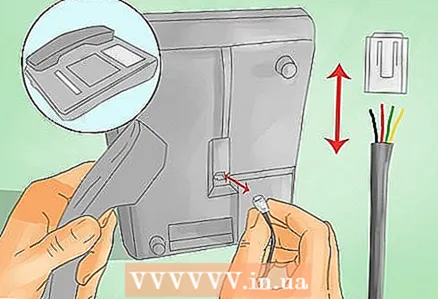 1 Unplug your phone and cable. To get your inductive coil to work, you need a POST phone (regular landline phone). Remove the plastic connector without breaking the wires inside. Damage will cause the telephone line to be broken and the inductive coil will not work.
 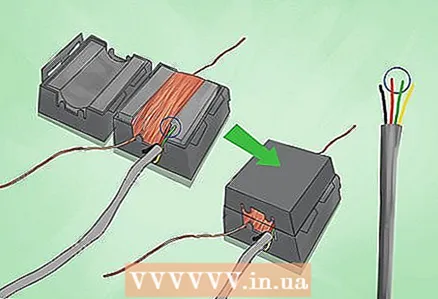 2 Open the ferrite bead and place the red or green wire inside it. One of this pair of telephone line wires will suffice. Do not use the yellow wire, otherwise your wiretap will not receive the signal.
  3 Connect the jack cable soldered to the listening device to the amplifier. If the distance from the wiretap to the amplifier is long, then you may need a 3.5mm jack extension cord.
  4 Listen to the conversation through the amplifier. While using the telephone, the sound is transmitted to the amplifier by induction of the telephone electrical signal. Step away from the device and admire the fruits of your work, while everyone around you calls you a genius.
Tips
- All the materials necessary for this can be purchased at any radio market.
- Installation may require some tweaking to work properly. Check for damage to the wire or enamelled ends. Both of these defects will impede the functioning of the inductive coil.
- Instead of soldering wires from the wiretap to the plug, you can connect them to the oscilloscope using jumper wires and terminals to see the signal on the screen. Better yet, connect via PicoScope to be able to analyze the signal using a computer.
Warnings
- This device is not intended for secret wiretapping! Unauthorized wiretapping is illegal in most countries and can have negative consequences for you.
- You must know the basic safety rules for working with electrical appliances before trying to use this device, otherwise you may get an unpleasant surprise. Although the potential danger when following the sequence of steps described in this article is very low, it is still better to study the safety rules than to regret later.
What do you need
- Enamelled copper wire (using a solenoid would be the best option)
- Ferrite latch bar
- Industrial alcohol
- Nippers
- 3.5mm jack cable
- Heat shrink tubing or electrical tape
- Amplifier with 3.5mm jack input
- POTS phone
- Soldering iron
- Solder


