Author:
Helen Garcia
Date Of Creation:
20 April 2021
Update Date:
1 July 2024
Content
- Method 2 of 3: Create Layered Invitations
- Method 3 of 3: Create Invitation Cards with a Pocket
- What do you need
- The number of colors you choose will be reflected in the cost of the invitation. Buying designer or colored paper or color prints will cost significantly more, so keep that in mind.
 2 Decide on the text. On your invitations, you need to include basic information so that everyone arrives at the right time, on the right day, and in the right place. Make sure to confirm all time and place arrangements before you sit down and grab your invitations.
 - Think about additional information you may need to enter, such as a contact phone number, details about an outfit or gift, a plan or map, or an internet address (if you created a website for the occasion).
- Some events, such as a wedding, usually include several parts: a rehearsal dinner, a dinner after the wedding day, and so on. Make sure all information about supporting activities is resolved and approved.
 3 Decide on the size. Two things to think about are postage and the right size envelopes. Visit an art store and contact the delivery service or visit their website for details.
 - Envelopes. In the Russian Federation, 5 types of envelopes are used: C6, DL / E65, C5, C4, B4. The smallest (C6) measures 114 mm x 162 mm, the largest (B4) 250 mm x 353 mm.
- You can search the internet for other sizes.Make sure the size of the invitation will fit the size of the envelope you choose.
- Postage. Shipping rules vary from country to country, so check with the service you will be using for details. Requirements apply to the size and thickness of envelopes.
- Square envelopes or other unusual shapes will require additional money for shipping, as they make it difficult to automatically sort them.
Method 2 of 3: Create Layered Invitations
 1 Choosing the lining. Lining - a layer on which the actual invitation text will be attached. The use of several levels gives the invitation depth, interest and can emphasize the color scheme of the event.
 - Choose medium to high density cardboard for lining. This will add weight and reliability to your invitation. This paper quality is most readily available in thick colors.
- Select one or more types of focal paper and glue it to the first page of the cover. Choose paper with different patterns, similar colors, or different textures to add originality.
- Multi-layered invitations are folded before being placed directly in the envelope, so don't worry about rolling a few thick or multi-layered cardboard.
 2 Print your invitation text. In order not to be mistaken with the size, it makes sense to first print the text of the invitation. When you see what length and width you need for the text section, you can push off of that and arrive at the final shape of the lining.
 - 3 Cut out the paper. How visible the backing will be depends on how large you cut each layer to. You can standardize the cuts, leaving the backing sticking out, for example, a centimeter from each border, or you can create different sizes of borders and from different paper, thus changing the amount of paper used in the invitation.
- Measure the paper carefully, cut it using a paper trimmer or scissors. A paper trimmer will make straight, even cuts, but if you have enough time and attention, a pair of scissors can do the job too.
- You can buy scissors with decorative blades so that the edge of the paper will take on an interesting shape when cut.
- Measure the paper carefully, cut it using a paper trimmer or scissors. A paper trimmer will make straight, even cuts, but if you have enough time and attention, a pair of scissors can do the job too.
- 4 Glue the layers in place. Use a glue stick to glue all the layers together. Place the back layer on the table and glue the rest of the layers on top of it. Some people have a good eye, and they can see for themselves where to glue so that they get even edges, for some it is better to make small pencil marks-points so that you can see exactly where to glue.
- Press firmly on the paper and let it dry completely before gluing the next layer so that the first layer does not move anywhere when you start gluing the next layers.
- The layer with the invitation text must be glued at the very end.
- If any of your layers are too thin and delicate, use double-sided tape instead of glue to avoid leaks and tears.
- 5 Add decorative elements. Once all of your layers are glued in place and dry, you can add some embellishments to your liking. If you used more than three layers (a layer with text also counts) or embossed paper, you can do without decorations. If you still want to complete the invitation with decorative elements, go ahead, do not hesitate.
- Make two holes at the top edge of the invitation, pass a ribbon through them and tie a bow.
- Glue buttons, stickers, or paper cutouts in the corner of your invitation.
- Use a sewing machine and zig-zag the edges of the layers to give your invitation a unique look.
- Print a large drawing on the back of your invitation - this will be a fun surprise for those who turn the card over after reading it.
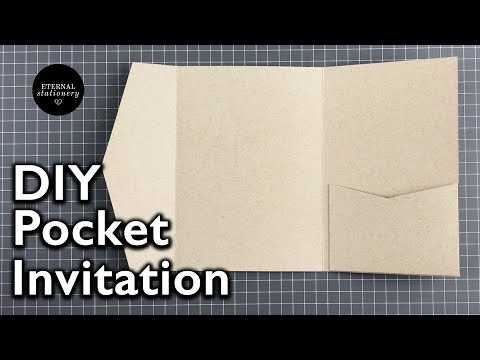
Method 3 of 3: Create Invitation Cards with a Pocket
 1 Measure your pocket. Lay a piece of thick paper horizontally on the table in front of you, which will be folded into a pocket. Using a ruler from the bottom-left corner of the paper, draw a horizontal rectangle 4.5 cm high and 17.5 cm long.
 - 2 Cut off. Using scissors or a knife, cut out the horizontal rectangle you just measured. Remove excess pieces of paper.
- The long flap of paper on the right will fold and become your pocket.
- 3 Fold across. With the lining in front of you and the space cut out in the lower left corner, fold from left to right. Measure 5 cm from the left side and fold vertically. Measure 12.5 cm from the fold (17.5 cm from the left edge of the paper) and make a second fold.
- Use a bookmark or ruler to sharpen the folds of the paper.
- 4 Roll up. Measure 3.75 cm from the bottom edge of the long paper "flap" on the right side and fold over to form a pocket. Glue the pocket back in place.
 5 Create invitation text. Use your computer and printer to print the invitation text. As a result, the cut-out text should be 12 cm wide and 16 cm high.
 - If this makes it easier for you, you can print out the corners around the text to make it clear how the text should be cut.
- Use a glue stick to glue the invitation text in the middle of the invitation panel.
 6 Make earbuds. Print out the text for the inserts that you will put in the pocket of your invitation and cut them to fit. The inserts should be slightly smaller than the pocket itself. In this example, they should be less than 10 cm wide and less than 16.5 cm high.
 - Inserts may contain directions and / or a map; if it is a wedding invitation, it may contain an entry badge, seating information, or a first and last name card or envelope.
- Consider the fluctuations in the height of your earbuds. You can do it by eye or standardize the earbuds in height, at least making each of them shorter than the other by 2-3 centimeters.
- Whatever you decide on the height of the liners, mark each one so that you can see them when the invitation is opened. Place the earbuds along their height so that the edge of the earbud looks out a little higher behind the smallest one, and so on. This way, the overall view of the invitation will look orderly, and the reader can easily pull out each insert as he reads it.
- 7 Collect your invitation. Place the earbuds in your pocket; first the highest, then descending in height, until the pocket is full.
 8 Roll up and tie. Fold the right edge of the pocket and close the top with the left flap. Tie a piece of decorative ribbon around it to keep it covered.
What do you need
- Cardboard
- Decorative paper
- Thick paper 22x27.5 cm (for pockets)
- Ruler
- Glue
- Scissors or paper trimmer
- Ribbon, stickers, buttons and other decorative elements
- Rubber seals
- Printer


