Author:
Ellen Moore
Date Of Creation:
14 January 2021
Update Date:
27 June 2024
Content
- Steps
- Part 1 of 4: Preparing the Webbing
- Part 2 of 4: Installing Buckles and Clips
- Part 3 of 4: Sewing the cross brace
- Part 4 of 4: Making Suspenders Using the D-Ring
- Tips
- What do you need
- Additional articles
For several centuries, braces periodically come into fashion, then go out of it. By supporting the belt of the trousers, they take over the function of the belt and prevent the trousers from falling off. This article will help you do crisscross back braces as well as D-ring braces. Even if they go out of fashion again, they can always be worn under a suit. The process of working on such an easy sewing project will be one pleasure for you.
Steps
Part 1 of 4: Preparing the Webbing
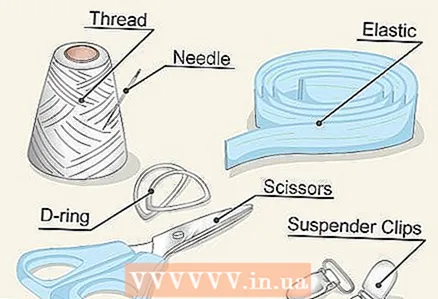
 1 Prepare the required materials. Buy about 1.8-3.6m thick elastic for suspenders 25mm wide (the specific length depends on your height and weight), two buckles and four special clips. All of these can be found in a fabric store. You will also need scissors, tailor's pins, a tape measure, a sewing machine, or a regular needle and thread.
  2 Cut the elastic into two equal pieces. The two lengths of elastic for the suspenders should be slightly longer than the required final size, as the length of the straps will be adjusted by the buckles.
 - To prevent the elastic from being too short, measure yourself first. Grasp the end of the tape measure and place it at the front of your waist.
- Ask someone to throw a measuring tape over your shoulder and also attach it to your waist, but this time on your back.
- Add 15-30 cm to the resulting measurement to make the suspenders adjustable. You will need two pieces of elastic that are exactly this length.
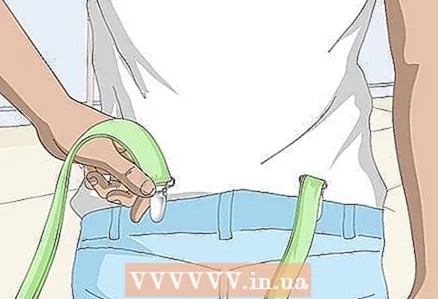
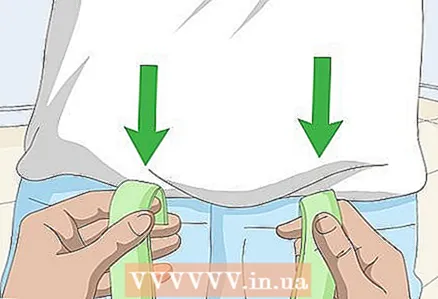 3 Attach both ends of the elastic to the front of the waistband with one end. Hold the ends of the elastic bands at the waist level (where they will later be fastened).
 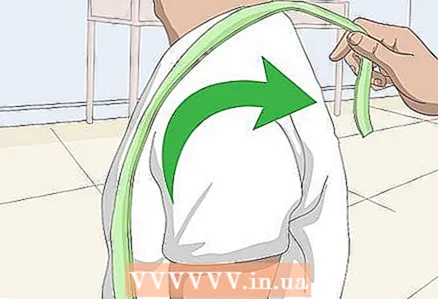 4 Place both elastic bands over your shoulders. Have someone help you to get the elastic of the straps over your shoulders.
  5 Cross the elastic bands at the back. Have a helper put the pieces of elastic to the back of your pants. In this case, the straps on the back should go towards each other in order to cross each other. The resulting cross will be located in the lumbar region.
 - After this visual check, remove the elastic bands from the shoulders and proceed to the process of installing the buckles and clips.
Part 2 of 4: Installing Buckles and Clips
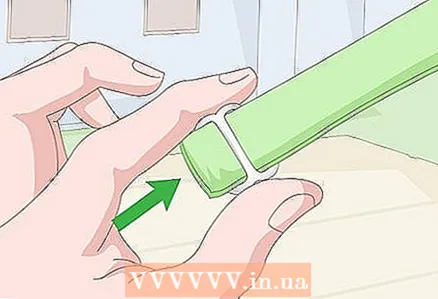 1 Take one rubber strap and put the buckle over it. Thread the end of the elastic into the first hole of the buckle from bottom to top, and into the second from top to bottom. Pull the end of the elastic out of the buckle about 6 mm.
  2 Wrap the end of the elastic around the center strap of the buckle and sew. Fold the protruding end of the elastic back over the center strap of the buckle, and then sew it in that position.
 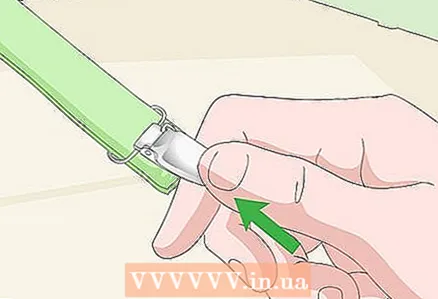 3 Slip the first clip over the same strap. Slide the free end of the strap into the loop of the suspender clip, then fold it up to the main length of the elastic. Please note that the clip itself should stick out from the opposite side of the elastic than the one you folded and hemmed the first end with the buckle.
 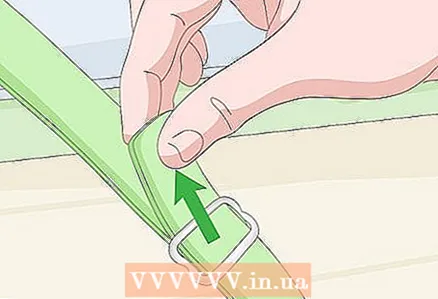 4 Pass the free end of the strap through the buckle. Take the free end of the elastic and thread it through the buckle. First, swipe it from bottom to top, then top to bottom and pull it out.
 - This will create an adjustable front end of the webbing.
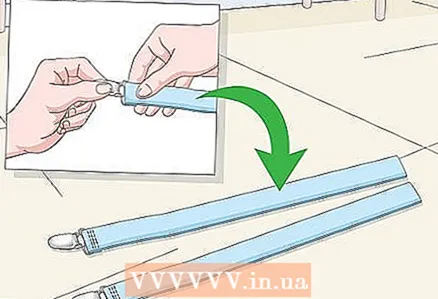
 5 Slide the second clip over the free end of the webbing. Slide the still free end of the elastic into the hole in the second clamp and tuck. Note that the clip should be on the front side of the suspender strap, and the underside of the elastic should be on the wrong side.
 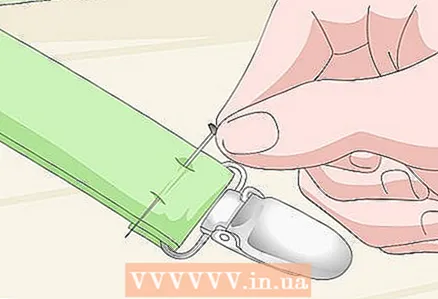 6 Secure the end of the elastic with a pin. Take a tailor's pin and pin it on the back of the elastic. The pin will keep the elastic in place while you sew.
 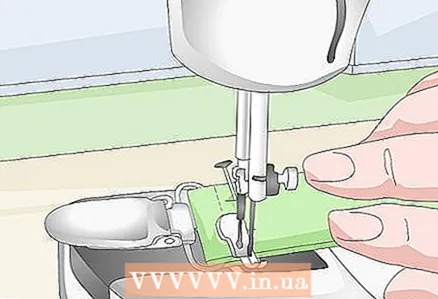 7 Sew the folded end of the elastic. Use a sewing machine or a regular needle and thread to sew on the other end of the strap. Be sure to bartack at the very beginning and at the end of the stitching, as it is your stitches that will hold the clip on the strap.
  8 Repeat the procedure with the second strap. Repeat the same procedure for the remaining strap, buckle, and clasps. You now have two ready-made suspender straps.
Part 3 of 4: Sewing the cross brace
 1 Attach the back strap clips to the waistband of your trousers. Wear pants that fit you well. Clip the back clips of both shoulder straps to the waistband of your trousers.
  2 Cross the straps. Place the straps over your shoulders, crossing them at the back.
  3 Clip the front suspender clips to the pants. Pull the loose ends of the straps hanging from the shoulders to the waist. Fasten the front clips of the suspenders on the pants at the front.
  4 Pin the straps on the back at the intersection. Ask your assistant to pin the crossed back straps of the suspenders with a pin. The pin will fix the location of the cross that needs to be sewn.
  5 Sew the cross brace. First unfasten all clips and remove the braces. Use a sewing machine or a simple needle and thread to sew a chain of stitches in the shape of a diamond at the point where the straps cross, which will secure the cross. Each side of this diamond will contain approximately five stitches.
Part 4 of 4: Making Suspenders Using the D-Ring
 1 Gather the required materials. For suspenders, the straps of which converge on the back on a D-shaped or even on a regular ring, you will need the following: 1.8-3.6 m thick elastic band for suspenders 25 mm wide (it all depends on your height and weight), one D-shaped or a circular ring, three special clamps, a needle, threads and scissors. Almost everything you need can be purchased at the sewing accessories department of a fabric store. If D-rings or regular rings are not available at the fabric store, you can look for them at the hardware store.
 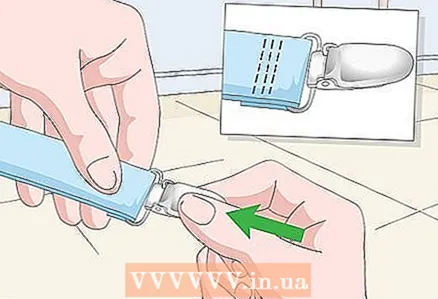 2 Install the rear suspender strap clip. First, you will need to make the back strap of the suspenders. First, thread the free end of the existing elastic into the loop of the clamp about 2.5 cm. Fold that end back over the web of the loop of the clamp and sew.
 - Sew about five stitches. Repeat the stitching several times, if desired, to reinforce the resulting seam.
 3 Install the D-ring. Next, cut the elastic about 30 cm from the installed clip. Then thread the free end of the back strap into the D-ring, fold it over 1 inch and sew.
 - Sew about five stitches.Repeat the stitching several times, if desired, to reinforce the resulting seam.
- Do not forget that all folds of the elastic must be done from the seamy side of the suspenders (clamps).
 4 Place the clips on the two front straps of the suspenders. Cut two equal lengths of elastic that will match the length of one and a half the length of your torso. Thread the ends of the lengths into the front clips about 1 inch (2.5 cm). Fold up the elastic and sew.
  5 Cut the front straps to the desired length. You will need the help of a friend to determine exactly how much excess straps to trim.
 - Clip the back strap of the suspenders to the waistband of your trousers and have a friend hold the D-ring of this strap on your back.
- Then fasten the front strap clips to the waistband of your trousers. Tell a friend to wrap the loose ends of the front straps over your shoulders and pull them into a D-ring. Ask him to mark the points of contact of the straps with the ring.
- Cut the front straps 2.5-5 cm beyond the marked points to accommodate the seam allowance.
 6 Attach the front straps to the D-ring. Thread the free ends of the front straps about 1 inch (2.5 cm) into the D-ring from the front to the wrong side. Tuck the ends and sew.
 - Sew about five stitches. Repeat the stitching several times, if desired, to reinforce the resulting seam.
Tips
- After measuring the required length of the elastic for the suspenders, make a slight allowance so that the suspenders are not too tight. Suspenders that are too tight will be just as uncomfortable as a belt that is too tight.
- Although it is recommended to use a 25mm elastic for your braces, you can also use a wider elastic if you need more durable braces that can handle a lot of stress.
- Some people prefer to dress so that the suspenders just hang around the sides of their trousers. If you like this style, then there is no need to use crisscross braces at the back. Simply grab the individual suspender straps and clip them to the front and back of your trousers. Release them from your shoulders so that they dangle freely at your sides.
What do you need
- About 1.8-3.6m Elastic bands for suspenders 25mm wide (any color)
- Tape measure
- 4 clips for suspenders
- Sewing machine (or needle and thread)
- Scissors
- Safety pins
Additional articles
How to patch holes How to take measurements for clothes without a measuring tape
  How to narrow a dress at the waist How to sew on a button How to measure shoulder width
  How to measure your waist How to make a bandana
 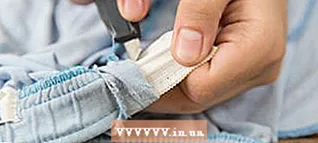 How to stretch an elastic band How to finish a stitch How to make a T-shirt-top out of a T-shirt
  How to sew a T-shirt
  How to make a V-neck on a T-shirt
  How to hem a T-shirt or shirt How to thread a needle and tie a knot


