Author:
Helen Garcia
Date Of Creation:
21 April 2021
Update Date:
1 July 2024

Content
If you want to show your students or children a fun and safe experiment that can be easily removed later and that allows you to show really impressive results, then you have come to the right place. With a little milk and vinegar, you can create a plastic-like material in minutes. This experiment is absolutely safe, and the resulting plastic can be used for any business.
Steps
Part 1 of 2: Prepare the "plastic"
 1 Get everything you need ready. For this experiment, you will need 1 cup (240 ml) milk, 4 tablespoons (60 ml) white vinegar, a saucepan or microwave, a cotton cloth or colander, a bowl, paper towels, and an adult to look after you. If you want to create more plastic or do this experiment multiple times, you will need more milk and vinegar.
 - Whole milk or heavy cream works better than milk with 1-2% fat.
- You can use an old T-shirt instead of cotton.
- Since you will be working with hot liquids, it is advisable to conduct the experiment under the supervision of an adult.
 2 Heat 1 cup (240 ml) milk. Measure out 1 cup (240 ml) milk. Milk can be heated in the microwave or on the stovetop. If you decide to use a microwave oven, heat the milk in a suitable container. Heat milk to near boiling point.
 - If you have a pastry thermometer, make sure the milk temperature is at least 50 ° C.
- Stir the milk constantly if you heat it on the stove.
- Ask an adult to help you with this.
- To reheat milk in the microwave, set it to half power and preheat for 2 minutes. After 2 minutes, start heating the milk in 30 second intervals until it is hot.
 3 Add 4 tablespoons (60 ml) of vinegar to the milk and stir. Until the milk has cooled down, pour all the vinegar into it and stir for 1 minute. You will soon see lumps begin to form in the milk. If this does not happen, then the milk was not hot enough for the reaction to occur. Try again with hotter milk.
 - Milk curdles due to changes in acidity (pH).Vinegar contains acetic acid, which makes the milk more acidic, and the milk protein, or casein, begins to separate from the rest of the liquid and collect into lumps.
 4 Pour warm milk through a colander. If you have an old T-shirt, wrap it around the neck of the can or over a bowl. Secure the shirt with a rubber band to keep it from moving. If you have a colander, then just put it on a bowl. Wait for the milk to cool slightly, then pour it through a colander and drain.
 - When the milk drains, only lumps will remain in the colander.
 5 Transfer the lumps to paper towels. If you have filtered milk through a cloth, you will need to remove the rubber band and collect the curdled milk. Squeeze the bag to squeeze out as much liquid as possible. If you've used a colander, transfer the lumps to paper towels with your hands or a spoon.
 - Squeeze the lumps on a paper towel to squeeze out as much liquid as possible.
Part 2 of 2: Shape and decorate the plastic
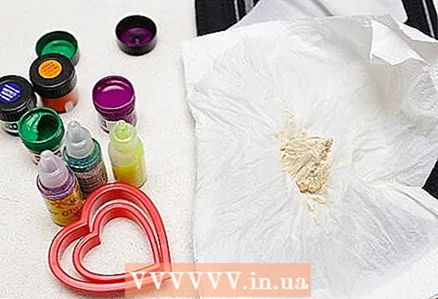 1 Get everything you need ready. If you want to craft something from your own plastic, you need to act quickly, as long as the lumps remain plastic. Use cookie cutters, molds, food coloring, glitter, or any other decorative material.
 - If you want to do something really incredible, use the sculpting tools.
- When the plastic is completely dry, paint over with paint or markers.
 2 Knead the casein dough. The first thing you need to do is squeeze all the curds together to make something like a piece of dough. As soon as you collect them into a single mass, knead it well. Knead the dough with your hands for a few minutes until you can shape it.
 - Allow the curds to cool completely before mixing the dough.
 3 Shape the dough using a baking dish or cookie cutters. Roll out the kneaded dough and cut different shapes out of it using cookie cutters. The dough can also be pressed into a baking dish to shape it. Remove the dough from the mold and set aside. Alternatively, mold the dough into any shape you like.
 - Add food coloring to the dough to immediately give the forms the same color. This way you don't have to wait for them to dry to paint them. Put on gloves, add some food coloring to the dough, and knead until the color is evenly distributed over the dough. Gel food dyes will work better than liquid dyes.
 4 Make plastic beads for decoration. Roll the dough into round beads and pierce them in the middle with a straw. Prepare beads in this way, from which you can later make a bracelet or necklace. Add the glitter while the dough is still dry so that it sticks to it as it dries.
 - Set the beads aside to dry. Check them after a few days to make sure they are completely dry.
 5 Wait at least two days for the "plastic" to dry. The plastic will take several days to dry. If you are not planning on making any more plastic, leave it on for a few days until it dries. If you have shaped it, wait until it is completely dry before using it.
 - When the plastic is dry, paint it a different color or decorate it in some way.
 6 Color your creation. Color your creation with paint or markers. The plastic must be completely dry before painting.
 - Once the paint is dry, you can craft a piece or play with your creations!
Warnings
- Since there are many hot objects involved in the experiment, ask your parents for help.


