Author:
Virginia Floyd
Date Of Creation:
5 August 2021
Update Date:
1 July 2024

Content
- Part 2 of 4: How to use templates and stencils
- Part 3 of 4: How to write by hand
- Part 4 of 4: How to Apply the Finish Layer
- What do you need
 2 Clean the wood. Even if the surface looks clean, it needs to be lightly cleaned. Dampen a tissue in warm water and wipe the entire surface. If you want to make an inscription on furniture or a sign with metal elements, then they must be removed before starting painting.
 - If there are holes or large dents in the wood that need to be painted over, they should be repaired with wood putty.
3 Sand the wood with sandpaper. This step is important for a number of reasons. When working with furniture that is varnished, the surface must be sanded with sandpaper so that the paint adheres well. In the case of an untreated uneven board, this will produce a smooth surface. - Work with light pressure and follow the grain. Do not sand against or across the grain or the wood will look rough and roughened.
- Use 140 micron fine sandpaper to remove the top layer of material. Then use finer paper to get a smoother surface.
4 Remove dust. After sanding, there will most likely be wood dust on the surface. Remove dust even if the surface looks clean. Sweep away dust and sawdust with a large brush or clean cloth. - Remove dust thoroughly so that the paint adheres to the surface and not to dust particles.
5 Apply a primer. Before applying the inscription with paint, you must use a primer. This is the only way to close the pores in the wood and create a good base for the paint. Thanks to the primer, it will not flake or tarnish. - If you also need to paint the background, then use a white or gray primer. If only letters, then choose a transparent primer.
Part 2 of 4: How to use templates and stencils
 1 Design your symbols. If you are confident in your ability to create freehand lettering, you can skip this step. Otherwise, design the letters on your computer to keep them clean and crisp. In Microsoft Word, you can type the letters you want, which should then be transferred to the tree.
 - Open Microsoft Word, click File and select the Page Layout tab. Size the sheet according to the size of the wood surface or write your own size.
- Print the lettering on the document as it should appear on the wood. If the page size corresponds to the size of the wood, then the inscription will be in full size.
- Print your document.
- 2 Transfer the letters to the wood. There are many ways to transfer printed letters to a wooden object, and some of them will give you more accurate results. The first way - you can cut out the letters on paper, and then trace the outlines (only suitable if the letters are large enough and it will be convenient for you to cut). The second method is suitable for labels of any size.
- Turn the printed page over to work with the reverse side. Take a pencil and paint over the entire area of ink that is on the front side. In other words, you need to paint over all the printed letters with a lead, only on the other side of the sheet.
- Turn the paper over again and place it on the wood. The printed letters will be facing you. Use your pencil again and trace the outlines of all the letters.
- When you're done, remove the paper. The pressure of the pencil transfers the graphite on the back of the paper to the wood. Now the material will contain the outlines of letters that need to be painted over, and the result will be a beautiful inscription.
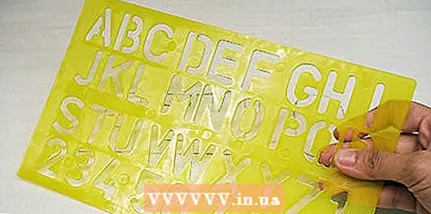 3 Buy letter stencils. Find ready-made stencils in your art supply store that will help you create the lettering you want. If you are interested in a specific size or type of font, then try ordering stencils online. For best results, use a stencil brush and sticky spray.
 - Take your time and attach the stencil to the wood exactly as needed for your lettering. Mark with a pencil to see where the stencil should be.
- Shake the sticky spray can and apply a thin layer to the stencil. This way it can be fixed to the wood so that it remains stationary and the letters do not smudge.
- After fixing the stencil, use a special paintbrush to apply acrylic paint to the wood through the cutouts in the stencil.
- Take your time to remove the template from the tree and wait for the paint to dry.
Part 3 of 4: How to write by hand
 1 Take different brushes. For handwriting, it is better to use brushes of different sizes and textures of the material. Hard, square brushes allow you to create thick, straight outlines for letters, while small brushes are great for fine details. If you are confident in your abilities, buy acrylic crayons from your art supply store.
 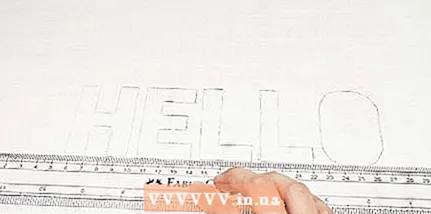 2 Use a ruler to get straight letters. Use a ruler if the letters should be on a straight line. Take a pencil and draw a soft, straight line like in notebooks. You can also draw the top border if you know the exact dimensions of each letter. Add any markings and borders that will help you create an even lettering.
 - 3 Draw the letters carefully. Squeeze a small amount of paint onto a piece of paper or a palette and start painting. Make sure to follow all previously drawn lines and markings on the wood, if the inscription does not have to be fancy! Take a glass of water to rinse out your brush when color changes.
- In case of error, carefully wipe off the element with a clean, damp cloth. Wet paint can be removed.
Part 4 of 4: How to Apply the Finish Layer
- 1 Wait for the paint to dry. Acrylic paint dries very quickly, but it is better to wait a few hours until it dries completely. If you need to touch up the letters with a second coat of paint, then do it only when the first coat is dry. Usually a second coat is required for lighter lettering (white and pastel colors).
- 2 Apply a clear acrylic polyurethane finish. The transparent top coat will secure the lettering with paint to the wood. Thanks to this, the paint will not peel off or scratch, and will also retain its original appearance for a long time. You can buy this cover at a hardware or art store.
- 3 The coating must be completely dry. It is recommended to leave the finished piece of wood for 24 hours to dry completely.In a day, your project is ready! Now you can give it to a loved one or keep it for yourself. In any case, this kind of work can be proud of.
What do you need
- Wood
- Newspapers or old towel
- Cleaning cloth
- Sandpaper (fine and very fine)
- Brushes (different sizes depending on the size of the letters)
- Primer for paint on wood
- Computer with Microsoft Word and printer (to make your own template)
- Pencils (to trace the pattern)
- Stencils
- Ruler
- Acrylic paints
- Water
- Clear acrylic polyurethane coating


