Author:
Gregory Harris
Date Of Creation:
11 August 2021
Update Date:
1 July 2024

Content
- Steps
- Method 1 of 4: How to take a photo of a friend
- Method 2 of 4: How to take a profile photo on iPhone
- Method 3 of 4: How to take a profile picture on Android
- Method 4 of 4: How to take a profile photo on a PC or Mac
In this article, we'll show you how to take a photo of a friend on Skype. You will also learn how to add a new profile photo. Alas, you cannot take and send pictures of yourself in the program.
Steps
Method 1 of 4: How to take a photo of a friend
 1 Launch Skype on your computer. Find the icon in the form of a white "S" on a blue background. Typically, you can find it on your desktop, taskbar, or start menu. While it is technically possible to take a screenshot on a mobile device, there is no built-in photo function for the Skype app for iPhone, Android, or other mobile devices.
 - If you are not yet signed in to your Skype account, then enter your Microsoft email address (or Skype username) and password.
 2 Click on the contact's name. Names are located on the Contacts tab on the left side of the Skype window.
 - The contact must be online and use a webcam.
 3 Click on the video call icon. The video camera icon is in the upper right corner of the Skype window.
  4 Wait for the connection. Continue with the next steps when the contact answers the call and turns on the webcam.
  5 Click the + button. It's at the bottom of the call screen to the right of the microphone icon.
 - Sometimes you need to click anywhere on the screen for the toolbar to appear.
 6 Click Take Snapshot. This is the top item of the popup menu. The function allows you to take a picture of the person at whom the interlocutor's camera is directed.
  7 Click Share. This is the bottom item of the photo popup. There are two dropdown menu items available Share this:
 - Submit [name] - sending a photo directly to the recipient in a dialog box.
- Send... - the ability to select the contact to whom you want to send a photo.
- You can also click To findto select a photo from the computer's memory.
 8 If desired, send the photo to the recipient. Click Submit [name]to send the photo to your contact.
Method 2 of 4: How to take a profile photo on iPhone
 1 Start Skype. Find the icon in the form of a white letter "S" on a blue background. It is located on one of the desktops or in the control room
 - If you are not yet signed in to your Skype account, then enter your Microsoft email address (or Skype username) and password.
 2 Click Profile. This item is located in the lower right corner of the screen.
  3 Click on your current profile photo. The photo is at the top of the screen. If you have not yet installed a profile photo, then click on the silhouette of a person.
  4 Click Take Snapshot. It's the top item in the pop-up menu at the bottom of the screen. This will open the device's camera.
 - If you haven't already shared your iPhone camera with Skype, tap the appropriate option.
 5 Click the "Take Photo" button. The white round button is at the bottom of the camera screen. Take a picture.
 - You can also tap the camera-shaped icon in the lower-right corner of the screen to switch to the front camera.
 6 Click Use Photo. The button is located in the lower right corner of the screen. The photo will now be set as your Skype profile picture.
 - You can also click Cancellation and take another photo or select a specific area of the photo.
Method 3 of 4: How to take a profile picture on Android
 1 Start Skype. Find the icon in the form of a white letter "S" on a blue background. As a rule, it is located on one of the desktops or in the application panel.
 - If you are not yet signed in to your Skype account, then enter your Microsoft email address (or Skype username) and password.
 2 Push ☰. The button is in the upper left corner of the screen.
  3 Click on your profile photo. The photo is at the top of the menu in the upper left corner of the screen.
 - If you have not yet installed a profile photo, then click on the silhouette of a person.
 4 Click Take Snapshot. This item is in the middle of the new menu.
  5 Click the "Take Photo" button. The blue round button is on the bottom (phone) or right (tablet) side of the screen.
  6 Click the checkmark. It is located at the bottom or right side of the screen. The photo will be set as your Skype profile picture.
 - You can also click Xto delete the photo and take another photo.
Method 4 of 4: How to take a profile photo on a PC or Mac
 1 Open Skype. Find the icon in the form of a white letter "S" on a blue background. It's on the desktop or in the Dock.
 - If you are not yet signed in to your Skype account, then enter your Microsoft email address (or Skype username) and password.
 2 Click on your name. It's in the upper left corner of the Skype window.
  3 Click Change Image. The button is located under the profile picture or silhouette of the person.
 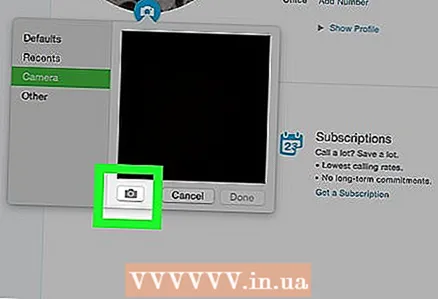 4 Click Take Snapshot. The button is in the lower-right corner of the pop-up window. This will take a picture of a person or space in front of the camera.
  5 Click Use Snapshot. The button is in the lower right corner of the window. The snapshot will be installed as your Skype profile picture.
 - You can also click Try again and take a new picture.


