Author:
Clyde Lopez
Date Of Creation:
21 June 2021
Update Date:
1 July 2024

Content
- Ingredients
- Steps
- Part 1 of 2: Prepare the base for the soy sauce
- Part 2 of 2: Starter and Pasteurize the Sauce
- What do you need
Soy sauce is one of the most popular dressings in the world. It has been used to season dishes for over 2,000 years. It takes a long time to cook soy sauce, besides, the smell is not the most pleasant, but the result is a delicious soy sauce with a deep aroma, which can be proudly served for family and friends!
Ingredients
For making 4 l of soy sauce
- 4 cups (800 g) soy
- 4 cups (480 g) wheat flour
- Yeast koji
- 4 l of water
- 3 and a half cups (1 kg) salt
Steps
Part 1 of 2: Prepare the base for the soy sauce
 1 Rinse and remove 4 cups (800g) soybeans. Soybeans (or edamame) can be bought at the grocery store, although you may need to visit a store that specializes in Asian foods.
 - Before soaking the soy, be sure to remove all the husks from it.
- If you come across both soybeans (mature beans) and edamame (unripe and softer beans) in the store, buy soybeans.
- To rinse the soybeans, transfer them to a colander and rinse under running cold water. Remove any beans that are wrinkled or oddly colored.
 2 Soak the soybeans overnight. Transfer the soybeans to a large saucepan and then add enough water to completely cover the soybeans. This will take about 4.7 liters of water. Drain the pot and add fresh water.
  3 Boil the soybeans over medium heat for 4-5 hours. The cooked soy can be easily crushed with your fingers.
 - If you want to cook the beans faster, boil them in a pressure cooker. Place the beans in a pressure cooker, add about 1 cup (240 ml) of water, and cover. Put the pressure cooker on high heat and then turn it down when the pressure cooker whistles. Cook the soybeans for about 20 minutes.
 4 Make a soy paste. Make soy puree using a food processor, the back of a spoon, or a potato grinder.
  5 Add 4 cups (480 g) wheat flour to the soy puree. The puree should acquire a pasty consistency. Knead until smooth.
  6 Add koji yeast to the mixture and stir well. The beneficial mushrooms Aspergillus oriza (lat. Aspergillus Oryzae) and Aspergillus yellow (lat. Aspergillus flavus). Traditionally, the soy mixture was left to ferment for a week. However, mold spores, or koji yeast, can be purchased online and at some specialty health food stores.
 - Read the package directions to find out how much koji to add, as each yeast manufacturer specifies a different amount.
- If the soy was still warm when you added the flour to it, cool the mixture to about body temperature before adding the koji.
 7 Transfer the koji mixture to a tray approximately 7.5 cm deep. The koji must remain in the tray during fermentation. Spread the mixture so that it is no more than 5 cm thick.
  8 Use your fingers to poke grooves in the mixture to increase the exposure to air. Press with your fingers to make long indentations in the mixture. They should be about 5 cm deep and 5–7.5 cm apart.
  9 Place the mixture in a warm and humid place for two days. This will allow bacteria to grow. You will see Aspergillus grow in the mixture. It will be light or dark green in color.
 - After two days, proceed to fermentation in brine.
- Choose a place where no one will touch the koji while fermenting. The ideal place is the kitchen (if you can handle the smell, of course). Place the tray in your kitchen cabinet or refrigerator.
Part 2 of 2: Starter and Pasteurize the Sauce
 1 Dissolve 3.5 cups of salt (1 kg) in 4 liters of water. Add salt to water and stir until it is completely dissolved. This brine will prevent the growth of unwanted bacteria during the koji culture.
 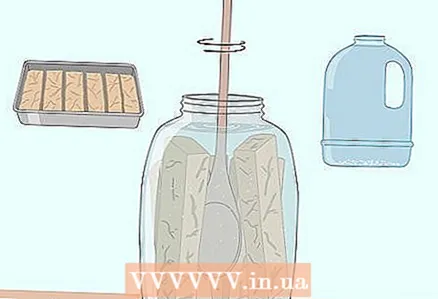 2 Mix koji with brine to make moromi. Place the koji in a large jar with a tight lid. The volume of the can must be at least 8 liters, so that there is enough space for stirring the mixture. Pour the brine over the koji and stir with a long spoon. The thick koji paste will not dissolve in the brine, but the soybeans and Aspergillus will start to seep into the water.
  3 Cover the moromi and stir once a day for the first week. Place the moromi in a warm, constant temperature place and stir it every day with a long spoon.
 - There will be a strong odor from the koji during fermentation, so keep it closed at all times and only open it when stirring.
 4 Stir the moromi once a week for the next 6-12 months. The aroma appears precisely during the fermentation process. Soy sauce must be fermented for at least 6 months. If you want to make the taste more intense, increase this period to 1 year.
  5 Strain the mixture when fermentation is complete. When the flavor is strong enough, strain the mixture. Place the solids in a cooking press or cheesecloth to squeeze out any liquid.
 - When done, discard any remaining solids.

Vanna tran
Experienced Cook Vanna Tran is a home cook. She started cooking at a very young age with her mother. Organizing events and dinners in the San Francisco Bay Area for over 5 years. Vanna tran
Experienced chefExperienced chef Vanna Tran says the following: “As with any fermentation process, the result will be highly dependent on a number of environmental conditions. For example, if it is cold outside, the mixture should ferment longer. If you're wondering how the fermentation is going, squeeze out some of the mixture and pasteurize to taste it! "
 6 Pasteurize the soy sauce by heating it to 79 ° C. Heat the soy sauce over medium heat, then use a thermometer to hold this temperature for 20 minutes. When you have squeezed out all the mixture, pour the liquid into a saucepan and use a pastry thermometer to monitor its temperature. Proper pasteurization ensures that no harmful bacteria are present in the soy sauce.
  7 Pour the soy sauce into a bottle and serve. Pour the pasteurized soy sauce into a container with a tight lid and refrigerate. It is advisable to pour the soy sauce into something small to make it easier to use.
 - In an airtight container, pasteurized soy sauce can be stored for up to 3 years, and for 1–2 years if the container has already been opened.
What do you need
- Colander
- Soybean Soaking Bowl
- Long stirring spoon
- Large saucepan
- Cooking press or gauze
- 7.6 cm deep tray
- Bank of 8 liters with a tight lid
- Pastry thermometer
- Bottle

")

