Author:
William Ramirez
Date Of Creation:
22 September 2021
Update Date:
1 July 2024

Content
- Steps
- Part 1 of 3: Targeted Cross Twine Training
- Part 2 of 3: Warming Warm Up Exercises
- Part 3 of 3: Helpful Yoga Stretching Exercises
- Tips
- Warnings
Learning to do the side split is difficult. This requires good plasticity of the legs, which is achieved only by training. To prepare your body for intense stretching, remember to do a warming workout and practice yoga assisted poses. The lateral split requires flexibility in the flexors of the hips, groin, quads, and hamstrings.
Steps
Part 1 of 3: Targeted Cross Twine Training
 1 Warm up. It is very important to warm up the muscles and stretch beforehand to avoid injury. First of all, it is necessary to perform exercises for stretching and warming up the legs and back, since it is they who bear the main load when performing the transverse twine.
  2 Sit against the wall. Lie with your back on the floor, raise your legs in the air and press your buttocks against the wall. While pressing against the wall for support, keep your back straight. For exercise, it is recommended to use comfortable clothing that will not hinder movement. If the floor surface is uncomfortable on your back, place yourself a rug or pillow.
 - You will need athletic shoes with good grip of the sole to the surface, as it will be necessary to move your feet along the wall in a controlled manner.
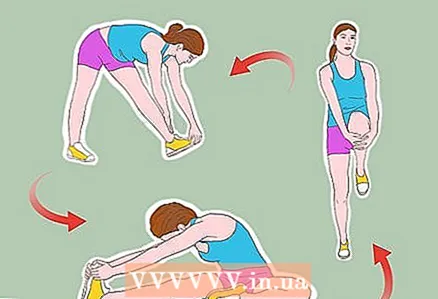
 3 Spread your legs to the sides. Moving along the wall, slowly spread your legs to the sides, forming the letter “V” with them.Spread them apart until you feel tension in the muscles, but not so much that pain appears. Hold the pose for 10-15 seconds.
 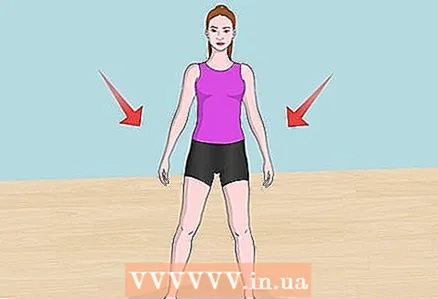 4 Get into a standing position. After practicing lying down, stand in a comfortable position with your feet shoulder-width apart and bend at your hips with your hands on the floor. This is best done on a tiled or wooden floor, after making sure that it is not too slippery.
 - Barefoot will make it easier for you to control the movement of your legs to the sides, while your socks may be too slippery and cause injury.
 5 Spread your legs to the sides. Begin to slowly and in a controlled way spread your legs to the sides, lowering your buttocks closer to the floor. Take your time and use your hands for support. If you find that your feet are slipping too much, try putting on shoes or spreading a rubber mat for yourself.
 - If you are not yet able to sink as low as you would like, place a chair in front of you for comfort or practice in front of a wall so that you can stabilize your position.
- Try to keep your toes pointing up. Don't let your feet twist if you can control them.
 6 Stop when the muscles feel tension. After reaching the widest angle, hold the pose for 10-15 seconds and continue breathing normally. Then slowly return back to the rack so as not to accidentally injure yourself.
 - Sinking down, rotate your hips a couple of centimeters forward. This will keep your belly facing the floor as you continue to spread your legs, and it will be easier for you.
- To achieve a stronger stretch, rotate your hips with your legs back. This is difficult to do, but it will stretch your muscles better.
 7 Practice as much as possible. It takes time to master the transverse twine, since first of all you need to increase your plasticity. Remember to make sure to do a warm-up before the main exercises and do not force the body to do more than it is currently able to do. Work slowly and follow the correct movement to avoid injury.
Part 2 of 3: Warming Warm Up Exercises
 1 Do a cardio exercise. Before doing the splits, it is important to warm up the muscles. 15 minutes of cardiovascular exercise will help you with this. Cardio exercises come in a variety of ways, so pick the ones you like best so you don't get bored with them. Whatever you choose, be it jumping with arms and legs to the sides, jogging or walking up stairs, you need to stretch your muscles and get them ready for more intense activity.
 - You can increase the intensity of the warming warm-up by jumping rope, squatting and jumping on a stand, which will provide blood flow to the legs.
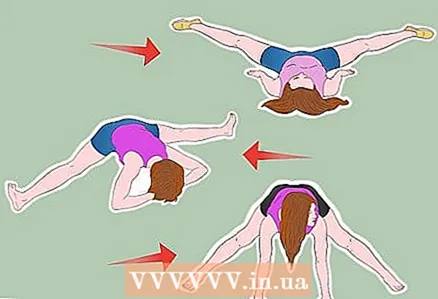
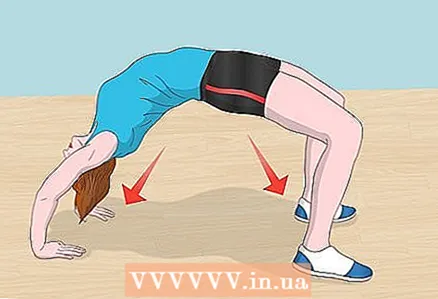 2 Stretch your back. Stand in the bridge. To do this, lie on your back and push up with your arms and legs. Note that your palms and feet should be on the floor and your legs should be bent at the knees. You need to try to form a bridge with your body, lifting your back as high as possible above the floor with the help of your arms and legs.
 - Point your elbows up towards the ceiling and try to feel how your back is stretching. Getting into the bridge will be difficult at first, but with time and practice, your plasticity will increase. Don't force yourself to do anything through pain. Push off the floor in order to feel the stretch without feeling painful.
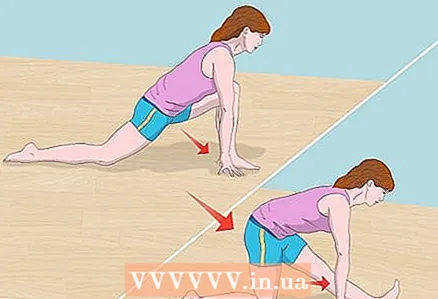 3 Stretch your lower body. Do the stretches that runners usually do. Lunge with one foot forward. Place your hands as low as possible to the floor. Then stand up while slowly straightening your front leg. Feel the stretch on that leg and exhale. Return to lunge position and repeat the exercise.
 - Stretch the runner for both legs, repeating the exercise 4 times for each leg.
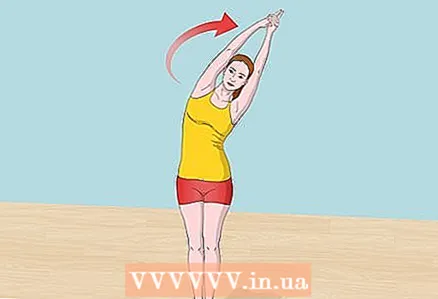 4 Stretch your upper body. Do a side stretch from a standing position. To do this, clasp your hands in a lock above your head, pointing up and pressing your index fingers together. Inhale and start bending as far as you can to the side. Bend over and exhale slowly. Hold the bend for 5 seconds, and then return to the starting position, standing with your hands over your head.
 - Be sure to do the above side stretch to both sides.
Part 3 of 3: Helpful Yoga Stretching Exercises
 1 Practice the frog pose. This pose allows you to work out the deep muscles of the inner thighs. Get on all fours, rest on your forearms, not your palms, and lower your pelvis and hips down, slowly spreading your knees to the sides. Be sure to control deep breathing as you go lower.
 - Feel the stretch and do not sink lower than your body's capabilities allow. When you feel the stretch, hold the pose and take 10-15 breaths.
 2 Strike the butterfly pose. This pose is great for preparing for a side split. Sit up straight with your feet together and your knees out to the sides. Inhale and exhale, gently lowering your knees lower to the floor. Don't pull your knees forcibly. When the muscles are comfortable, bend your chest towards your legs and make sure that your back remains straight as well. Hold the pose for ten breaths.
 - If your knees stay high enough off the floor, give your hips extra support by placing something underneath to keep them elevated off the floor. You need to release excess tension from your hip flexors.
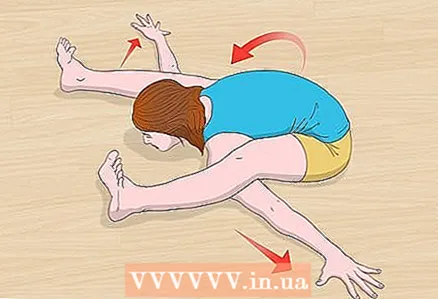 3 Strike the tortoise pose. The tortoise pose is quite intense. Sit up straight and spread your legs wide apart. Stretch your back while slowly lifting your chest. Pull your toes to create tension in your legs. Lower your chest to the floor, gradually moving your arms forward from your pelvic region. Keep your back straight and bend forward until you feel a stretch.
 - Deepening the pose, take 10-15 breaths.
- Allow gravity to help you work your leg and hip muscles in this position to get your body accustomed to the movements that would be required for the side split.
 4 Stretch while sitting. Sit with your legs wide apart. Pull your socks out, but keep your leg muscles relaxed. Lean forward to pull your hamstrings. Keep your lower back as straight as possible and try not to round it.
 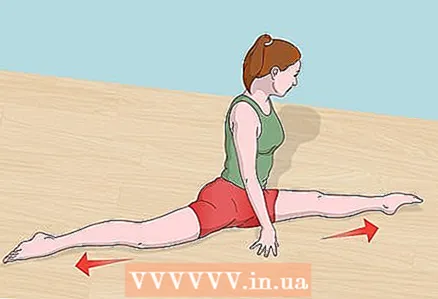 5 Warm up with longitudinal twines (optional). If you already know how to do longitudinal splits, you can use them to warm up. Longitudinal splits are great for developing flexibility in the hips and hamstrings in order to move on to mastering the lateral splits.
Tips
- Exercise patience and allow adequate time for each new exercise and movement.
- For stretching, you can do an inverted longitudinal twine. The inverted pose is more challenging, but allows for deeper stretches.
- Stretch properly, giving it enough time before and after basic exercises so that you don't stretch your muscles.
Warnings
- Doing the side split can cause injury if you do not stretch and warm up the muscles first. Do not stretch your muscles more than they are ready to stretch, and to the point of soreness. The development of plasticity takes time.
- Do the splits slowly to avoid injury. Avoid slippery floors so you can control the speed at which you lower yourself into the splits.


