Author:
Janice Evans
Date Of Creation:
2 July 2021
Update Date:
1 July 2024

Content
- Steps
- Part 1 of 3: Preparing for Construction
- Part 2 of 3: Building a Snow Fort
- Part 3 of 3: Decorating the Fort
- Tips
- Warnings
- What do you need
If in winter you are tired of the usual sledging and snowball games, try building your own snow fort. This is an amazing activity for the whole family: you can build your own wonderland and spend time there until the warmer. Always build your fort with a friend or a few friends and place "guards" near it so that no one knocks down your structure.
Steps
Part 1 of 3: Preparing for Construction
 1 Come up with the structure of your fort. A snow fort can be of any structure, from a single wall to more complex fortifications with four walls and a roof.
 - Your choice depends in part on how much snow you can use.
- When calculating the amount of snow you will need, consider the length, width, and height of the walls. Typically 1.2m is a suitable height.
 2 Measure the size of the fort. Use a shovel or twig to mark the perimeter of the fort. When there is little snow, it is best to build a one-walled fort with two wings on each side.
  3 Find a good snowdrift. If it is not nearby, do it yourself! To do this, use snow from the road or other place.
  4 Make sure the snow sticks well and doesn't fall apart. Check it out with a snowball. If the snow sticks well, then it is great for building a fort. If not, move on to the next step to find out how to make it more sticky.
 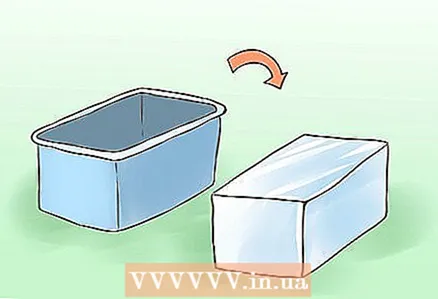 5 If the snow doesn't stick well, use snow bricks. Place as much snow as possible in plastic trays, buckets, or portable refrigerators, then turn them over and lift them up so that bricks fall out of the containers.
 - Alternatively, pour cold water over the snow to form a layer of ice. If you are planning to dig a tunnel, do not pour water where it will be to make it easier for you to dig.
Part 2 of 3: Building a Snow Fort
 1 Build walls. Use regular snow or snow bricks to build walls. Be sure to build your walls so that they are perpendicular to the ground from the inside.
 - If you are using snow bricks, work like a bricklayer: lay one row, leaving a couple of centimeters between the bricks, then lay the next row on top so that each brick goes on top over the junction of the two bottom ones. You should be followed by a second person who will put snow between the bricks.
- If you will be making a fort from a snowdrift, dig the entrance with a shovel or hands. Then clean the inside of the fort with a scoop or hands.
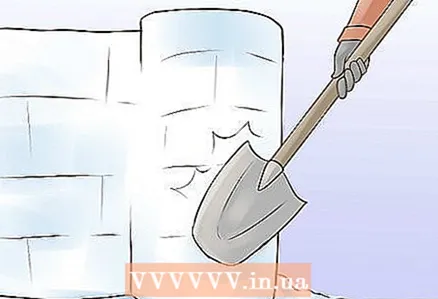 2 Reinforce the outside of the walls with a shovel. Smooth out the outside of the walls, reinforcing them with additional snow if needed.If you used snow bricks, fill in the gaps between them and flatten them with a shovel. When doing this, be careful not to damage the bricks. The outer walls should be slightly sloping to last longer.
 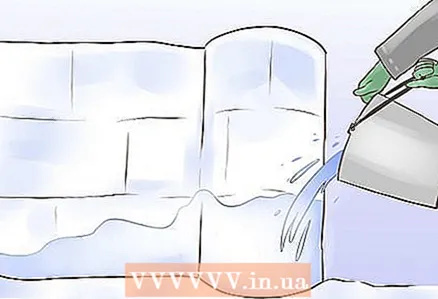 3 Pour water over the fort to create a protective layer of ice. The water will freeze and turn into ice, thereby strengthening the structure of the fort and protecting it from melting.
 - Water from bottom to top so that too much ice does not form on top and the fort does not collapse.
- At this time, there must be a subzero temperature outside so that the water can quickly freeze.
Part 3 of 3: Decorating the Fort
 1 To paint the fort, sprinkle it with cold water and food coloring. Paint the snow bricks as you cook them by adding colored water to the snow, spray the walls with colored water from a spray bottle, or add food coloring to the cold water as you pour it over the fort at the end.
  2 Cover your fort with low power LED lights to illuminate your fort. They generate a minimum of heat, which will minimize the melting of snow.
  3 Decorate the fort with flags, snowmen, or other decorative items. If there is a lot of snow, fashion snowmen guards or watchtowers for your fort. If space permits, add furniture. Cut out patterns on the outside of the walls to make your design original.
Tips
- Buy waterproof gloves. They can be found at a sporting goods store. Your hands will be warm and dry throughout the construction site. If you do not find such gloves, use several pairs of woolen ones: when one pair gets wet, you can put on the second, and hang them on the battery to dry.
- Don't be angry if your fort falls apart. You can always build a new one!
- If you want a good and sturdy roof, find a quality umbrella and place it on top. He is able to carry himself well.
Warnings
- Don't make the upper part of the fort too heavy: it shouldn't sink.
- Try to choose a location where there is no direct sunlight. This will help the fort to last longer and reduce the risk of subsidence.
- Do not step on your fort, otherwise it may fall apart.
- Do not let animals in your fort that can destroy it.
- ALWAYS leave someone near the fort when building it and when you spend time in it. NEVER go into it alone. Sometimes structures can collapse, and you risk suffocating if there is no person nearby to help you get out.
- Don't build your fort near the parking lot. Carbon monoxide fumes can build up in the fort, which can lead to poisoning and even death.
What do you need
- Snow
- Clothes and equipment for working with snow
- Shovel (optional)
- A scoop (for example, a garden scoop to clean the inside of the fort)
- A plastic tray, portable refrigerator, or plastic bucket if you will be building a fort with snow bricks
- Spray bottle (optional)
- Water
- Food coloring (optional)


