Author:
Carl Weaver
Date Of Creation:
27 February 2021
Update Date:
1 July 2024

Content
Printer cartridges are low on ink after prolonged use. Replacing the cartridge quickly and correctly will get you back to work faster. Follow the next steps if you would like to learn how to change a laser printer cartridge.
Steps
 1 Turn on the printer by pressing the power button. In most cases, the printer must be turned on to access the cartridge.
 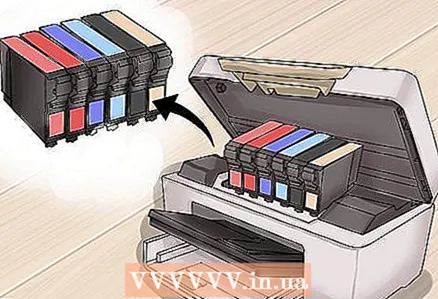 2 Open the printer door to access the cartridges. On some models, you will need to hold down the reset button and pull the cover towards you. For easier access to the cartridges, lifting the cover in most printers will cause the cartridge to slide automatically into the center of the printer.
  3 Pull the empty cartridge out of the printer.
- Depending on the model, you might have to open the stop mechanism that holds the cartridge in place, or push the catch inward to release it. On some printers, you need to pinch the blue reset button on the side of the cartridge cradle.
- Once unlocked, remove the cartridge by pulling it up and out.
 4 Remove the new cartridge from the box, but do not remove it from the plastic wrap. Occasionally, during shipping, the ink in the toner may accumulate, resulting in poor print quality. To solve this problem, shake the cartridge lightly. This will help distribute the toner evenly in the cartridge.
  5 Remove the new cartridge from its packaging and peel off the colored tab from it. This will remove the protective film from the bottom of the cartridge.
 - Be careful not to touch the printhead on the bottom of the cartridge during the process. Head stains can result in poor print quality.
 6 Insert a new cartridge into the printer. It should lock securely in place. On printers with a stop mechanism, make sure you snap it firmly around the cartridge before closing the cover.
  7 Your printer is ready to go.
- Print a test page. Your computer will automatically detect that the cartridge has been replaced. Most computers will ask you if you would like to print a test page to ensure that the new cartridge works as expected. Click OK. The computer scans the printer settings and prints a color page.
Tips
- If ink gets on your clothes, wipe off as much as possible with a dry towel. Rinse off the rest with cold water. Never use hot water, otherwise the stain will bite into the fabric.
- If you are replacing more than one of your four cartridges, it is imperative to insert the new cartridges into the correct positions inside the printer cradle. Make sure the colors or shapes of the cartridges match the colors and shapes of the printheads.


