Author:
Clyde Lopez
Date Of Creation:
21 June 2021
Update Date:
1 July 2024

Content
- Steps
- Part 1 of 3: Determining the Height of an Object Above the Horizon
- Part 2 of 3: Determining latitude with a sextant during the day
- Part 3 of 3: Finding latitude with a sextant at night
- Tips
- Warnings
- What do you need
A sextant is a navigational instrument consisting of a small telescope, mirrors, a movable arm, and a 60-degree wooden or metal arc called a limb (one-sixth of a full circle, from which this instrument gets its name). The sextant can be used to determine the position in the sky of the sun, moon, or other celestial body, as well as to determine latitude and longitude. Although this device looks daunting, by understanding how it works and with practice, you can use it to reliably locate your location.
Steps
Part 1 of 3: Determining the Height of an Object Above the Horizon
 1 Find out, if possible, your altitude. If you are using the sextant outside of a ship at sea, you must enter an altitude correction. This amendment is discussed below, for now you only need to know your altitude above sea level.
  2 Sight the horizon while looking through a small mirror. The small mirror is translucent, allowing you to see through it when you look through the telescope.
 - The horizon line forms the baseline from which the elevation angle of the object you are positioning is measured.
- The 0 degree mark on your sextant may not line up with the horizon. If so, you need to correct the angular height by an amount equal to the magnitude of this misalignment. This value is called the index error.
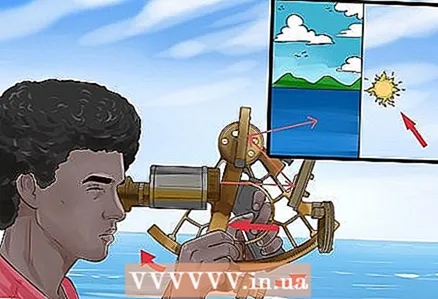 3 Move the sextant handle until the object you are trying to locate is visible on the horizon. Another mirror, called a large one, is installed on the movable handle. As the handle moves, the disc with the large mirror rotates until the light hitting the large mirror is reflected in the small mirror, as a result of which the object from which the light is coming is visible in it on the horizon line.
 - Sextants designed for observing the sun are equipped with light filters to protect the user's eyes from the sun's rays.
 4 Secure the handle. Fastening is carried out by a flip-lock, which prevents the free movement of the handle.
 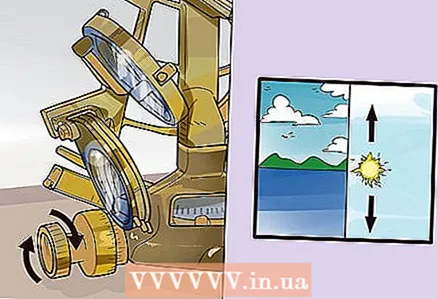 5 Fine tune the grip by turning the fine adjustment knob until the object is precisely aligned with the horizon. Adjust gradually by swinging the sextant from side to side until the subject is exactly on the horizon.
  6 Record the time of the observation. You need to record the time in hours, minutes and seconds, starting with seconds to avoid errors.
 - Recording the time quickly is especially important if you are using a sextant to navigate at sea.
 7 Write down the measured angle. The elevation angle of an object can be calculated as follows:
 - The heights are visible in the center of the alidade (the part of the handle where the clamp and fine adjustment knob are located) in the window above the dial. The alidada may be equipped with a small magnifying glass to help you read the graduation on the dial.
- Minutes and seconds can be read on the graduation of the fine adjustment knob.
 8 Correct the angle you measured according to your position and the object you were observing. The angle you measured with the sextant must be corrected in each of the following cases:
 - Index error. This error occurs when the elevation corresponding to the horizon is not 0 degrees, but greater or less than zero. If the elevation corresponding to the horizon is greater than 0 (a positive number), it must be subtracted from the measured angle. If this mark is less than 0 (negative number), it must be added to the measured angle.
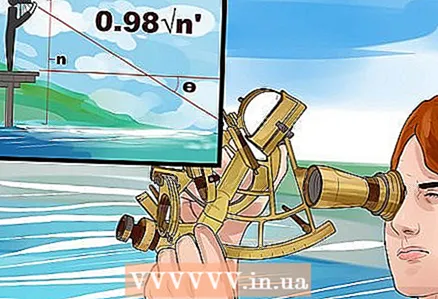
- Mood. This is an altitude correction. Find out your height in feet (if you know it in meters, multiply by 3.28), then multiply the square root of that value by 0.98 to calculate the value to correct for the angle you measured.
- Refraction. Light beams are deflected when passing through matter; this deviation is called refraction. The denser the atmosphere, the stronger the refraction. You can find the refractive error correction value for your location in the Nautical Almanac.
- Parallax. You need to enter a parallax correction if you are viewing the sun, moon, or planet with a sextant. The amount of the correction can be found in the Nautical Almanac.
- Corner radius. If you observe an object with a significant apparent diameter (sun or moon), you need to know the apparent distance from its edge to the center. The value of the correction can be found in the Nautical Almanac.
- When all the corrections have been made, you will get the true elevation of the object.
Part 2 of 3: Determining latitude with a sextant during the day
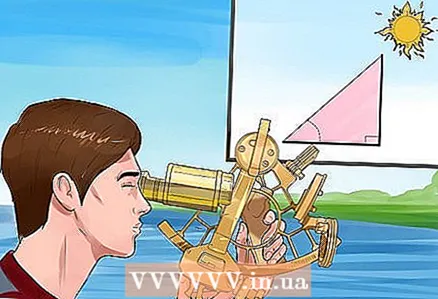 1 Determine the angle of the sun at its highest point. This takes place at noon local time.
 - Follow the instructions in the first part of our article.
 2 Find out from the reference tables the latitude at which the sun is directly overhead on the day of your observation. The sun is exactly overhead (at the zenith, with an elevation angle of 90 degrees) at the equator (0 degrees latitude) during the spring and autumn equinox (March 20 and September 22 or 23).
 - After the vernal equinox, the latitude at which the sun is exactly overhead shifts northward until the summer solstice, and then returns back to the equator until the autumnal equinox. The latitude at which the sun is directly overhead during the summer solstice is called the Tropic of Cancer (23.5 degrees north latitude).
- After the autumnal equinox, the latitude at which the sun is exactly overhead shifts south until the winter solstice, and then returns back to the equator until the spring equinox. The latitude at which the sun is directly overhead during the winter solstice is called the Tropic of Capricorn (23.5 degrees south latitude).
- If you are north of the Tropic of Cancer, the sun will always be south of you at its highest point. If you are south of the Tropic of Capricorn, the sun will always be north of you at its highest point. If you are in between the tropics, the sun at its highest point can be either north or south of you, or directly overhead, depending on the season.
 3 Find the difference between the angle of the sun and the zenith (90 degrees). For example, if your measured sun is 49 degrees, subtract 49 from 90 to make the difference 41.
 - If you make an observation on the day of the vernal or autumnal equinox, this difference will be your latitude, in this case 41 degrees of latitude - north if you observed the sun south of you and south if you observed it to the north. If it's not the equinox, you'll have to do some more work.
- If the latitude at which the sun is exactly overhead that day is northerly, and the sun at its highest point was south of you, add that latitude (declination of the sun) to the angle you calculated to get your latitude. For example, if the sun is overhead at 20 degrees north on the day you saw it at 49 degrees to the horizon, then you are at 61 degrees north (90 - 49 + 20). Likewise, if the latitude at which the sun is exactly overhead is southerly, and the sun at its highest point was north of you, you need to add that latitude to the calculated angle to get your latitude.
- If the latitude at which the sun is exactly overhead is southerly, and the sun at its highest point was south of you, subtract that latitude from the angle you calculated to get your latitude. For example, if the sun is overhead at 20 degrees South on the day you saw it at 49 degrees to the horizon, you are at 21 degrees North (90 - 49 - 20). Likewise, if the latitude at which the sun is exactly overhead is north, and the sun at its highest point was north of you, you need to subtract that latitude from the calculated angle to get your latitude.
Part 3 of 3: Finding latitude with a sextant at night
 1 Find the North Star. The Polar Star is the brightest in the constellation Ursa Minor (Lesser Dipper). It is located at the end of the Ursa Minor's tail / Small Dipper handle. If you are at a loss to find it, there are two ways to do this.
 - Continue the line connecting the two stars at the outer end of the Big Dipper bucket towards the side that the bucket opens into. These pointing stars will lead your eye to the North Star.
- Look from the Great Square of Pegasus towards the constellation Cassiopeia (resembling "M" or "W", depending on its position in the sky). This is a backup way to find Polaris in case the Big Dipper is below the horizon.
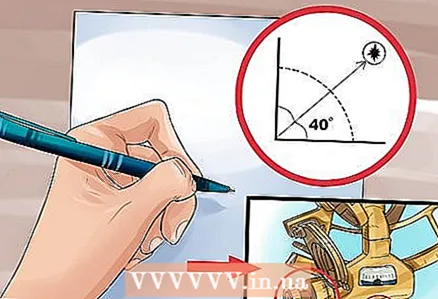
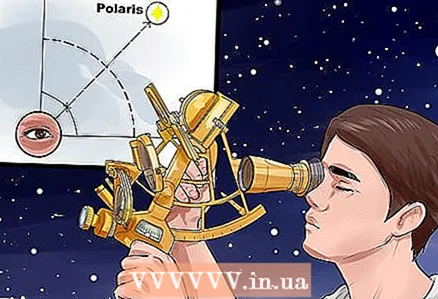 2 Find the height of the North Star above the horizon using a sextant. Instructions for this are given in the first part of our article. The elevation angle of the North Star will be equal to your latitude.
 - This method only works in the Northern Hemisphere, as the North Star is not visible south of the equator.
Tips
- Instruments such as the quadrant, quintant and octant are similar to the sextant. They are so named because their arcs are equal to a quarter, a fifth, and an eighth of a full circle, respectively. They are all graduated so that the angle that can be measured with their arcs is twice the physical angle of these arcs; for example, the arc of the sextant is 60 degrees, but it can be used to measure angles up to 120 degrees.
- The mirrors of modern sextants are larger than those of the old ones, their diameter is about 5 cm, while the old ones are about 2.5 cm. Some also have an artificial horizon for use in conditions when the natural horizon is not visible.
- An astronomical sextant is associated with the navigation sextant. It differs from the navigation sextant in that it is much larger in size, and also in that it does not use mirrors to measure angles, which means that they cannot measure angles larger than its 60-degree arc.
Warnings
- The sextant telescope should be parallel to the plane of the limb (arc). To test this, select two stars with an angle greater than 90 degrees and align their images using a sextant. Then move the sextant so that these stars move from one side of the field of view to the other. If the two stars separate, your sextant has a parallelism error and you need to adjust its telescope. This is a problem for the old sextants; modern ones have an adjustable pipe.
- The small mirror should be perpendicular to the plane of the dial. To check this, move the handle to 0 degrees and look in the small mirror.Then turn the fine adjustment knob (setscrew) back and forth until you see the star and its reflected image at the same time. If the reflected image passes exactly on top of the direct one, the small mirror is correctly aligned. If it is offset to the side, your sextant has a small mirror error and needs to be adjusted so that the direct and reflected images match.
- If the large mirror is not perpendicular to the sextant frame, the sextant limb may appear broken when viewed through it. This is called a large mirror error. You can test the sextant for this error by securing the handle at 60 degrees and looking through a large mirror - the reflection of the limb should continue straight ahead without kinking.
- Check the sextant for these three errors and correct them in the following order: large mirror error, small mirror error, parallel error.
What do you need
- Sextant
- Nautical almanac (or equivalent tables)


